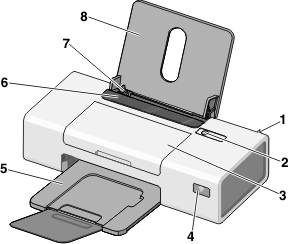
Understanding the parts of the printer

picture of printer
 

Use the

To

1

Internal wireless adapter

Connect to a wireless network.

2

power button
  • Turn the printer on and off.

  • Cancel a print job. Press power button in the middle of a print job.

  • Load or eject paper.

  • Troubleshoot.

3

Access cover

  • Install or change the print cartridges.

  • Clear paper jams.

4

Wi-Fi indicator

Check wireless status:

  • Off indicates that the printer is not turned on.

  • Orange

    • indicates that the printer is ready to be configured for wireless printing and is connected to a wireless network

    • indicates that the printer is connected for USB printing

  • Orange blinking indicates that the printer is configured but is unable to communicate with the wireless network.

  • Green indicates that the printer is connected to a wireless network.

5

Paper exit tray

Stack paper as it exits.

6

Paper feed guard

Prevent items from falling into the paper slot.

7

Paper guide

Keep paper straight when feeding.

8

Paper support

Load paper.


picture of back of printer
 

Use the

To

1

USB port

Connect the printer to a computer using a USB cable.

2

Power supply

Connect the printer to a power source using the power cord.

  1. Plug the power cord all the way into the power supply on the printer.

  2. Plug the power cord into an electrical outlet that other electrical devices have been using.

    picture of power supply connecting to the wall
  3. If the power button light is not on, press power button.

3

Internal wireless adapter

Connect to a wireless network.


Related topics: