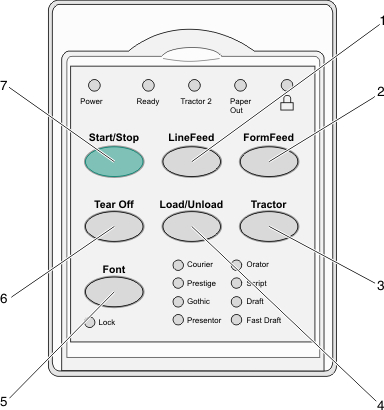
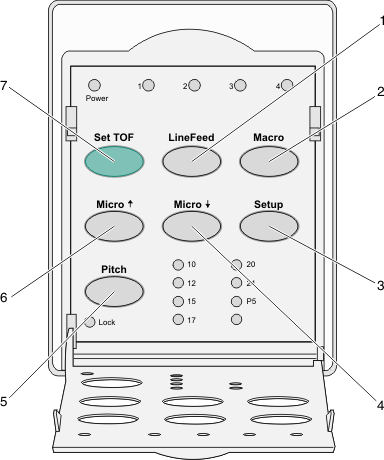
Understanding the control panel buttons

The control panel has two layers of functionality:

control panel with the cover up
Layer 1 control panel buttons

Button

Description

1

LineFeed

This advances the paper one line.

2

FormFeed

This advances the paper to the next Top-Of-Form.

3

Tractor

This alternates between Tractor 1 and Tractor 2 if the optional Tractor 2 is installed.

4

Load/Unload

This loads paper to the current Top-Of-Form or unloads paper to a parked position.

5

Font

This selects one of the resident font styles.

Note: Repeatedly pressing the Font button cycles through the printer font selections. If you continue pressing Font through a second pass, then the font selections will be locked.

6

Tear Off

This alternates the paper between Tear Off and Top-Of-Form.

7

Start/Stop

This communicates the on or off status of the printer and places the printer in low power mode.


printer control panel with the cover open
Layer 2 control panel buttons

Button

Description

1

LineFeed

This advances the paper one line.

Note: Press and hold LineFeed to advance the paper 5 micro movements, and then go into continuous feed.

2

Macro

This supports different styles of pre-printed forms and selects between four document formats.

3

Setup

This is used to enter Setup mode. This lets you change the default values and modes of printer operation.

4

Micro down arrow

This feeds the paper downward in small incremental movements.

Note: Press and hold this button to select continuous feed.

5

Pitch

This sets the character pitch to: 10 cpi, 12 cpi, 15 cpi, 17 cpi, 20 cpi, or proportional spacing.

Notes:

  • On 2590+ or 2591+ models, you can also select 24 cpi.
  • Fast Draft supports only 10, 12, and 15 pitch.

6

Micro up arrow

This feeds the paper upward in small incremental movements.

Note: Press and hold this button to select continuous feed.

7

Set TOF

This sets the Top-Of-Form, which is the position of the first print line on the page.