Using the control panel
Using a computer
To find out more information about the control panel button functions in Scan mode, see Using the control panel.
Using the control panel
- Make sure the All-In-One is connected to a computer.
- Load the document face down on the scanner glass. For help, see Loading a document on the scanner glass.
- Press Mode until the Scan light comes on.
- Use the left or right arrow button to scroll to the destination program.
- Press Select.
- Press Color or Black.
Using a computer
- Make sure the All-In-One is connected to a computer.
- Load the document face down on the scanner glass. For help, see Loading a document on the scanner glass.
- Open the Lexmark Imaging Studio. For help, see Using the Lexmark Imaging Studio.
- Click the Scan button.

The All-In-One Center appears with the Scanning & Copying tab expanded.
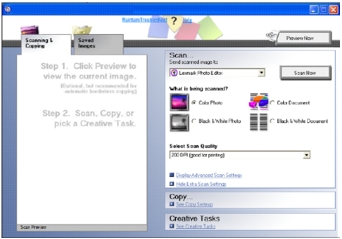
- Click Preview Now in the upper right corner of the All-In-One Center.
An image of the scanned item appears in the preview section.
- Click and drag the dotted line box to select a specific area of the preview image to scan.
- Click Display Advanced Scan Settings to review and change the scan settings. Click OK.
- From the "Send scanned image to:" drop-down menu, select a program to send the scanned image to, or click the Creative Tasks section to display a list of projects.
- Select scan settings.
- If you are sending the scanned image to a software program, click Scan Now to complete the scan. If you are using the Creative Tasks section, follow the instructions on the computer screen.
For a list of the Creative Tasks available from the All-In-One Scanning & Copying tab, see Using the Lexmark All-In-One Center.
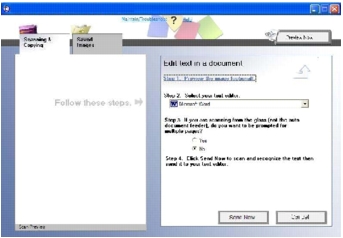
Scan and edit text (OCR)
- Load the text document face down on the scanner glass. For help, see Loading a document on the scanner glass.
- Open the Lexmark Imaging Studio. For help, see Using the Lexmark Imaging Studio.
- Click the Scan & Edit Text (OCR) button.

The All-In-One Center appears with the Scanning & Copying tab expanded.
- Click Preview Now in the upper right corner of the All-In-One Center.
An image of the scanned document appears in the preview section.
- Click and drag the dotted line box to select a specific area of the preview image to scan.
- From the "Select your text editor:" drop-down menu, select a word- processing or text-editing program.
- Click Send Now.
E-mailing photos
- Load the photo face down on the scanner glass. For help, see Loading a document on the scanner glass.
- Open the Lexmark Imaging Studio. For help, see Using the Lexmark Imaging Studio.
- Click the Share Photos button.

The E-mail dialog appears.
.jpg)
- From the E-mail dialog, make a selection.
The All-In-One Center appears.
- Follow the instructions on the computer screen to prepare the item for e-mail.
Note: If you do not have an e-mail account already established, you will be prompted to create one.
- Click Next.
- Write a note to accompany the attached item, and then send it.
Using the auto-cropping feature
- Open the Lexmark Imaging Studio. For help, see Using the Lexmark Imaging Studio.
- Click the Scan button.
The All-In-One Center appears.
- Click Display Advanced Scan Settings.
- Select Auto-crop the scanned item.
- Adjust the slider to the left to crop less or to the right to crop more.
- Click OK.
To turn auto-cropping off:
- Open the Lexmark Imaging Studio. For help, see Using the Lexmark Imaging Studio.
- Click the Scan button.
The All-In-One Center appears.
- Click Display Advanced Scan Settings.
- Click Select area to be scanned, and then select a scan area from the drop-down menu.
- Click OK.