With a photo open, click File ![]() Print.
Print.
Click Properties, Preferences, Options, or Setup.
Click the Image Enhancement tab.
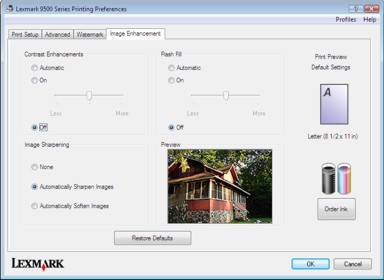
From the Contrast Enhancements area of the screen, select Automatic if you want the printer to apply an optimum amount of contrast, or On if you want to manually control the amount of contrast with the slider. Move the slider to control how much contrast is applied. Select Off to apply no contrast.
From the Flash Fill area of the screen, select Automatic if you want the printer to lighten the darker areas of a photo, or On if you want to manually control the amount of flash fill with the slider. Move the slider to control how much flash fill is applied. Select Off to apply no flash fill.
From the Image Sharpening area of the screen, select None to apply no image sharpening or softening. Select Automatically Sharpen Images if you want the printer to sharpen a photo, or Automatically Soften Images if you want the printer to blur or soften a photo.
From the Preview area of the screen, you can see the image as it will look with the Image Enhancement settings you have chosen. You can apply more or less contrast, flash fill, or sharpness to further alter the image. If you do not like the results with the automatic settings, try selecting the manual settings. If you want to return to the original image without enhancements, click Cancel.
ClickOK to print.