When a jam occurs, a message indicating the jam location appears on the printer display. Open doors and covers, and remove trays to access jam locations. To resolve any paper jam message, you must clear all jammed paper from the paper path.
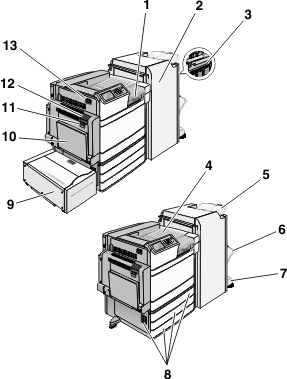
Area | Area name | Jam numbers | What to do |
|---|---|---|---|
1 | Cover F | 281 4yy.xx | Open cover F, and then remove the jammed paper. |
2 | Door G | 455 4yy.xx | Open door G, and then remove the jammed paper. For staple jams, remove the staple cartridge, and then clear the staple jam. |
3 | Door H | 4yy.xx | Open door H, and then remove the jammed paper. |
4 | Standard exit bin | 201–202 203 | Remove all paper from the standard exit bin, and then remove the jammed paper. |
5 | Standard finisher bin | 4yy.xx | Remove all paper from the standard finisher bin, and then remove the jammed paper. |
6 | Finisher bin 1 | 4yy.xx | Remove all paper from the finisher bin 1, and then remove the jammed paper. |
7 | Finisher bin 2 | 4yy.xx | Remove all paper from the finisher bin 2, and then remove the jammed paper. |
8 | Door C Tray [x] | 24x | Open door C, and then remove the jammed paper. Open each tray, and then remove any jams. |
9 | Tray 5 (high-capacity feeder) | 24x | Open the tray, and then remove the jammed paper. Open the top cover, and then remove the jammed paper. Gently move the tray to the left until it stops, and then remove the jammed paper. |
10 | Multipurpose feeder | 250 | Remove all paper from the multipurpose feeder, and then remove the jammed paper. |
11 | Door B | 230 | Open door B, and then remove the jammed paper. |
12 | Door A | 201–202 231 281 | Open door A, and then remove the jammed paper. |
13 | Door D | 203 | Open door A, and then door D, and then remove the jammed paper. |