Unexpected page breaks occur
Action | Yes | No |
|---|---|---|
Increase the printing timeout.
Did the file print correctly? | The problem is solved. | Check the original file for manual page breaks. |
| Note: Confidential, Verify, Reserve, and Repeat print jobs may be deleted if the printer requires extra memory to process additional held jobs. |
Action | Yes | No |
|---|---|---|
Step 1 Open the held jobs folder on the printer display, and then verify that your print job is listed. Is your print job listed in the held jobs folder? | Go to step 2. | Select one of the Print and Hold options, and then resend the print job. For more information, see Printing confidential and other held jobs. |
Step 2 The print job may contain a formatting error or invalid data.
If you are printing from the Internet, then the printer may be reading multiple job titles as duplicates and deleting all jobs except the first one. For Windows users
For Macintosh usersSave each print job, name each job differently, and then send the individual jobs to the printer. Does the job print? | The problem is solved. | Go to step 3. |
Step 3 Free up additional printer memory by deleting some of the held jobs. Does the job print? | The problem is solved. | Add additional printer memory. |
Action | Yes | No |
|---|---|---|
Step 1 Check if the flash drive is inserted into the front USB port. Note: The flash drive will not work if it is inserted into the rear USB port. Is the flash drive inserted into the front USB port? | Go to step 2. | Insert the flash drive into the front USB port. |
Step 2 Check if the indicator light on the printer control panel is blinking green. Note: A green blinking light indicates that the printer is busy. Is the indicator light blinking green? | Wait until the printer is ready, then view the held jobs list, and then print the documents. | Go to step 3. |
Step 3
Does the error message still appear? | Go to step 4. | The problem is solved. |
Step 4 Check if the flash drive is supported.
Does the error message still appear? | Go to step 5. | The problem is solved. |
Step 5 Check if the USB port is disabled by the system support person. Does the error message still appear? | Contact customer support. | The problem is solved. |
Action | Yes | No |
|---|---|---|
Step 1 Make sure the printer is not in Hex Trace mode. Note: If appears on the printer display, then turn off the printer, and then turn it back on to deactivate Hex Trace mode. Is the printer in Hex Trace mode? | Deactivate Hex Trace mode. | Go to step 2. |
Step 2
Do incorrect characters print? | Contact customer support. | The problem is solved. |
Action | Yes | No |
|---|---|---|
Step 1
Did the job print from the correct tray or on the correct paper? | The problem is solved. | Go to step 2. |
Step 2
Did the job print from the correct tray or on the correct paper? | The problem is solved. | Go to step 3. |
Step 3
Did the job print from the correct tray or on the correct paper? | The problem is solved. | Go to step 4. |
Step 4
Did the job print from the correct tray or on the correct paper? | The problem is solved. | Contact customer support. |
Action | Yes | No |
|---|---|---|
Step 1
Did the job print and collate correctly? | The problem is solved. | Go to step 2. |
Step 2
Did the job print and collate correctly? | The problem is solved. | Go to step 3. |
Step 3 Reduce the complexity of the print job by eliminating the number and size of fonts, the number and complexity of images, and the number of pages in the job. Did the job print and collate correctly? | The problem is solved. | Contact customer support. |
Action | Yes | No |
|---|---|---|
Step 1
Do the files print? | The problem is solved. | Go to step 2. |
Step 2
Do the files print? | The problem is solved. | Contact customer support. |
Notes:
Action | Yes | No |
|---|---|---|
Place letter- or A4-size paper in the tray, and then resend the print job. Does the print speed increase? | The problem is solved. | Contact customer support. |
Action | Yes | No |
|---|---|---|
Step 1
Do the jobs print? | The problem is solved. | Go to step 2. |
Step 2
Do the jobs print? | The problem is solved. | Go to step 3. |
Step 3 If an error message appears on the printer display, then clear the message. Note: The printer continues to print after clearing the message. Do the jobs print? | The problem is solved. | Go to step 4. |
Step 4
Do the jobs print? | The problem is solved. | Go to step 5. |
Step 5
Do the jobs print? | The problem is solved. | Go to step 6. |
Step 6
Do the jobs print? | The problem is solved. | Contact customer support. |
Action | Yes | No |
|---|---|---|
Step 1 Change the environmental settings of the printer.
Did the job print? | The problem is solved. | Go to step 2. |
Step 2 Reduce the number and size of fonts, the number and complexity of images, and the number of pages in the print job, and then resend the job Did the job print? | The problem is solved. | Go to step 3. |
Step 3
Did the job print? | The problem is solved. | Go to step 4. |
Step 4
Did the job print? | The problem is solved. | Go to step 5. |
Step 5
Did the job print? | The problem is solved. | Go to step 6. |
Step 6 Install additional printer memory, and then resend the print job. Did the job print? | The problem is solved. | Contact customer support. |
Notes:
Action | Yes | No |
|---|---|---|
Step 1
Do the trays link correctly? | The problem is solved. | Go to step 2. |
Step 2
Do the trays link correctly? | The problem is solved. | Contact customer support. |
Action | Yes | No |
|---|---|---|
Increase the printing timeout.
Did the file print correctly? | The problem is solved. | Check the original file for manual page breaks. |

Action | Yes | No |
|---|---|---|
Step 1
Are you using fonts that are supported by the printer? | Go to step 2. | Select a font that is supported by the printer. |
Step 2 Check if the fonts installed on the computer are supported by the printer. Are the fonts installed on the computer supported by the printer? | The problem is solved. | Contact customer support. |

Action | Yes | No |
|---|---|---|
Step 1
Is the page or image clipped? | Go to step 2. | The problem is solved. |
Step 2 From the printer control panel, set the paper size and type in the Paper menu to match the paper loaded in the tray. Does the paper size match the paper loaded in the tray? | Go to step 3. | Do one or more of the following:
|
Step 3
Is the page or image clipped? | Go to step 4. | The problem is solved. |
Step 4
Is the page or image clipped? | Contact customer support. | The problem is solved. |
Action | Yes | No |
|---|---|---|
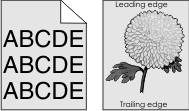
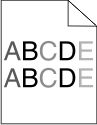
Step 1 Reduce the toner darkness.
Did the gray background disappear? | The problem is solved. | Go to step 2. |
Step 2
Did the gray background disappear? | The problem is solved. | Contact customer support. |
Action | Yes | No |
|---|---|---|
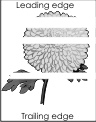
Step 1
Do horizontal voids appear on prints? | Go to step 2. | The problem is solved. |
Step 2
Do horizontal voids appear on prints? | Go to step 3. | The problem is solved. |
Step 3
Do horizontal voids appear on prints? | Go to step 4. | The problem is solved. |
Step 4 Replace the imaging kit, and then resend the print job. Do horizontal voids appear on prints? | Contact customer support. | The problem is solved. |
Action | Yes | No |
|---|---|---|
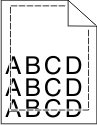
Step 1
Are the margins correct? | The problem is solved. | Go to step 2. |
Step 2 From the printer control panel, set the paper size in the Paper menu to match the paper loaded in the tray. Does the paper size match the paper loaded in the tray? | Go to step 3. | Do one or more of the following:
|
Step 3
Are the margins correct? | The problem is solved. | Contact customer support. |
Action | Yes | No |
|---|---|---|
Step 1 Move the width and length guides in the tray to the correct positions for the size of the paper loaded. Are the width and length guides positioned correctly? | Go to step 2. | Adjust the width and length guides. |
Step 2 From the printer control panel, set the paper type and weight in the Paper menu to match the paper loaded in the tray. Do the paper type and weight match the type and weight of the paper in the tray? | Go to step 3. | Specify the paper type and weight from the tray settings to match the paper loaded in the tray. |
Step 3
Is the paper still curled? | Go to step 4. | The problem is solved. |
Step 4
Is the paper still curled? | Go to step 5. | The problem is solved. |
Step 5
Is the paper still curled? | Contact customer support. | The problem is solved. |
Action | Yes | No |
|---|---|---|
Step 1
Do print irregularities still appear? | Go to step 2. | The problem is solved. |
Step 2 From the printer control panel, set the paper size and type in the Paper menu to match the paper loaded in the tray. Is the tray set to the size and type of the paper loaded in the tray? | Go to step 3. | Do one or more of the following:
|
Step 3
Do print irregularities still appear? | Go to step 4. | The problem is solved. |
Step 4 Check if the paper loaded in the tray has texture or rough finishes. Are you printing on textured or rough paper? | From the printer control panel, set the paper texture in the Paper menu to match the paper loaded in the tray. | Go to step 5. |
Step 5
Do print irregularities still appear? | Go to step 6. | The problem is solved. |
Step 6 Replace the imaging kit, and then resend the print job. Do print irregularities still appear? | Contact customer support. | The problem is solved. |

Action | Yes | No |
|---|---|---|
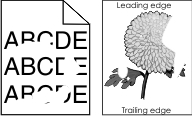
Step 1
Is the print still too dark? | Go to step 2. | The problem is solved. |
Step 2
Is the print still too dark? | Go to step 3. | The problem is solved. |
Step 3
Is the tray set to the type, texture, and weight of the paper loaded? | Go to step 4. | Change the paper loaded in the tray to match the paper type, texture, and weight specified in the tray settings. |
Step 4
Is the print still too dark? | Go to step 5. | The problem is solved. |
Step 5 Check if the paper loaded in the tray has texture or rough finishes. Are you printing on textured or rough paper? | From the printer control panel, set the paper texture in the Paper menu to match the paper loaded on the tray. | Go to step 6. |
Step 6
Is the print still too dark? | Go to step 7. | The problem is solved. |
Step 7 Replace the imaging kit, and then resend the print job. Is the print still too dark? | Contact customer support. | The problem is solved. |

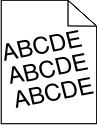
Action | Yes | No |
|---|---|---|
Step 1
Is the print still too light? | Go to step 2. | The problem is solved. |
Step 2
Is the print still too light? | Go to step 3. | The problem is solved. |
Step 3 From the printer control panel, set the paper type, texture, and weight in the Paper menu to match the paper loaded in the tray. Is the tray set to the type, texture, and weight of the paper loaded? | Go to step 4. | Specify the paper type, texture, and weight from the tray settings to match the paper loaded in the tray. |
Step 4
Is the print still too light? | Go to step 5. | The problem is solved. |
Step 5 Make sure that the paper has no texture or rough finishes. Are you printing on textured or rough paper? | From the printer control panel, set the paper texture in the Paper menu to match the paper loaded in the tray | Go to step 5. |
Step 6
Is the print still too light? | Go to step 7. | The problem is solved. |
Step 7 Replace the imaging kit, and then resend the print job. Is the print still too light? | Contact customer support. | The problem is solved. |
Action | Yes | No |
|---|---|---|
Step 1
Is the printer still printing blank pages? | Go to step 2. | The problem is solved. |
Step 2 Replace the imaging kit, and then resend the print job. Is the printer still printing blank pages? | Contact customer support. | The problem is solved. |

Action | Yes | No |
|---|---|---|
Step 1
Is the printer printing solid black pages? | Go to step 2. | The problem is solved. |
Step 2 Replace the imaging kit, and then resend the print job. Is the printer printing solid black pages? | Contact customer support. | The problem is solved. |
Action | Yes | No |
|---|---|---|
Step 1 Measure the distance between the defects.
Is the distance between defects equal to one of the listed measurements? | Go to step 2. |
|
Step 2 Replace the imaging kit, and then resend the print job. Do the repeating defects still appear? | Contact customer support. | The problem is solved. |
Action | Yes | No |
|---|---|---|
Step 1 Check if the paper loaded in the tray has the correct paper type and weight. Is paper with the correct paper type and weight loaded in the tray? | Go to step 2. | Load paper with the correct paper type and weight in the tray. |
Step 2 From the printer control panel, set the paper type and weight in the Paper menu to match the paper loaded in the tray. Do the printer settings match the type and weight of the paper loaded? | Go to step 3. | Change the paper type and weight to match the paper loaded in the tray. |
Step 3
Do shadow images still appear on prints? | Go to step 4. | The problem is solved. |
Step 4 Replace the imaging kit, and then resend the print job. Do shadow images still appear on prints? | Contact customer support. | The problem is solved. |
Action | Yes | No |
|---|---|---|
Step 1
Is the print still skewed? | Go to step 2. | The problem is solved. |
Step 2
Is the print still skewed? | Contact customer support. | The problem is solved. |
Action | Yes | No |
|---|---|---|
Step 1
Do streaked horizontal lines appear on prints? | Go to step 2. | The problem is solved. |
Step 2 From the printer control panel, set the paper type and weight in the Paper menu to match the paper loaded in the tray. Do the paper type and weight match the paper in the tray? | Go to step 3. | Do one or more of the following:
|
Step 3
Do streaked horizontal lines appear on prints? | Go to step 4. | The problem is solved. |
Step 4
Do streaked horizontal lines appear on prints? | Go to step 5. | The problem is solved. |
Step 5 Replace the imaging kit, and then resend the print job. Do streaked horizontal lines appear on prints? | Contact customer support. | The problem is solved. |
Action | Yes | No |
|---|---|---|
Step 1
Do streaked vertical lines appear on prints? | Go to step 2. | The problem is solved. |
Step 2 From the printer control panel, set the paper texture, type, and weight in the Paper menu to match the paper loaded in the tray. Do the paper texture, type, and weight match the paper in the tray? | Go to step 3. | Do one or more of the following:
|
Step 3
Do streaked vertical lines appear on prints? | Go to step 4. | The problem is solved. |
Step 4
Do streaked vertical lines appear on prints? | Go to step 5. | The problem is solved. |
Step 5 Replace the imaging kit, and then resend the print job. Do streaked vertical lines appear on prints? | Contact customer support. | The problem is solved. |

Action | Yes | No |
|---|---|---|
Step 1
Does fog or shading disappear from the prints? | The problem is solved. | Go to step 2. |
Step 2 Replace the imaging kit, and then resend the print job. Does fog or shading disappear from the prints? | The problem is solved. | Contact customer support. |
Action | Yes | No |
|---|---|---|
Step 1 From the Paper menu on the printer control panel, check the paper type and weight. Do the paper type and texture match the paper loaded in the tray? | Go to step 2. | Specify the paper type and weight from the tray settings to match the paper loaded in the tray. |
Step 2 Check if you are printing on paper with texture or rough finishes. Are you printing on textured or rough paper? | From the Paper menu on the printer control panel, set the paper texture. | Contact customer support. |
Action | Yes | No |
|---|---|---|
Replace the imaging kit, and then resend the print job. Do toner specks appear on prints? | Contact customer support. | The problem is solved. |
Action | Yes | No |
|---|---|---|
Step 1 From the printer control panel, set the paper type in the Paper menu to match the paper loaded in the tray. Is the paper type for the tray set to Transparency? | Go to step 2. | Set the paper type to Transparency. |
Step 2
Is the print quality still poor? | Contact customer support. | The problem is solved. |
Action | Yes | No |
|---|---|---|
Replace the imaging kit, and then resend the print job. Is the print density uneven? | Contact customer support. | The problem is solved. |

Action | Yes | No |
|---|---|---|
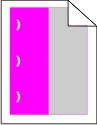
Step 1
Do vertical voids appear on prints? | Go to step 2. | The problem is solved. |
Step 2
Do vertical voids appear on prints? | Go to step 3. | The problem is solved. |
Step 3 Check if you are using a recommended type of paper.
Do vertical voids appear on prints? | Go to step 4. | The problem is solved. |
Step 4
Do vertical voids appear on prints? | Go to step 5. | The problem is solved. |
Step 5 Replace the imaging kit, and then resend the print job. Do vertical voids appear on prints? | Contact customer support. | The problem is solved. |
What is RGB color?
Red, green, and blue light can be added together in various amounts to produce a large range of colors observed in nature. For example, red and green can be combined to create yellow. Televisions and computer monitors create colors in this manner. RGB color is a method of describing colors by indicating the amount of red, green, or blue needed to produce a certain color.
What is CMYK color?
Cyan, magenta, yellow, and black inks or toners can be printed in various amounts to produce a large range of colors observed in nature. For example, cyan and yellow can be combined to create green. Printing presses, inkjet printers, and color laser printers create colors in this manner. CMYK color is a method of describing colors by indicating the amount of cyan, magenta, yellow, and black needed to reproduce a particular color.
How is color specified in a document to be printed?
Software programs typically specify the document color using RGB or CMYK color combinations. Additionally, they let users modify the color of each object in a document. For more information, see the help information of your operating system.
How does the printer know what color to print?
When a user prints a document, information describing the type and color of each object is sent to the printer. The color information is passed through color conversion tables that translate the color into the appropriate amounts of cyan, magenta, yellow, and black toner needed to produce the color you want. The object information determines the application of color conversion tables. For example, it is possible to apply one type of color conversion table to text while applying a different color conversion table to photographic images.
What is manual color correction?
When manual color correction is enabled, the printer employs user-selected color conversion tables to process objects. However, Color Correction must be set to Manual, or no user-defined color conversion will be implemented. Manual color correction settings are specific to the type of object being printed (text, graphics, or images), and how the color of the object is specified in the software program (RGB or CMYK combinations).
Notes:
- Manual color correction is not useful if the software program does not specify colors with RGB or CMYK combinations. It is also not effective in situations in which the software program or the computer operating system controls the adjustment of colors.
- When Auto Color Correction is selected, the color conversion tables will generate preferred colors used for the majority of the documents.
To manually apply a different color conversion table, do the following:
From the Quality menu on the printer control panel, select Color Correction, and then select Manual.
From the Quality menu on the printer control panel, select Manual Color, and then select the appropriate color conversion table for the affected object type.
Object type
Color conversion tables
RGB Image
RGB Text
RGB Graphics
Vivid—Produces brighter, more saturated colors and may be applied to all incoming color formats.
sRGB Display—Produces an output that approximates the colors displayed on a computer monitor.
Note: Black toner usage is optimized for printing photographs.
Display—True Black—Produces an output that approximates the colors displayed on a computer monitor. This uses only black toner to create all levels of neutral gray.
sRGB Vivid—Provides an increased color saturation for the sRGB Display color correction.
Note: Black toner usage is optimized for printing business graphics.
Off—No color correction is implemented.
CMYK Image
CMYK Text
CMYK Graphics
US CMYK—Applies color correction to approximate the SWOP (Specifications for Web Offset Publishing) color output.
Euro CMYK—Applies color correction to approximate Euroscale color output.
Vivid CMYK—Increases the color saturation of the US CMYK color correction setting.
Off—No color correction is implemented.
How can I match a particular color (such as a corporate logo)?
Nine types of Color Samples sets are available from the Quality menu on the printer control panel. These are also available from the Color Samples page of the Embedded Web Server. Selecting any sample set generates a multiple-page printout consisting of hundreds of colored boxes. Either a CMYK or RGB combination is located on each box, depending on the table selected. The observed color of each box is obtained by passing the CMYK or RGB combination labeled on the box through the selected color conversion table.
By examining Color Samples sets, you can identify the box whose color is the closest to the color you want. The color combination labeled on the box can then be used for modifying the color of the object in a software program. For more information, see the help information of your operating system.
Note: Manual color correction may be necessary to utilize the selected color conversion table for the particular object. Selecting which Color Samples set to use for a particular color-matching problem depends on the Color Correction setting being used , the type of object being printed, and how the color of the object is specified in the software program. When Color Correction is set to Off, the color is based on the print job information, and no color conversion is implemented.
Note: The Color Samples pages are not useful if the software program does not specify colors with RGB or CMYK combinations. Additionally, certain situations exist in which the software program or the computer operating system adjusts the RGB or CMYK combinations specified in the program through color management. The resulting printed color may not be an exact match of the Color Samples pages.
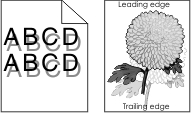
| Note: This problem occurs when projecting transparencies with reflective overhead projectors. To obtain the highest projected color quality, transmissive overhead projectors are recommended. |
Action | Yes | No |
|---|---|---|
Step 1 From the printer control panel, make sure the paper type setting is set to Transparency. Is the paper type setting correct? | Go to step 2. | Set the paper type to Transparency. |
Step 2 Reduce the toner darkness, and then resend the print job. Does the print on the color transparency look lighter? | The problem is solved. | Go to step 3. |
Step 3 Make sure you are using a recommended type of color transparency, and then resend the print job. Does the print on the color transparency look lighter? | The problem is solved. | Contact customer support. |
| Note: The color conversion tables used in Auto Color Correction mode generally approximate the colors of a standard computer monitor. However, because of technology differences that exist between printers and monitors, there are many colors that can also be affected by monitor variations and lighting conditions. |
Action | Yes | No |
|---|---|---|
Step 1
Does the color of the print match the color of the file on the computer screen? | The problem is solved. | Go to step 2. |
Step 2 From the Quality menu on the printer control panel, do the following:
Does the color of the print match the color of the file on the computer screen? | The problem is solved. | Contact customer support. |
Action | Yes | No |
|---|---|---|
Adjust the color balance.
Does the print still appear tinted? | The problem is solved. | Contact customer support. |
 > Settings > General Settings > Timeouts