Use the | To | |
|---|---|---|
1 |
| |
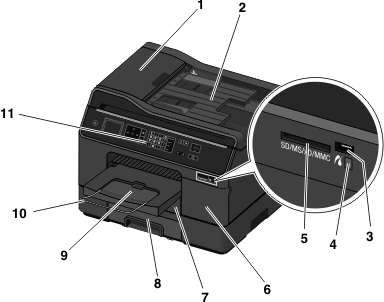
2 | Load original documents into the ADF. Notes:
| |
3 | Connect a PictBridge-enabled digital camera or a flash drive to the printer. | |
4 | Check the card reader status. The light comes on when a memory card is inserted and blinks when a memory card is being accessed. | |
5 | Insert a memory card. | |
6 | Install, remove, or replace ink cartridges. | |
7 | Load paper. | |
8 | Note: This option is available only in select printer models. | Load additional paper. You can load the same type of paper as in Tray 1. You can also load a different type of paper and change the default paper settings so the printer uses paper from Tray 2 for certain types of print jobs. |
9 | Hold paper as it exits. Note: For the printer to be ready for any print job, make sure to fully extend the exit bin and to flip out the bin extender. | |
10 | Catch the paper as it exits. Note: For the printer to be ready for any print job, make sure to fully extend the exit bin and to flip out the bin extender. | |
11 | Operate the printer. |
Use the | To | |
|---|---|---|
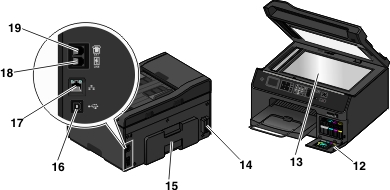
12 | Identify the model number of the printer, the customer support hot line, and the ink cartridge information. | |
13 | Scan, copy, or fax photos and documents. | |
14 | Connect the printer to the power cord. | |
15 |
| |
16 | Connect the printer to a computer using a USB cable. Warning—Potential Damage: Do not touch the USB port except when plugging in or removing a USB cable or installation cable. Note: Remove the sticker to access the port. | |
17 | Connect your printer to a computer, a local network, an external DSL, or a cable modem. | |
18 |  | Connect the printer to an active telephone line through a standard wall jack (RJ-11), DSL filter, or VoIP adapter, or any other adapter that allows you to access the phone line to send and receive faxes. |
19 |  | Connect additional devices (telephone or answering machine) to the printer and the telephone line. Use this port if you do not have a dedicated fax line for the printer and if this connection method is supported in your country or region. Note: Remove the plug to access the port. |