Use the | To | |
|---|---|---|
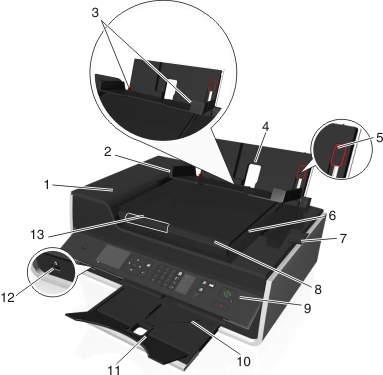
1 | Scan, copy, or fax multiple-page letter-, legal-, and A4-size documents. | |
2 | Prevent items from falling into the paper slot. | |
3 | Keep paper straight when feeding. | |
4 | Load paper. | |
5 | Adjust the paper guides. | |
6 | Hold documents as they exit from the ADF. | |
7 | Catch legal-size paper as it exits from the ADF. | |
8 | Load original documents into the ADF. Notes:
| |
9 | Operate the printer. | |
10 | Hold paper as it exits. | |
11 | Keep paper in place as it exits. | |
12 | Connect a PictBridge-enabled digital camera or a flash drive to the printer. | |
13 | Keep paper straight when feeding it into the ADF. Note: Adjust the paper guide on the ADF tray to the width of the original document. |
Use the | To | |
|---|---|---|
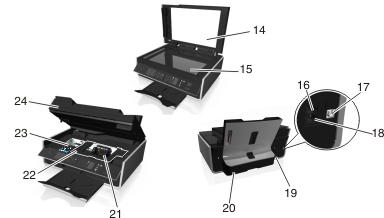
14 | Access the scanner glass. | |
15 | Scan or copy photos and documents. | |
16 |  | Connect additional devices (telephone or answering machine) to the printer and the telephone line. Use this port if you do not have a dedicated fax line for the printer, and if this connection method is supported in your country or region. Note: Remove the plug to access the port. |
17 | Connect the printer to a computer using a USB cable. Warning—Potential Damage: Do not touch the USB port except when plugging in or removing a USB cable or installation cable. | |
18 |  | Connect the printer to an active telephone line through a standard wall jack (RJ-11), DSL filter, or VoIP adapter, or any other adapter that allows you to access the phone line to send and receive faxes. |
19 | Connect the printer to the power cord. | |
20 |
| |
21 | Install the printhead. Note: The carrier moves to the printhead access area when no printhead is installed in the printer. | |
22 | Access and clear paper jams. | |
23 | Install, replace, or remove ink cartridges. | |
24 |
|