 | CAUTION—POTENTIAL INJURY: To reduce risk of fire, use only the telecommunications (RJ-11) cord provided with this product or a UL Listed 26 AWG or larger replacement when connecting this product to the public switched telephone network. |
| | CAUTION—POTENTIAL INJURY: To reduce risk of fire, use only the telecommunications (RJ-11) cord provided with this product or a UL Listed 26 AWG or larger replacement when connecting this product to the public switched telephone network. |
 | CAUTION—SHOCK HAZARD: Do not use the fax feature during a lightning storm. Do not set up this product or make any electrical or cabling connections, such as the power supply cord or telephone, during a lightning storm. |

Connect the cable from the wall jack to the
port of the printer.
You can set the printer to receive faxes automatically (Auto Answer On) or manually (Auto Answer Off).
If you want to receive faxes automatically (Auto Answer On), then set the printer to pick up on any number of rings that you want.
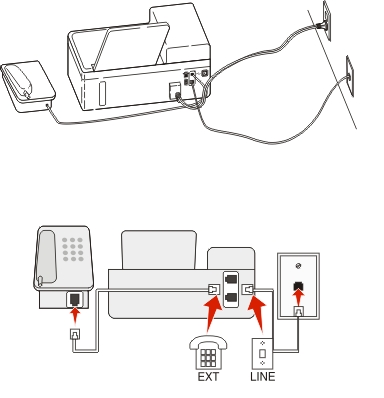
Connected to the same telephone wall jack
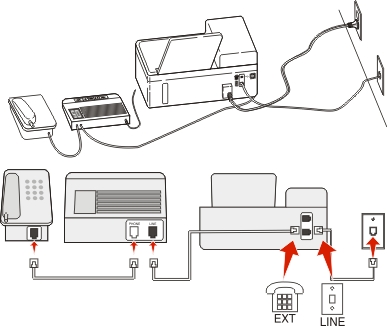
Connect the cable from the wall jack to the port of the printer.
Remove the protective plug from the  port of the printer, and then connect the answering machine to the port.
Connected to different wall jacks

Connect the cable from the wall jack to the
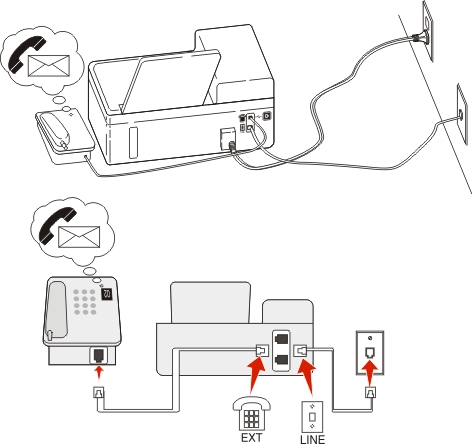
If you have only one telephone number on your line, then you need to set the printer to receive faxes automatically (Auto Answer On).
Set the printer to pick up calls two rings after the answering machine. For example, if the answering machine picks up calls after four rings, then set the printer to pick up after six rings. This way, the answering machine picks up calls first and your voice calls are received. If the call is a fax, then the printer detects the fax signal on the line and takes over the call.
If you subscribe to a distinctive ring service provided by your telephone company, then make sure that you set the correct ring pattern for the printer. Otherwise, the printer will not receive faxes even if you have set it to receive faxes automatically.
Connect the cable from the wall jack to the port of the printer.
Remove the protective plug from the port of the printer, and then connect the telephone to the port.
This setup works best if you subscribe to a distinctive ring service. If you have distinctive ring service, then make sure that you set the correct ring pattern for the printer. Otherwise, the printer will not receive faxes even if you have set it to receive faxes automatically.
If you have only one telephone number on your line, then you need to set the printer to receive faxes manually (Auto Answer Off).
When you answer the telephone and you hear fax tones, press *9* or the manual answer code on the telephone to receive the fax.
You can also set the printer to receive faxes automatically (Auto Answer On), but you need to turn off the voice mail service when you are expecting a fax. This setting works best if you are using voice mail more often than fax.
A Digital Subscriber Line splits your regular telephone line into two channels: voice and Internet. Telephone and fax signals travel through the voice channel, and Internet signals pass through the other channel. This way, you can use the same line for analog voice calls (including faxes) and digital Internet access.
To minimize interference between the two channels and ensure a quality connection, you need to install a DSL filter for the analog devices (fax machine, telephone, answering machine) in your network. Interference causes noise and static on the telephone, failed and poor quality faxes for the printer, and slow Internet connection on your computer.
To install a filter for the printer:
Connect the line port of the DSL filter to the wall jack.
Connect a telephone cable from the port on the back of the printer to the phone port on the DSL filter.
To continue using a computer for Internet access, connect the computer to the DSL HPN port on the DSL filter.
To connect a telephone to the printer, remove the protective plug from the port of the printer and then connect the telephone to the port.

Connect one end of a telephone cable to the port of the printer.
Connect the other end of the cable to the port labeled Phone Line 1 or Phone Port on the VoIP adapter.
The port labeled Phone Line 2 or Fax Port is not always active. You may need to pay extra to your VoIP provider if you want to activate the second phone port.
Remove the protective plug from the port of the printer, and then connect the telephone to the port.
To make sure that the phone port on the VoIP adapter is active, plug an analog telephone into the phone port, and then listen for a dial tone. If you hear a dial tone, then the port is active.
If you need two phone ports for your devices but do not want to pay extra, then do not plug the printer into the second phone port. You can use a phone splitter. Plug the phone splitter into the Phone Line 1 or Phone Port, and then plug the printer and telephone into the splitter.
Make sure you use a phone splitter, not a line splitter. To make sure that you are using the correct splitter, plug an analog telephone into the splitter and then listen for a dial tone.
Follow this setup if you normally connect your telephone to a cable modem.
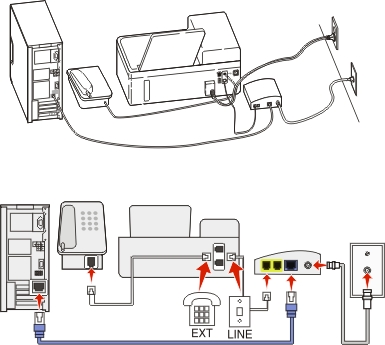
Connect one end of a telephone cable to the port of the printer.
Connect the other end of the cable to the port labeled Phone Line 1 or Phone Port on the cable modem.
The port labeled Phone Line 2 or Fax Port is not always active. You may need to pay extra to your cable provider if you want to activate the second phone port.
Remove the protective plug from the port of the printer, and then connect the telephone to the port.
To make sure that the phone port on the cable modem is active, plug an analog telephone into the phone port, and then listen for a dial tone. If you hear a dial tone, then the port is active.
If you need two phone ports for your devices but do not want to pay extra, then do not plug the printer into the second phone port. You can use a phone splitter. Plug the phone splitter into the Phone Line 1 or Phone Port , and then plug the printer and telephone into the splitter.
Make sure you use a phone splitter, not a line splitter. To make sure that you are using the correct splitter, plug an analog telephone into the splitter and then listen for a dial tone.
Follow this setup if your cable provider activated the wall jacks in your house so that you do not have to plug your devices into the cable modem. Your cable telephone service comes from the wall jacks.
Connect the cable from the wall jack to the port of the printer.
Remove the protective plug from the port of the printer, and then connect the telephone to the port.
Different countries or regions have different types of telephone wall jacks. The standard wall jack adopted by most countries or regions is the Registered Jack-11 (RJ-11). You need to have an RJ-11 plug, or a telephone cable that has an RJ-11 connector, so you can connect a device to an RJ-11 wall jack.

The fax ports on the back of the printer and the telephone cable that comes with the printer have RJ-11 connectors. If you have a different type of connector in your country or region, then you may need to use an RJ-11 adapter.

Connect one end of a telephone cable to the port of the printer.
Connect the other end of the cable to the RJ-11 adapter, and then connect the adapter to the wall jack.
If you want to connect another device (telephone or answering machine) to the same wall jack, and if the device has a non-RJ 11 connector, then connect it directly to the wall jack.
Notes:
port of the printer.If the additional device (telephone or answering machine) has an RJ-11 connector, then you can remove the wrap plug and connect the device to the port of the printer.

In some countries or regions, you need to plug all devices into the wall jack. You cannot plug a telephone or answering machine into the port of the printer. This is called serial connection.
Austria | Germany | Portugal |
Belgium | Ireland | Spain |
Denmark | Italy | Sweden |
France | Netherlands | Switzerland |
Finland | Norway | United Kingdom |
| Warning—Potential Damage: If your country or region is on the list, then do not remove the wrap plug from the port of the printer. It is necessary for the proper functioning of the devices on the telephone line. |
Connect the cable from the wall jack to the
The German wall jack has two kinds of ports. The N ports are for fax machines, modems, and answering machines. The F port is for telephones.
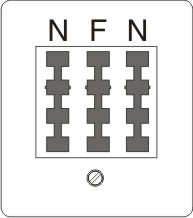
Connect the printer to any of the N ports.
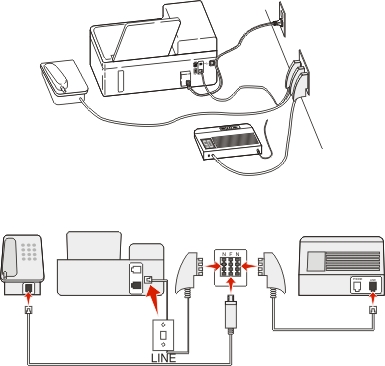
Connect one end of a telephone cable to the port of the printer.
Connect the other end of the cable to the RJ-11 adapter, and then connect the adapter to an N port.
If you want to connect a telephone and answering machine to the same wall jack, then connect the devices as shown.
Your user information includes your name or your company name, your fax number (which is your telephone number, unless you have a dedicated fax telephone line), and the time and date on your fax machine when a transmission is made. This information appears in the header and footer of the faxes that you send.
In some countries, you cannot send a fax without this information. Some fax machines block faxes without sender information, so make sure that you enter this information in your printer.
From the printer control panel, navigate to:
 > Setup >
  > Fax Setup > > Dialing and Sending > > Fax Name >
Enter your name or your company name, and then press .
To change a character, press the left arrow button.
To add a space, press the number 0.
Press the arrow buttons to scroll to , and then press .
Enter your fax number or your telephone number, and then press .
From the printer control panel, navigate to:
From the printer control panel, navigate to:
> Setup > > Device Setup > > Date/Time >
Enter the date, and then press .
Enter the time, and then press .
You can configure the fax settings through the printer control panel or the fax software. If you configure the fax settings in the printer control panel, then the fax software imports those settings. The changes appear the next time you launch the fax software. The printer also saves the settings that you choose in the fax software, unless you set the printer to block changes made from the computer.
From the printer control panel, navigate to:
> Setup > > Fax Setup >
Configure the fax settings using the selections in the menu:
From here | You can |
|---|---|
Address Book | Set up, view, or print the Address Book. |
Reports |
|
Ringing and Answering |
|
2-Sided Faxes |
|
Dialing and Sending |
|
Fax Blocking | Block unwanted incoming faxes. |
Before you begin, make sure that:
The printer is properly connected to the telephone line.
The printer is turned on and connected to the computer.
The printer is not in Sleep mode. If the printer is in Sleep mode, then press  to wake up the printer.
Click  or Start.
Click All Programs or Programs, and then select the printer program folder from the list.
Click Printer Home > Fax > Set up the printer to fax.
The Fax Setup Wizard opens.
Run the Fax Setup Wizard. Make sure you select the correct telephone service and connection. The wizard configures optimal fax settings based on your connection.
| Note: If you want to configure the advanced fax settings, then from the Printer Home, click Fax > Configure the advanced fax settings. This launches the Printer Setup Utility. |
From the Applications folder in the Finder, or from the Finder desktop, double-click the printer folder.
Double-click Printer Settings.
Configure the fax settings using the printer software.
To view the help information for the fax software, click Help or ![]() .
.
You can create a contact list using the Address Book in the printer control panel or the phone book in the fax software. If you create a contact list in the printer control panel, then the fax software automatically saves those contacts as Speed Dial entries. Likewise, when you add contacts to the Speed Dial list of the fax software, the printer automatically saves them to the printer Address Book.
You can save up to 89 contacts and 10 fax groups in the contact list.
From the printer control panel, navigate to:
> Setup > > Fax Setup > > Address Book >
To add a fax number to your Address Book:
Press the arrow buttons to scroll to , and then press .
Use the keypad to enter the contact name in the Name field.
To change a character, press the left arrow button.
To add a space, press the number 0.
Press the up or down arrow button to move the cursor to the .
Use the keypad to enter the fax number in the Number field, and then press to save the entry.
If you want to add another entry, then repeat steps a through d.
To add a fax group:
Press the arrow buttons to scroll to , and then press .
Use the keypad to enter a group name, and then press .
To change a character, press the left arrow button.
To add a space, press the number 0.
Press the arrow buttons to select whether you want to add a contact manually or import a contact. Press when you make a selection.
If you want to add a contact manually, then use the keypad to enter the fax number, and then press .
If you want to import a contact, then press the arrow buttons to select a contact from the Address Book or the History List. Press when you make a selection.
When you are finished adding contacts to the group, select .
Click or Start.
Click All Programs or Programs, and then select the printer program folder from the list.
Click Printer Home > Fax > Edit contact list.
The Contacts tab of the Printer Setup Utility opens.
Click Select from phonebook.
From the Phonebook field, choose a phone book.
Select the contact that you want to add, and then click Add to or change list to import the contact.
| Note: To add contacts, you need to import contacts from the phone books on your computer that are supported by the fax software. In addition to the software Address Book, you may also have phone books of the mail clients installed on your computer, such as Microsoft Outlook. |
Click OK.
From the Applications folder in the Finder, or from the Finder desktop, double-click the printer folder.
Double-click Printer Settings.
Click the Contacts tab.
To add contacts, click the Individuals tab.
To add fax groups, click the Groups tab.
Click ![]() to open the Address Book.
to open the Address Book.
| Note: To add contacts, you need to import contacts from the Address Book on your Macintosh computer. If the contact is not in the Mac Address Book, then first add the contact to the address book, and then import it. |
From the Address Book, click and drag the contacts that you want to add to the Contacts list.
For more information on the fax software, click Help or ![]() .
.
ADF | Scanner glass |
|---|---|
 Use the ADF for multiple-page documents. Note: The ADF is available only in select models. If you purchased a printer without an ADF, then load original documents or photos on the scanner glass. |  Use the scanner glass for single pages, small items (such as postcards or photos), transparencies, photo paper, or thin media (such as magazine clippings). |
Make sure the printer is on and connected to a working telephone, DSL, or VoIP line. The line is working if you hear a dial tone.
Make sure the paper exit tray is fully extended and the tray extension is flipped out.
Depending on your printer model, use the ADF when scanning two-sided (duplex) pages.
To easily retrieve a document after copying or scanning, lift the ADF input tray.
When using the ADF, adjust the paper guide on the ADF to the width of the original document.
When using the scanner glass, close the scanner cover, if possible, to avoid dark edges on the scanned image.
Do not load postcards, photos, small items, transparencies, photo paper, or thin media (such as magazine clippings) into the ADF. Place these items on the scanner glass.
When the document to be faxed is in place with the settings you want, press ![]() to send the fax.
to send the fax.
From the printer control panel, navigate to:
>
Enter a fax number, or press Address Book to select a number from the Speed Dial or Group Dial list.
If you want to send a fax to a single recipient, then press .
If you want to send a fax to a group of numbers (broadcast fax), then press the left or right arrow button to enter another number, and then press . Repeat this step to add more numbers.
Press the Color/Black button to select a color or black-and-white fax.
Press  to start the fax job.
| Warning—Potential Damage: Do not touch the cables or the and ports while actively sending a fax. |
You can send a broadcast fax to up to 30 recipients.
With a document open, click File > Print.
Make sure the appropriate printer is selected, and then click Properties, Preferences, Options, or Setup.
Click the Fax tab, and then make sure Enable Fax is selected.
Enter the recipient fax number or numbers in the “Fax number(s)” field.
You can enter fax numbers manually or by using the Phone Book feature.
If necessary, enter a prefix in the Dialing Prefix dialog.
Select the appropriate paper size and page orientation.
Select Include Cover Page with Fax, and enter the appropriate information if you want to include a cover page with the fax.
Click OK.
With a document open, choose File > Print.
From the Printer pop-up menu, select the fax version of your printer.
| Note: In order to see the fax options on the Print dialog, you must use the fax driver for your printer. If the fax version of the printer is not on the list, then choose Add a printer, and then choose the fax version of the printer. |
Enter the name and number of the recipient.
Click Fax.
When receiving faxes:
Make sure that the printer is on and connected to a working telephone, DSL, or VoIP line. The line is working if you hear a dial tone.
If you set the printer to receive faxes manually (Auto Answer Off), then make sure that the ringer volume is not set to Off.
If you have set the printer to receive faxes automatically (Auto Answer On), then load paper in the printer.
Make sure that Auto Answer is on:
From the printer control panel, navigate to:
> Setup > > Fax Setup > > Ringing and Answering > > Auto Answer > > On >
Set the number of rings before the printer picks up incoming faxes:
Press the arrow buttons to scroll to , and then press .
Press the arrow buttons to scroll to the number of rings that you want, and then press to save the setting.
When the number of rings you set is detected, the printer automatically receives the incoming fax.
| Warning—Potential Damage: Do not touch the cables or the and ports while actively receiving a fax. |
If the printer is sharing the line with other analog devices (telephone, answering machine), then set the printer to pick up calls two rings after the answering machine. For example, if the answering machine picks up calls after four rings, then set the printer to pick up after six rings. This way, the answering machine picks up calls first and your voice calls are received. If the call is a fax, then the printer detects the fax signal on the line and takes over the call. If the printer is on a dedicated fax line, then you may set the printer to pick up on any number of rings.
If you have multiple numbers on a single line, or if you subscribe to a distinctive ring service provided by your telephone company, then make sure that you set the correct ring pattern for the printer. Otherwise, the printer will not receive faxes even if you have set it to receive faxes automatically.
Turn off Auto Answer:
From the printer control panel, navigate to:
> > > Fax Setup > > Ringing and Answering > > Auto Answer > > Off >
When the telephone rings and you hear fax tones when you pick up the handset, press on the printer or *9* on the telephone attached to the printer.
| Warning—Potential Damage: Do not touch the cables or the and ports while actively receiving a fax. |
The default code for answering faxes manually is *9*, but for increased security, you can change it to a number that only you know. You can enter up to 7 characters for your code. The valid characters are the digits 0–9 and the characters # and *.
Make sure that the telephone is plugged into the port on the back of the printer and that the printer is connected to the wall jack through the port.
You do not need to run the installer again. You can set up and configure the fax through the fax software that was installed with the printer software.
Connect the printer to the telephone line. For more information, see Setting up the printer to fax.
Configure the fax settings using the fax software. To access the fax software:
Click or Start.
Click All Programs or Programs, and then select the printer program folder from the list.
Click Printer Home > Fax >Set up the printer to fax.
The Fax Setup Wizard opens.
Run the wizard. Make sure you select the correct telephone service and connection. The wizard configures optimal fax settings based on your connection.
From the Applications folder in the Finder, or from the Finder desktop, double-click the printer folder.
Double-click Printer Settings, and then configure the fax settings.
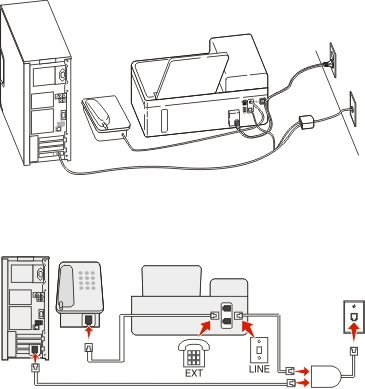
If there are limited wall jacks in your home or limited ports on your adapter, then you can use a phone splitter. A splitter splits the telephone signal and allows you to connect multiple devices to the wall jack. It has two or more ports where you can plug the devices. Do not use a line splitter.
To make sure that you are using the correct splitter, plug an analog telephone into the splitter and then listen for a dial tone.
In most cases, your telephone number is also your fax number. If you subscribe to the Distinctive Ring Pattern Detection (DRPD) service offered by telephone companies, then your fax number is the number that you assigned to the printer. Make sure that you enter the correct distinctive ring pattern for that number in the fax software or in the Fax Setup menu of the printer control panel.
If you have more than one telephone line, then make sure that you enter the number for the line on which the printer is connected.
The dialing prefix is the number or series of numbers that you press before you can dial the actual fax number or telephone number. If the printer is in an office setting or in a private branch exchange, then this can be a specific number that you need to press so you can make a call outside the office. This can also be a country code or an area code that you need to enter if you are sending faxes outside of town. This can be very useful if you frequently send faxes to the same country or area. When you set the dialing prefix in the utility, the printer automatically inputs the prefix when you dial the fax number or telephone number.
You can enter up to 8 characters as your dialing prefix. The valid characters are the numbers 0–9, the letters P and W (uppercase and lowercase), and the characters pound (#) and star (*). If you are using the fax software to enter the dial prefix, then you may also include the characters minus and comma.
Notes:
Auto Answer is set to On by default, which lets the printer receive faxes automatically.
If the printer is connected to the same telephone line with an answering machine, then you must set Auto Answer to On so that you can receive both your voice calls and your faxes. Make sure that the answering machine is set to pick up on fewer rings than the rings set in the printer. This lets the other devices pick up the voice calls first. If an incoming call is a fax, the printer can detect fax signals on the line and takes the call.
If the printer is sharing a line with an answering machine, then set the printer to pick up after a greater number of rings than the answering machine. For example, if the answering machine picks up calls after four rings, then set the printer to pick up after six rings. This way, the answering machine picks up calls first and your voice calls are received. If the call is a fax, then the printer detects the fax signal on the line and takes over the call.
If the printer is on a dedicated fax line, then you may set the printer to pick up on any number of rings that you want.
Setting the correct ring is important if you subscribe to the Distinctive Ring Pattern Detection (DRPD) feature offered by telephone companies. This feature allows you to have multiple telephone numbers on one telephone line. Each telephone number has a designated ring pattern (All Rings, Single Ring Only, Double Ring Only, Triple Ring Only, Single or Double Rings Only, Single or Triple Rings Only, Double or Triple Rings Only). The different ring patterns let you know what telephone number was dialed, and what device you should use to answer the call.
Assign one of your telephone numbers to the printer as the fax number, and then set the printer to answer the ring pattern of that number. If the pattern is set incorrectly, then the printer rings, but it never receives the fax.
Distinctive Ring is also called Ident-a-Call, Smart Ring, Teen Ring, RingMaster, or IdentaRing.
From the printer control panel, navigate to:
> Setup > > Fax Setup > > Ringing and Answering > > Ring Pattern >
Press the arrow buttons to scroll to the ring pattern you want, and then press .
A dial tone lets you know if the telephone line is working or if the printer is properly connected to the telephone line. If you encounter problems sending and receiving faxes, then make sure you can hear a dial tone on the line and through the printer.
Plug an analog telephone into the wall jack.
Listen for a dial tone through the telephone handset.
If you hear a dial tone, then the telephone line and the wall jack are working.
If you do not hear a dial tone, plug the analog telephone into a second wall jack, and then listen for a dial tone. If you hear a dial tone, then the telephone line is working but the first wall jack is not working.
While the printer is connected to a telephone line through the port on the back of the printer, plug an analog telephone into the port of the printer.
Listen for a dial tone.
If you hear a dial tone, then the telephone line is working and properly connected to the printer.
If you do not hear a dial tone through both the wall jack and the printer, then see the Fax troubleshooting checklist.
Listen to the dial tone to check if the telephone line is working and to check if the cables and devices are connected properly in your telephone network. If you set the printer to receive faxes manually, then make sure that you set the ringer volume loud enough for you to hear it.
From the printer control panel, navigate to:
> Setup > > Fax Setup > > Dialing and Sending > > Speaker Volume >
Press the up or down arrow buttons to select a dial volume setting, and then press .
From the printer control panel, navigate to:
> Setup > > Fax Setup > > Ringing and Answering > > Ringer Volume >
Press the up or down arrow buttons to select a ringer volume setting, and then press .
To make sure the printer picks up incoming faxes, set Auto Answer to On, and then set the printer to pick up after a greater number of rings than the answering machine. For example, if the answering machine picks up calls after four rings, then set the printer to pick up after six rings. This way, the answering machine picks up calls first and your voice calls are received. If the call is a fax, then the printer detects the fax signal on the line and takes over the call.
Voice mail and fax can share the same telephone line if you subscribe to a distinctive ring service offered by your telephone company. This feature allows you to have multiple telephone numbers on one telephone line. Each telephone number has a designated ring pattern (All Rings, Single Ring Only, Double Ring Only, Triple Ring Only, Single or Double Rings Only, Single or Triple Rings Only, Double or Triple Rings Only). The different ring patterns let you know which telephone number was dialed, and which device you should use to answer the call.
If you do not have distinctive ring service, then set the printer to receive faxes manually (Auto Answer Off). This setting lets you receive both voice calls and fax calls, but works best if you use voice mail more often. You need to turn off voice mail whenever you are expecting a fax.
The resolution, or fax quality, of the documents that you send may affect fax transmission. The receiving fax machine may not support high resolutions and may not be able to receive your fax. You can fix this by enabling Auto Fax Conversion, but the automatic conversion may result in an unreadable fax, especially if the original document is already blurred.
Choose a fax quality that best suits the capacity of the receiving fax machine and the quality of the original document.
Quality | Black resolution | Color resolution |
|---|---|---|
Standard | 200 x 100 | 200 x 200 |
Fine | 200 x 200 | 200 x 200 |
Superfine | 300 x 300 | 200 x 200 |
Ultrafine | 300 x 300 (half-toned) | 200 x 200 |
When sending a fax, after entering the fax number, press the arrow buttons to select a fax quality, and then press .
From the printer control panel, navigate to:
>
Enter the fax number of the recipient, or press Address Book to select a number from the Speed Dial or Group Dial list.
Press the arrow buttons to scroll to .
Enter the time you want to send the fax, and then press .
Press to start scanning the document and to save the scheduled fax.
The printer sends the fax at the designated time. Do not turn off the printer or unplug it from the telephone line before the scheduled time.
Press Dial tone.
You should hear the dial tone of the telephone line.
Enter the calling card information, and then when you are connected to the telephone carrier, follow the prompts.
When prompted, enter the fax number of the recipient, and then press .
You can set the printer to print a confirmation page, or transmission report, every time you send a fax. This report includes the date and time that the fax was sent. If the fax job is unsuccessful, then the report also includes the cause of the error.
From the printer control panel, navigate to:
> Setup > > Fax Setup > > Reports > > Transmission Log Printing >
Press the arrow buttons to select a report printing option:
If you want to print a report every time you send a fax, then select Print Log.
If you do not want to print the report, then select Do not print log.
If you want to save on ink and print a report only when a fax job is unsuccessful, then select Print only for error.
Press .
You can view the fax history of the printer on the display. You can also print reports of sent or received faxes, or both.
From the printer control panel, navigate to:
> Setup > > Fax Setup > > Reports > > Fax History >
From the printer control panel, navigate to:
> Setup > > Fax Setup > > 2-Sided Faxes >
Press the arrow buttons to select a setting:
Never—Incoming faxes are never printed on both sides of the paper regardless of the 2-sided button setting.
Always—Incoming faxes are always printed on both sides of the paper regardless of the 2-sided button setting.
Press .
From the printer control panel, navigate to:
> Setup > > Fax Setup > > Ringing and Answering > > Fax Forward >
Press the arrow buttons to scroll to or , and then press .
Using the keypad, enter the number to which you want to forward the fax, and then press .
When you enable this option, all the faxes that you receive are automatically forwarded until you disable it.
To disable fax forwarding, return to the Fax Forward menu, and then select Off.
You can block faxes from specific numbers. You can also block junk faxes and faxes from unidentified senders (senders without a Caller ID). This feature is helpful if you want to receive faxes automatically but want to filter the faxes that you receive.
Turn on fax blocking.
From the printer control panel, navigate to:
> Setup > > Fax Setup > > Fax Blocking > > Turn On/Off > > On >
Add a number to block.
Press the arrow buttons to scroll to , and then press .
Use the keypad to enter the name of the person you want to block.
Press the down arrow button to move the cursor to the Number field.
Use the keypad to enter the fax number, and then press .
Repeat steps 2b through 2d until you have added all the numbers that you want to block. You can block up to 50 numbers.
Block unidentified faxes (faxes without a Caller ID number).
Press the arrow buttons to scroll to , and then press .
Press the arrow buttons to scroll to , and then press to save the setting.
The printer saves an incoming fax to the printer memory before it prints the fax. If the printer runs out of ink or runs out of paper, then you can print the fax later after the error is resolved.
However, you cannot retrieve a failed fax if the failure is due to power loss. In this case, the printer automatically prints an error report the next time it is turned on. For incoming faxes, the error report lets you know who sent the fax and how many pages were not printed. For outgoing faxes, it lets you know how many pages were not sent.