ADF | Scanner glass |
|---|---|
 | 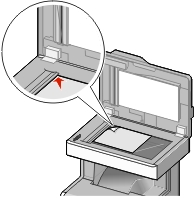 |
Use the ADF for multiple-page documents. | Use the scanner glass for single pages, small items (such as postcards or photos), transparencies, photo paper, or thin media (such as magazine clippings). |
ADF | Scanner glass |
|---|---|
| |
Use the ADF for multiple-page documents. | Use the scanner glass for single pages, small items (such as postcards or photos), transparencies, photo paper, or thin media (such as magazine clippings). |
The scanner lets you scan documents directly to a File Transfer Protocol (FTP) server. Only one FTP address may be used at a time.
Once an FTP destination has been configured by your system support person, the name of the destination becomes available as a shortcut number, or it is listed as a profile under the Held Jobs icon.
Instead of typing the entire FTP site address on the printer control panel each time you want to send a document to an FTP server, you can create a permanent FTP destination and assign a shortcut number.
Type the printer IP address into the address field of your Web browser.
If you do not know the IP address of the printer, you can:
View the IP address on the printer control panel in the TCP/IP section under the Networks/Ports menu.
Print a network setup page or the menu settings pages and locate the IP address in the TCP/IP section.
Click Settings.
Under Other Settings, click Manage Shortcuts.
| Note: A password may be required. If you do not have an ID and password, get one from your system support person. |
Click FTP Shortcut Setup.
Enter the appropriate information.
Enter a shortcut number.
If you enter a number that is already in use, then you are prompted to select another number.
Click Add.
From the home screen, navigate to:
FTP > type the FTP address >  > enter a name for the shortcut > Done
Verify that the shortcut name and number are correct, and then touch OK. If the name or number is incorrect, then touch Cancel, and then reenter the information.
If you enter a number that is already in use, then you are prompted to select another number.
Touch Submit.
Load an original document faceup, short edge first into the ADF or facedown on the scanner glass.
| Note: Do not load postcards, photos, small items, transparencies, photo paper, or thin media (such as magazine clippings) into the ADF. Place these items on the scanner glass. |
If you are loading a document into the ADF, then adjust the paper guides.
From the home screen, navigate to:
FTP > FTP > type the FTP address > Send It
Load an original document faceup, short edge first into the ADF or facedown on the scanner glass.
| Note: Do not load postcards, photos, small items, transparencies, photo paper, or thin media (such as magazine clippings) into the ADF. Place these items on the scanner glass. |
If you are loading a document into the ADF, then adjust the paper guides.
Press  , and then enter the FTP shortcut number.
Touch Send It.
Load an original document faceup, short edge first into the ADF or facedown on the scanner glass.
| Note: Do not load postcards, photos, small items, transparencies, photo paper, or thin media (such as magazine clippings) into the ADF. Place these items on the scanner glass. |
If you are loading a document into the ADF, adjust the paper guides.
From the home screen, navigate to:
FTP > FTP >  > enter the name of recipient > Browse shortcuts > name of recipient > Search
This option lets you enter the IP address for the FTP destination.
| Note: Addresses should be in dot notation form (for example: ). |
This option opens a screen where you can choose the size of the documents for FTP sending.
Touch a paper size button to select that size as the Original Size setting. The FTP screen appears with the new setting displayed.
When “Original Size” is set to Mixed Sizes, you can scan an original document that contains mixed paper sizes.
When “Original Size” is set to Auto Size Sense, the scanner automatically determines the size of the original document.
This option sets the output (PDF, TIFF, JPEG or XPS) for the scanned image.
PDF—Creates a single file with multiple pages, viewable with Adobe Reader. Adobe Reader is provided free by Adobe at www.adobe.com.
Secure PDF—Creates an encrypted PDF file that protects the file contents from unauthorized access
TIFF—Creates multiple files or a single file. If Multi-page TIFF is turned off in the Settings menu of the Embedded Web Server, then TIFF saves one page in each file. The file size is usually larger than an equivalent JPEG.
JPEG—Creates and attaches a separate file for each page of your original document, viewable by most Web browsers and graphics programs
XPS—Creates a single XPS file with multiple pages, viewable using an Internet Explorer-hosted viewer and the .NET Framework, or by downloading a third party standalone viewer
This option adjusts the output quality of your file. Increasing the image resolution increases the file size and the time needed to scan your original document. Image resolution can be decreased to reduce the file size.
This option lets you change the Sides (Duplex), Orientation, and Binding.
Sides (Duplex)— Specifies if the original document is simplex (printed on one page) or duplex (printed on both sides). This also identifies what needs to be scanned.
Orientation— Specifies the orientation of the original document, and then changes the Sides and Binding settings to match the orientation.
Binding— Specifies if the original document is bound on the long-edge or short-edge side.
This option lets you specify the content type and source of the original document.
Choose content type from Text, Text/Photo, Photo, or Graphics.
Text—Use when the content of the original document is mostly text or line art.
Graphics—Use when the original document is mostly business-type graphics such as pie charts, bar charts, and animations.
Text/Photo—Use when the original document is a mixture of text, graphics, and photos.
Photo—Use when the original document is mostly a photo or an image.
Choose content source from Color Laser, Black/White Laser, Inkjet, Photo/Film, Magazine, Newspaper, Press, or Other.
Color Laser—Use when the original document was printed using a color laser printer.
Black/White Laser—Use when the original document was printed using a mono laser printer.
Inkjet—Use when the original document was printed using an inkjet printer.
Photo/Film—Use when the original document is a photo from film.
Magazine—Use when the original document is from a magazine.
Newspaper—Use when the original document is from a newspaper.
Press—Use when the original document was printed using a printing press.
Other—Use when the original document was printed using an alternate or unknown printer.
This option displays the first page of the original document before it is scanned completely. When the first page is scanned, the scanning is paused and a preview image appears.
Touching the Advanced Options button opens a screen where you can change the following settings:
Advanced Imaging—Use to adjust the Background Removal, Color Balance, Color Dropout, Contrast, JPEG Quality, Negative Image, Mirror Image, Scan edge to edge, Shadow Detail, Sharpness, and Temperature image output settings before sending the image.
Edge Erase—Use to eliminate smudges or information around the edges of a document. You can choose to eliminate an equal area around all four sides of the paper, or pick a particular edge. Edge Erase will erase whatever is within the area selected, leaving nothing on that portion of the scan.
Transmission Log—Use to print the transmission log or transmission error log.
Custom Job—Use to combine multiple scanning jobs into a single job.