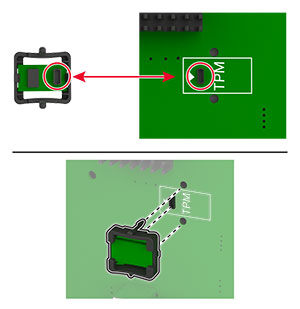
Intelligent storage drive (ISD)
Fonts
Simplified Chinese
Traditional Chinese
Japanese
Korean
Arabic
Mass storage
Printer hard disk
Licensed features
IPDS
Bar Code
Lexmark TM Internal solutions port
IEEE 1284-B Parallel Card
RS-232C Serial Card
Fiber Port
Wireless print server
MarkNet TM N8370
MarkNet N8372
MarkNet N8450
Notes:
CAUTION—SHOCK HAZARD:
To avoid the risk of electrical shock, if you are accessing the controller board or installing optional hardware or memory devices sometime after setting up the printer, then turn the printer off, and unplug the power cord from the electrical outlet before continuing. If you have any other devices attached to the printer, then turn them off as well, and unplug any cables going into the printer.
Turn off the printer.
Unplug the power cord from the electrical outlet, and then from the printer.
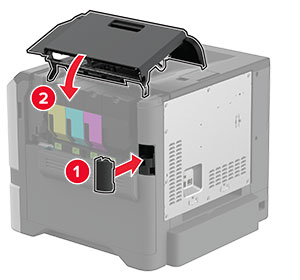
Unpack the optional tray, and then remove all the packing material.
Install the printer on top of the optional tray until it clicks into place.
CAUTION—POTENTIAL INJURY:
If the printer weight is greater than 20 kg (44 lb), then it may require two or more people to lift it safely.
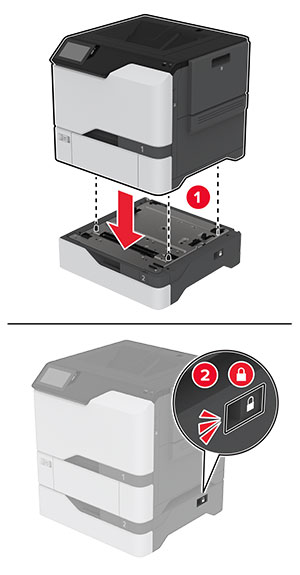
Connect the power cord to the printer, and then to the electrical outlet.
CAUTION—POTENTIAL INJURY:
To avoid the risk of fire or electrical shock, connect the power cord to an appropriately rated and properly grounded electrical outlet that is near the product and easily accessible.
Turn on the printer.
Add the tray in the print driver to make it available for print jobs. For more information, see Adding available options in the print driver .
CAUTION—SHOCK HAZARD:
To avoid the risk of electrical shock, if you are accessing the controller board or installing optional hardware or memory devices sometime after setting up the printer, then turn the printer off, and unplug the power cord from the electrical outlet before continuing. If you have any other devices attached to the printer, then turn them off as well, and unplug any cables going into the printer.
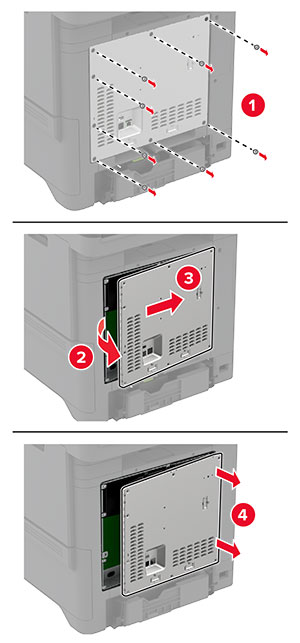
Turn off the printer, and then unplug the power cord from the electrical outlet.
Using a flat-head screwdriver, remove the controller board shield.
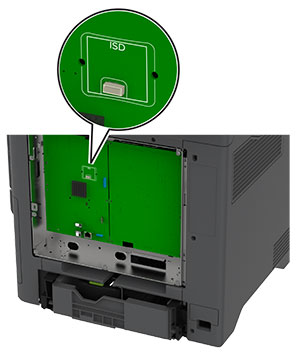
Unpack the intelligent storage drive (ISD).
Locate the ISD connector.
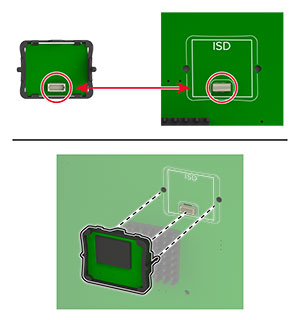
Insert the card to the ISD connector.
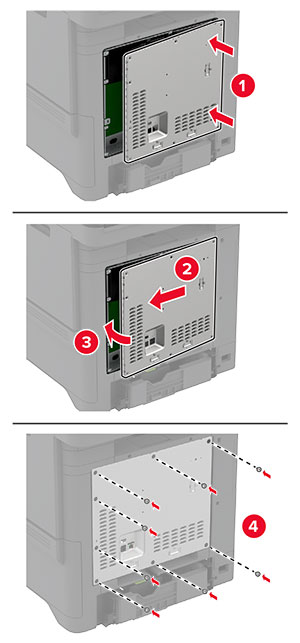
Attach the controller board shield.
Connect the power cord to the electrical outlet, and then turn on the printer.
CAUTION—POTENTIAL INJURY:
To avoid the risk of fire or electrical shock, connect the power cord to an appropriately rated and properly grounded electrical outlet that is near the product and easily accessible.
CAUTION—SHOCK HAZARD:
To avoid the risk of electrical shock, if you are accessing the controller board or installing optional hardware or memory devices sometime after setting up the printer, then turn the printer off, and unplug the power cord from the electrical outlet before continuing. If you have any other devices attached to the printer, then turn them off as well, and unplug any cables going into the printer.
Turn off the printer, and then unplug the power cord from the electrical outlet.
Using a flat-head screwdriver, remove the controller board shield.
Unpack the Trusted Platform Module.
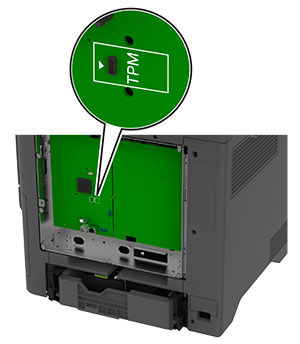
Locate the TPM connector.
Attach the module to the TPM connector.
Attach the controller board shield.
Connect the power cord to the electrical outlet, and then turn on the printer.
CAUTION—POTENTIAL INJURY:
To avoid the risk of fire or electrical shock, connect the power cord to an appropriately rated and properly grounded electrical outlet that is near the product and easily accessible.
CAUTION—SHOCK HAZARD:
To avoid the risk of electrical shock, if you are accessing the controller board or installing optional hardware or memory devices sometime after setting up the printer, then turn the printer off, and unplug the power cord from the electrical outlet before continuing. If you have any other devices attached to the printer, then turn them off as well, and unplug any cables going into the printer.
Turn off the printer, and then unplug the power cord from the electrical outlet.
Using a flat-head screwdriver, remove the controller board shield.
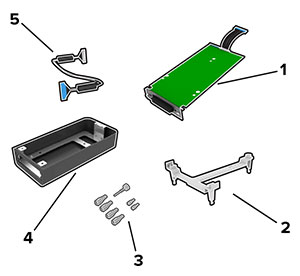
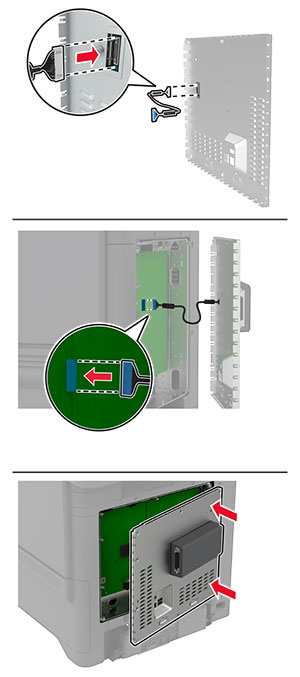
Unpack the internal solutions port (ISP) kit.
|
1 |
ISP |
|
2 |
Mounting bracket |
|
3 |
Thumbscrews |
|
4 |
Housing |
|
5 |
ISP extended cable |
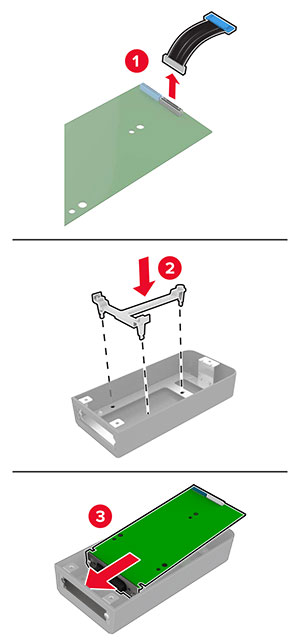
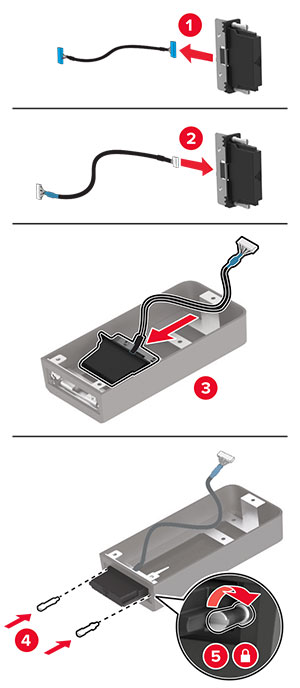
Install the ISP into its housing.
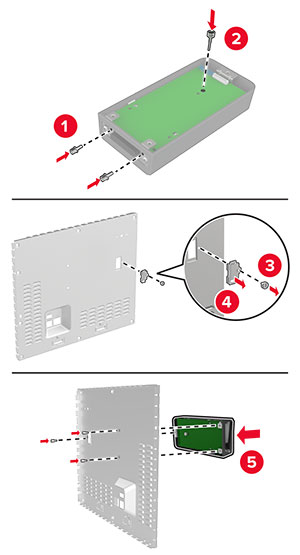
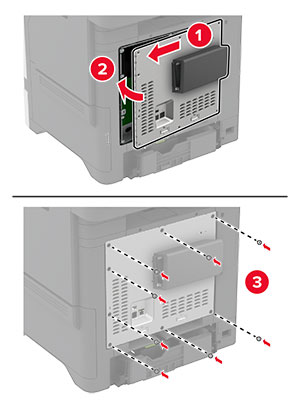
Attach the housing to the controller board shield.
Connect the ISP extended cable to the ISP connector in the controller board.
Attach the controller board shield.
Connect the power cord to the electrical outlet, and then turn on the printer.
CAUTION—POTENTIAL INJURY:
To avoid the risk of fire or electrical shock, connect the power cord to an appropriately rated and properly grounded electrical outlet that is near the product and easily accessible.
Notes:
Open the printers folder.
From the shortcut menu of the printer with the new ISP, open the printer properties.
Configure the port from the list.
Update the IP address.
Apply the changes.
From System Preferences in the Apple menu, navigate to the list of printers, and then select + > IP .
Type the IP address in the address field.
Apply the changes.
CAUTION—SHOCK HAZARD:
To avoid the risk of electrical shock, if you are accessing the controller board or installing optional hardware or memory devices sometime after setting up the printer, then turn the printer off, and unplug the power cord from the electrical outlet before continuing. If you have any other devices attached to the printer, then turn them off as well, and unplug any cables going into the printer.
Turn off the printer, and then unplug the power cord from the electrical outlet.
Using a flat-head screwdriver, remove the controller board shield.
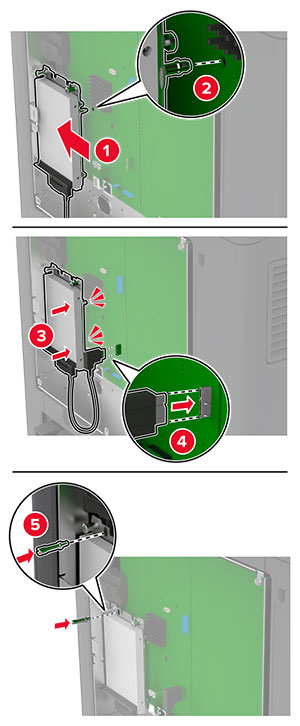
Unpack the hard disk.
Attach the hard disk to the controller board.
Attach the controller board shield.
Connect the power cord to the electrical outlet, and then turn on the printer.
CAUTION—POTENTIAL INJURY:
To avoid the risk of fire or electrical shock, connect the power cord to an appropriately rated and properly grounded electrical outlet that is near the product and easily accessible.
CAUTION—SHOCK HAZARD:
To avoid the risk of electrical shock, if you are accessing the controller board or installing optional hardware or memory devices sometime after setting up the printer, then turn the printer off, and unplug the power cord from the electrical outlet before continuing. If you have any other devices attached to the printer, then turn them off as well, and unplug any cables going into the printer.
Turn off the printer, and then unplug the power cord from the electrical outlet.
Using a flat-head screwdriver, remove the controller board shield.
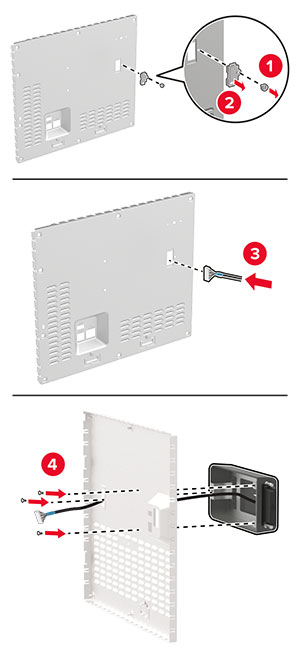
Install the wireless module into its housing.
Attach the wireless module to the controller board shield.
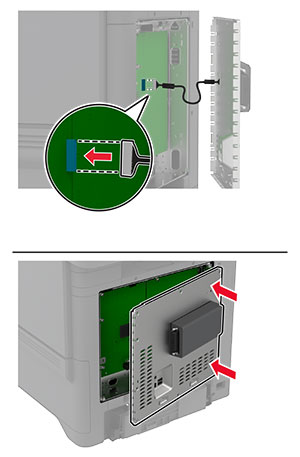
Connect the wireless assembly to the ISP connector in the controller board.
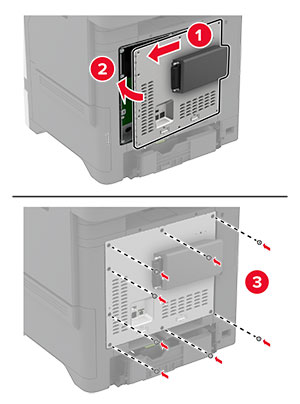
Attach the controller board shield.
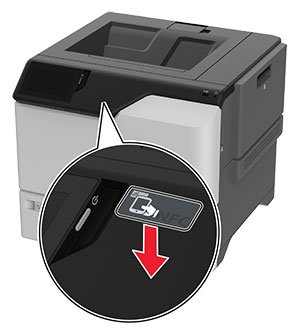
Attach the NFC card.
Connect the power cord to the electrical outlet, and then turn on the printer.
CAUTION—POTENTIAL INJURY:
To avoid the risk of fire or electrical shock, connect the power cord to an appropriately rated and properly grounded electrical outlet that is near the product and easily accessible.
Turn off the printer.
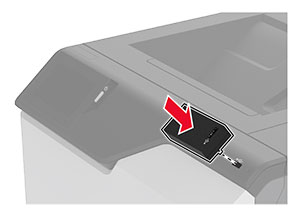
Apply isopropyl alcohol to a damp, soft, lint-free cloth, and then wipe the surface around the USB port.
Install the wireless module.
Notes:
Check for a gap between the module and the printer, then attach the spacer module if necessary.
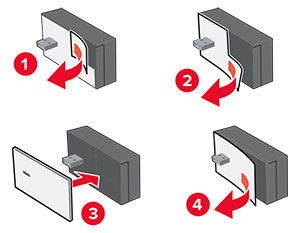
Attach the NFC card.
Turn on the printer.
Turn off the printer, and then unplug the power cord from the electrical outlet.
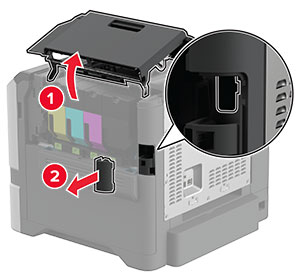
Depending on your printer model, locate the wireless print server port.
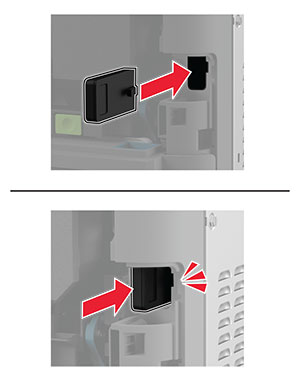
Insert the wireless print server until it clicks into place.
Depending on your printer model, close the door, attach the port cover, or do both.
Connect the power cord to the electrical outlet, and then turn on the printer.
CAUTION—POTENTIAL INJURY:
To avoid the risk of fire or electrical shock, connect the power cord to an appropriately rated and properly grounded electrical outlet that is near the product and easily accessible.