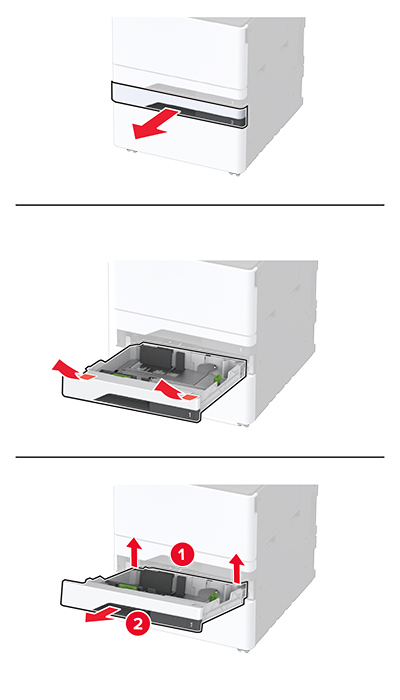
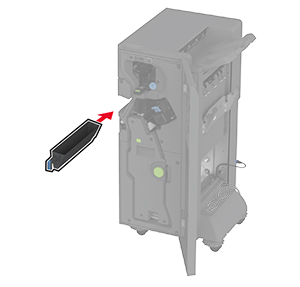
安裝信封紙匣組件
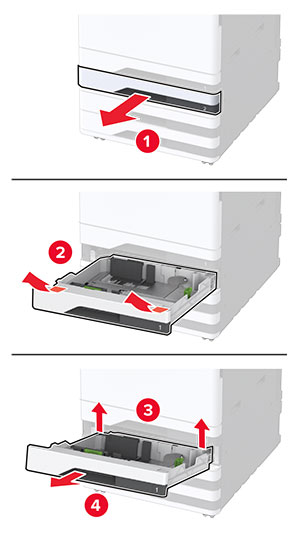
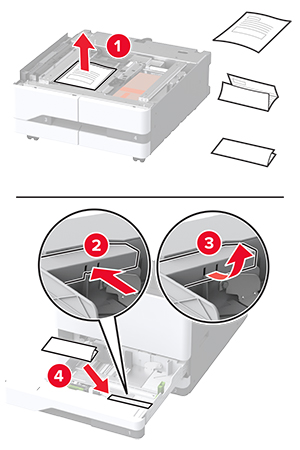
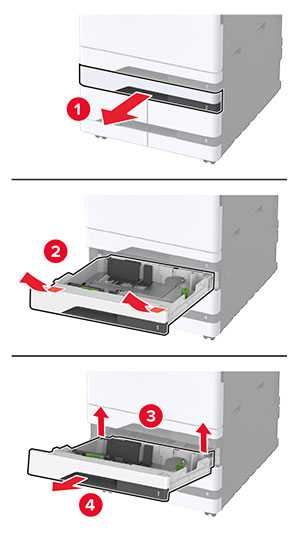
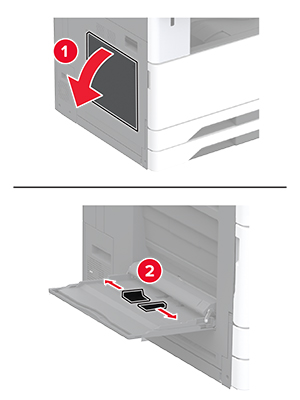
卸下 1 號紙匣組件。
請注意: 請勿丟棄標準送紙匣。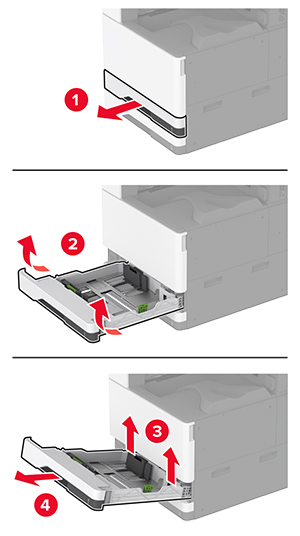
拆開信封紙匣組件的包裝,並移除所有的包裝材料。
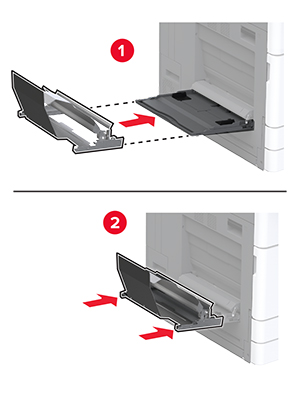
插入信封紙匣組件。
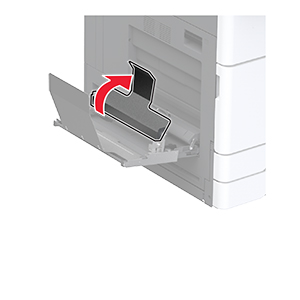
若要讓列印工作可以使用信封紙匣組件,從主畫面觸摸設定 > 裝置 > 維護 > 配置功能表 > 紙匣組件配置 > 信封紙匣組件設定 > 開啟。
卸下 1 號紙匣組件。
拆開信封紙匣組件的包裝,並移除所有的包裝材料。
插入信封紙匣組件。
若要讓列印工作可以使用信封紙匣組件,從主畫面觸摸設定 > 裝置 > 維護 > 配置功能表 > 紙匣組件配置 > 信封紙匣組件設定 > 開啟。
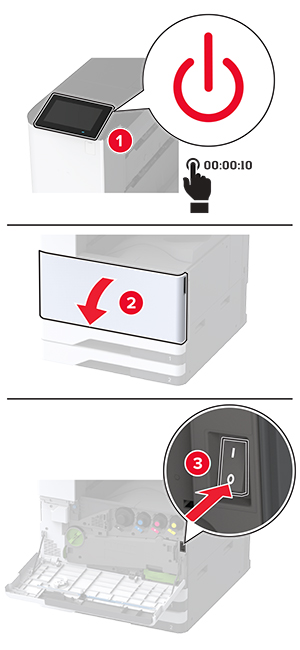
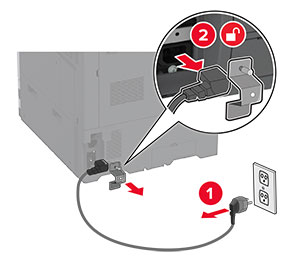
 請當心—觸電危險: 為避免發生電擊的風險,若您是在安裝印表機之後,才要取用控制板或安裝選購性硬體或記憶裝置,請先關閉印表機電源,並從電源插座拔除電源線,再繼續作業。若您有任何其他裝置連接至印表機,請同時關閉它們的電源,並拔下所有連接到印表機的電纜。
關閉印表機電源。
從電源插座拔除電源線,然後再從印表機拔除。
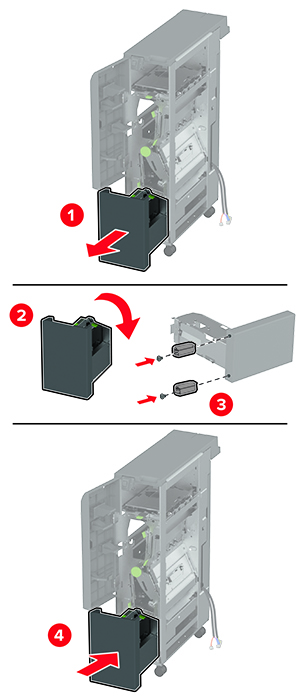
拆開選購性間隔匣的包裝,並移除所有的包裝材料。
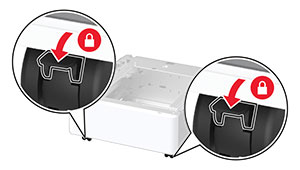
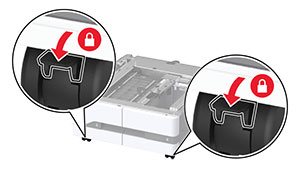
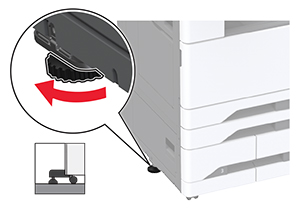
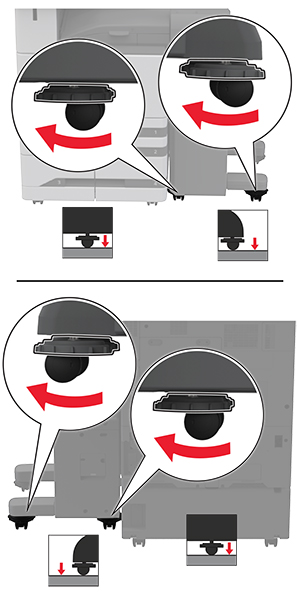
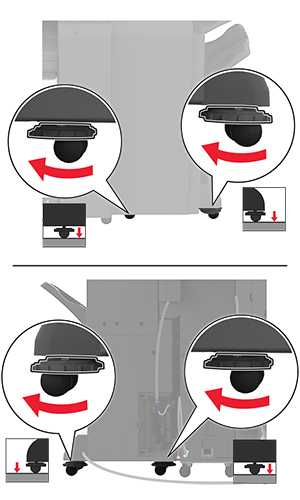
鎖定腳輪以免間隔匣移動。
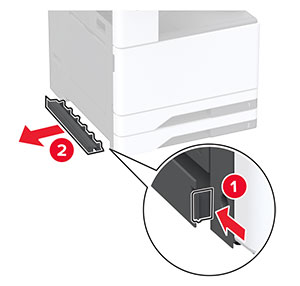
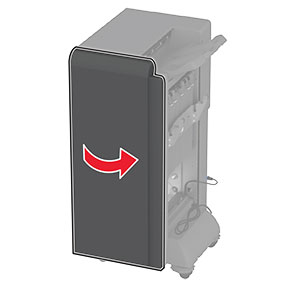
卸下印表機左側下方的選購品安裝蓋板。
拉出印表機左側的抬起握把。
將印表機對準間隔匣,然後讓印表機往下放入定位。
 請當心—潛在受傷危險性: 若印表機的重量超過 20公斤(44磅),這時需要有兩個或兩個以上人員,才能安全地抬起印表機。
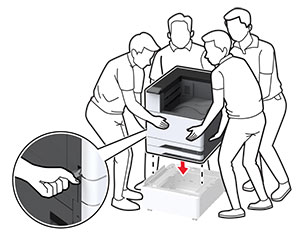
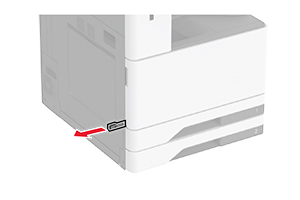
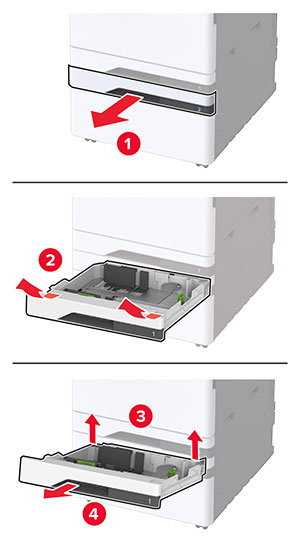
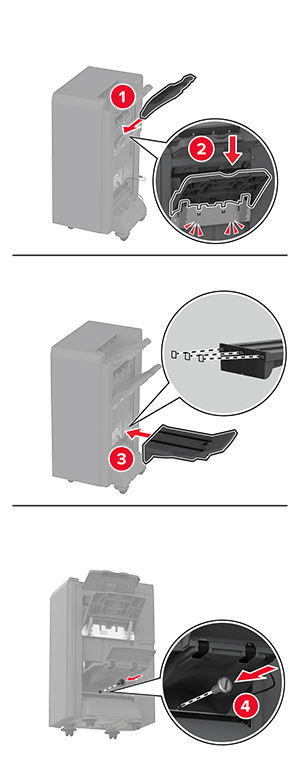
卸下 2 號紙匣組件。
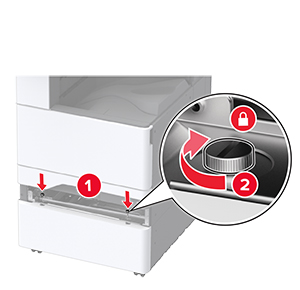
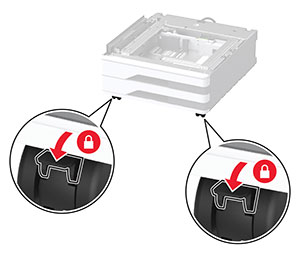
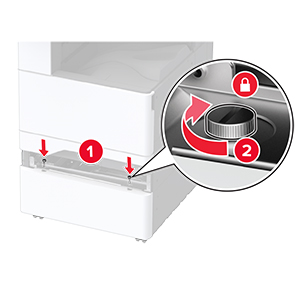
使用螺絲將間隔匣固定至印表機。
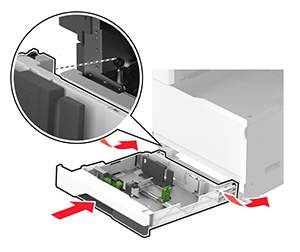
插入 2 號紙匣組件。
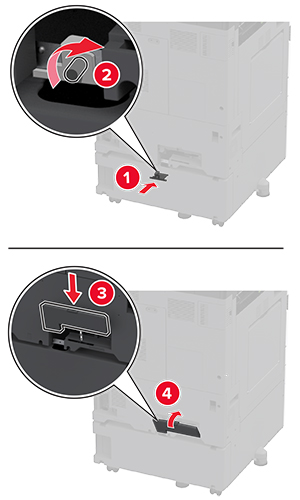
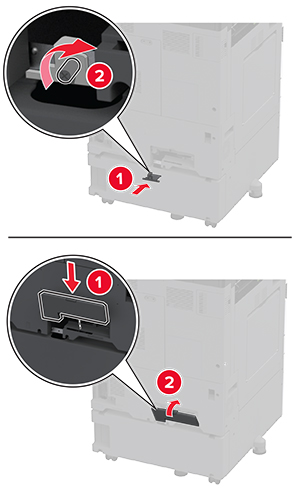
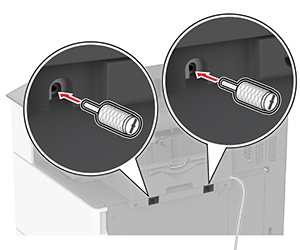
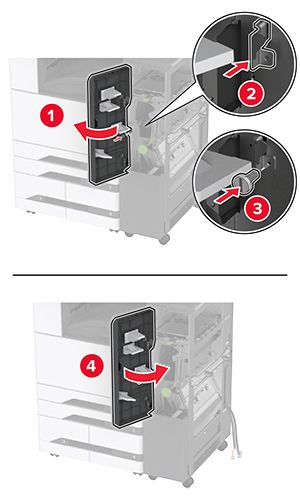
卸下印表機後方的連結器蓋板。

將鎖定支架固定至印表機,然後連接蓋板。
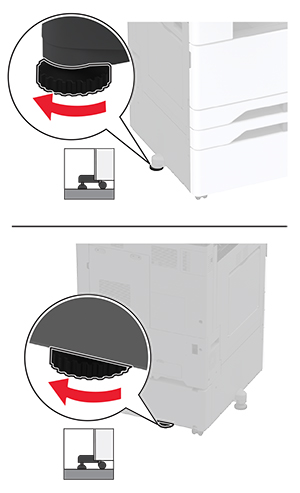
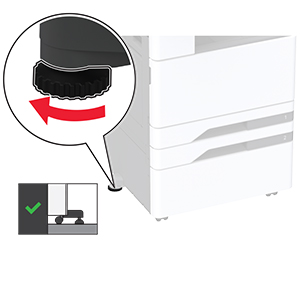
調整校平儀以確保印表機周圍高度一致。
將電源線連接至印表機,然後再連接至電源插座。
請當心—潛在受傷危險性: 為避免發生火災或觸電的危險,請將電源線連接至產品附近額定電壓相符且正確接地的電源插座,以便於使用。開啟印表機電源。
請當心—觸電危險: 為避免發生電擊的風險,若您是在安裝印表機之後,才要取用控制板或安裝選購性硬體或記憶裝置,請先關閉印表機電源,並從電源插座拔除電源線,再繼續作業。若您有任何其他裝置連接至印表機,請同時關閉它們的電源,並拔下所有連接到印表機的電纜。關閉印表機電源。
從電源插座拔除電源線,然後再從印表機拔除。
打開選購性紙匣組件的包裝,並移除所有的包裝材料。
將選購性紙匣組件隨附的表單儲存在 1 號紙匣組件區中。

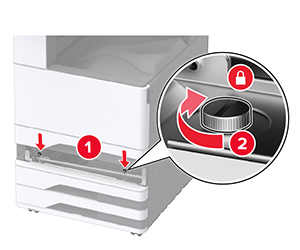
鎖定腳輪以免選購性紙匣組件移動。
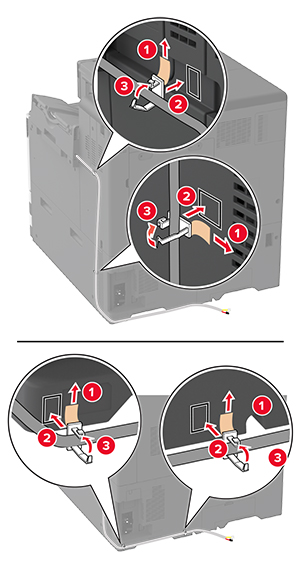
卸下印表機左側下方的選購品安裝蓋板。
拉出印表機左側的抬起握把。
將印表機對準選購性紙匣組件,然後讓印表機往下放入定位。
請當心—潛在受傷危險性: 若印表機的重量超過 20公斤(44磅),這時需要有兩個或兩個以上人員,才能安全地抬起印表機。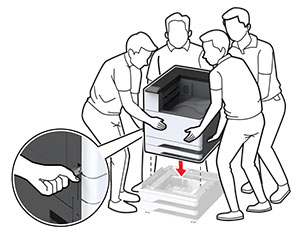
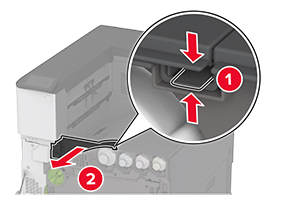
卸下 2 號紙匣組件。
使用螺絲將選購性紙匣組件固定至印表機。
插入 2 號紙匣組件。
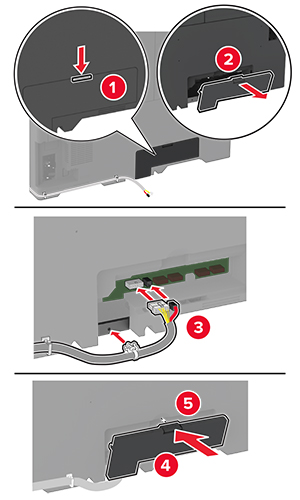
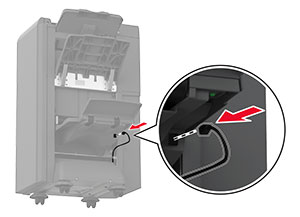
卸下印表機後方的連結器蓋板。
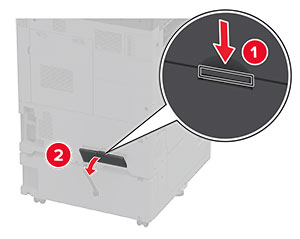
將紙匣組件連結器連接至印表機,然後連接蓋板。
調整校平儀以確保印表機周圍高度一致。
將電源線連接至印表機,然後再連接至電源插座。
請當心—潛在受傷危險性: 為避免發生火災或觸電的危險,請將電源線連接至產品附近額定電壓相符且正確接地的電源插座,以便於使用。開啟印表機電源。
請在列印驅動程式中新增此紙匣組件,才能將它用於列印工作。如需詳細資訊,請參閱 在列印驅動程式中新增可用選購品。
請當心—觸電危險: 為避免發生電擊的風險,若您是在安裝印表機之後,才要取用控制板或安裝選購性硬體或記憶裝置,請先關閉印表機電源,並從電源插座拔除電源線,再繼續作業。若您有任何其他裝置連接至印表機,請同時關閉它們的電源,並拔下所有連接到印表機的電纜。關閉印表機電源。
從電源插座拔除電源線,然後再從印表機拔除。
打開選購性紙匣組件的包裝,並移除所有的包裝材料。
將選購性紙匣組件隨附的表單儲存在 1 號紙匣組件區。
鎖定腳輪以免選購性紙匣組件移動。
打開 B 號門。
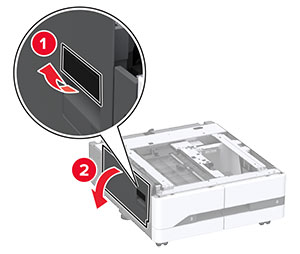
卸下印表機左側下方的選購品安裝蓋板。
拉出印表機左側的抬起握把。
將印表機對準選購性紙匣組件,然後讓印表機往下放入定位。
請當心—潛在受傷危險性: 若印表機的重量超過 20公斤(44磅),這時需要有兩個或兩個以上人員,才能安全地抬起印表機。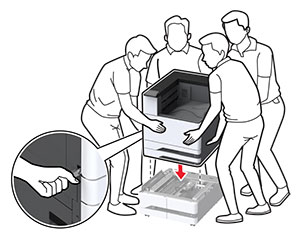
關上 B 門。
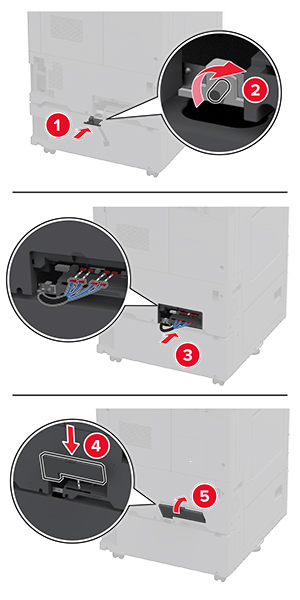
卸下 2 號紙匣組件。
使用螺絲將選購性紙匣組件固定至印表機。
插入 2 號紙匣組件。
卸下印表機後方的連結器蓋板。
將紙匣組件連結器連接至印表機,然後連接蓋板。
調整校平儀以確保印表機周圍高度一致。
將電源線連接至印表機,然後再連接至電源插座。
請當心—潛在受傷危險性: 為避免發生火災或觸電的危險,請將電源線連接至產品附近額定電壓相符且正確接地的電源插座,以便於使用。開啟印表機電源。
請在列印驅動程式中新增此紙匣組件,才能將它用於列印工作。如需詳細資訊,請參閱 在列印驅動程式中新增可用選購品。
請當心—觸電危險: 為避免發生電擊的風險,若您是在安裝印表機之後,才要取用控制板或安裝選購性硬體或記憶裝置,請先關閉印表機電源,並從電源插座拔除電源線,再繼續作業。若您有任何其他裝置連接至印表機,請同時關閉它們的電源,並拔下所有連接到印表機的電纜。關閉印表機電源。
從電源插座拔除電源線,然後再從印表機拔除。
打開選購性紙匣組件的包裝,並移除所有的包裝材料。
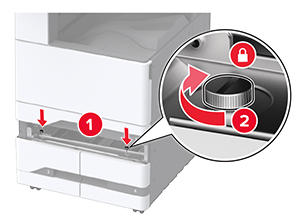
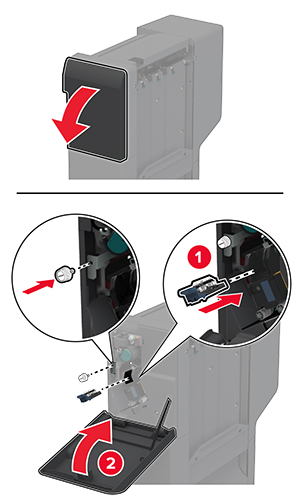
卸下印表機左側的水平調整螺絲 。

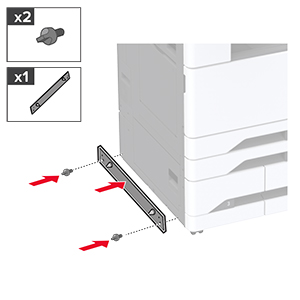
將固定支架連接至印表機。
安裝選購性紙匣組件。
將紙匣組件連接至印表機。
調整水平調整螺絲,以確保紙匣組件的高度與印表機一致。
將電源線連接至印表機,然後再連接至電源插座。
請當心—潛在受傷危險性: 為避免發生火災或觸電的危險,請將電源線連接至產品附近額定電壓相符且正確接地的電源插座,以便於使用。開啟印表機電源。
請在列印驅動程式中新增此紙匣組件,才能將它用於列印工作。如需詳細資訊,請參閱 在列印驅動程式中新增可用選購品。
請當心—觸電危險: 為避免發生電擊的風險,若您是在安裝印表機之後,才要取用控制板或安裝選購性硬體或記憶裝置,請先關閉印表機電源,並從電源插座拔除電源線,再繼續作業。若您有任何其他裝置連接至印表機,請同時關閉它們的電源,並拔下所有連接到印表機的電纜。關閉印表機電源。
從電源插座拔除電源線,然後再從印表機拔除。
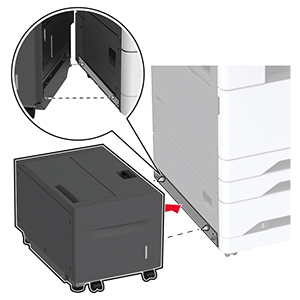
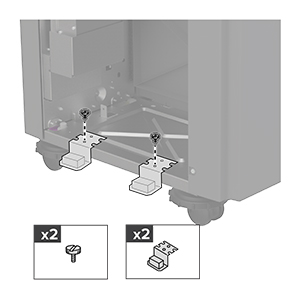
拆開櫃子的包裝。
鎖定腳輪,避免櫃子移動。

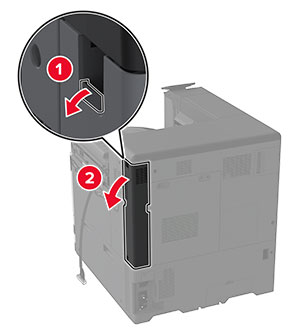
卸下印表機左側下方的選購品安裝蓋板。
拉出印表機左側的抬起握把。
將印表機對準櫃子,然後讓印表機往下放入定位。
請當心—潛在受傷危險性: 若印表機的重量超過 20公斤(44磅),這時需要有兩個或兩個以上人員,才能安全地抬起印表機。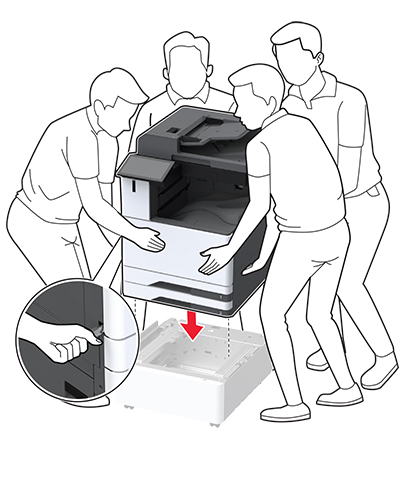
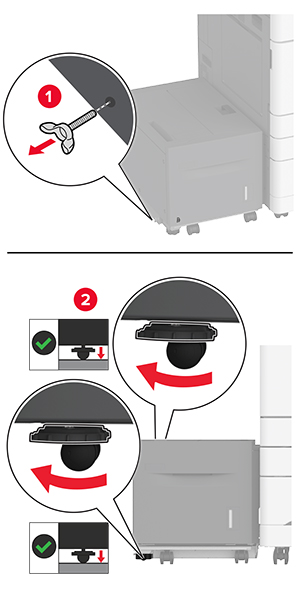
移除 2 號紙匣組件。
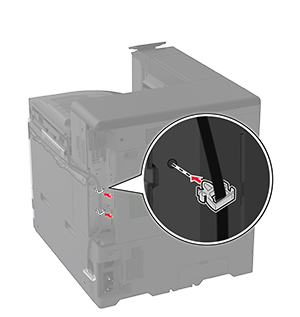
使用螺絲將選購性櫃子固定至印表機。
插入紙匣組件 2。
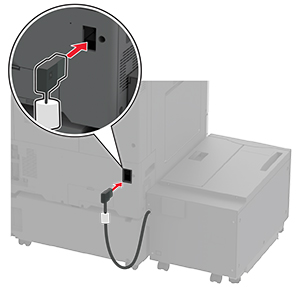
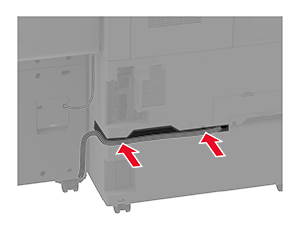
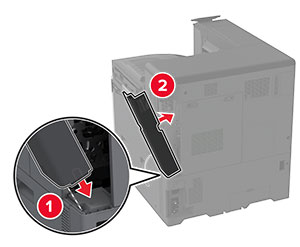
卸下印表機後方的連結器蓋板。
將櫃子固定至印表機,然後連接連結器蓋板。
調整校平儀以確保印表機周圍高度一致。
將電源線連接至印表機,然後再連接至電源插座。
請當心—潛在受傷危險性: 為避免發生火災或觸電的危險,請將電源線連接至產品附近額定電壓相符且正確接地的電源插座,以便於使用。開啟印表機電源。
關閉印表機電源。
從電源插座拔除電源線,然後再從印表機拔除。
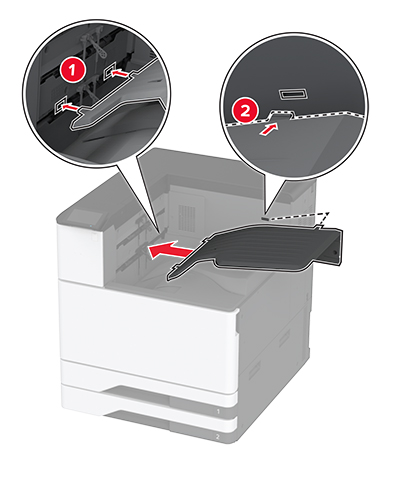
打開多用途送紙器,然後延伸側導引夾。
拆開新長條海報紙匣組件的包裝,並移除所有的包裝材料。
將長條海報紙匣組件連接至多用途送紙器。
將長條海報紙滾輪導環推向印表機。
將長條海報紙載入紙匣組件中,其中長條海報紙前緣位於長條海報紙滾輪導環下方。
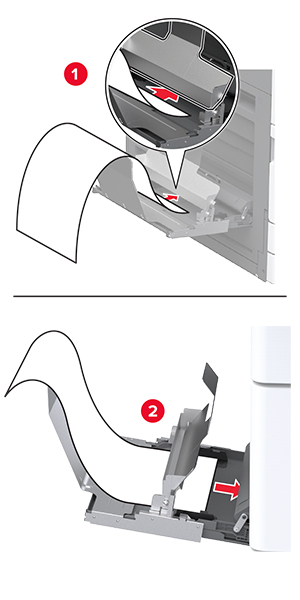
將長條海報紙的後緣放在長條海報紙滾輪導環上,然後調整側導引夾。

將電源線連接至印表機,然後再連接至電源插座。
請當心—潛在受傷危險性: 為避免發生火災或觸電的危險,請將電源線連接至產品附近額定電壓相符且正確接地的電源插座,以便於使用。開啟印表機電源。
請當心—觸電危險: 為避免發生電擊的風險,若您是在安裝印表機之後,才要取用控制板或安裝選購性硬體或記憶裝置,請先關閉印表機電源,並從電源插座拔除電源線,再繼續作業。若您有任何其他裝置連接至印表機,請同時關閉它們的電源,並拔下所有連接到印表機的電纜。關閉印表機電源。
從電源插座拔除電源線,然後再從印表機拔除。
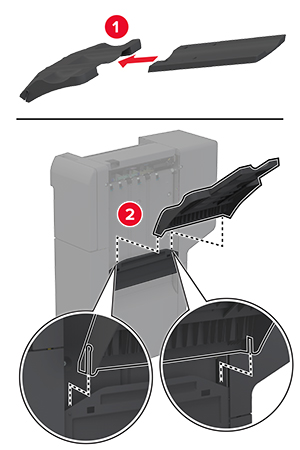
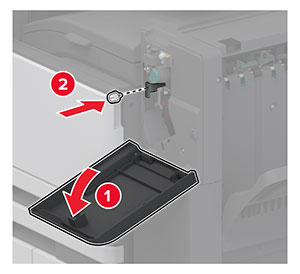
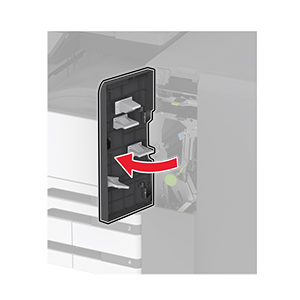
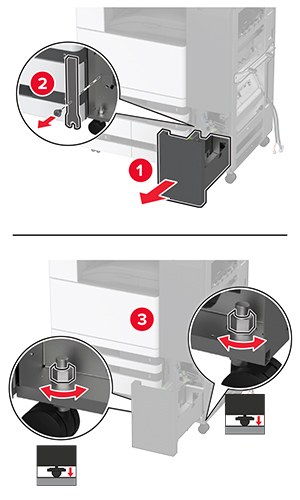
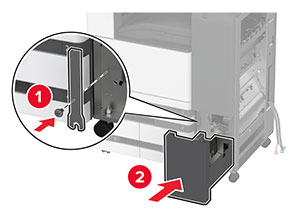
卸下標準出紙槽。
打開前門,然後卸下藍色旋鈕。
移除標準出紙槽側蓋板。
拆開分頁裝訂器的包裝,並移除所有的包裝材料。
插入分頁裝訂器。
關閉前門。
將分頁裝訂器固定至印表機。
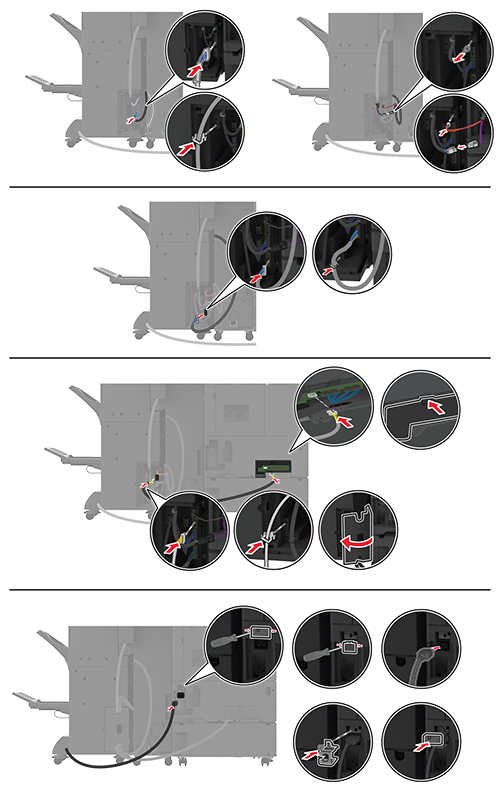
將分頁裝訂器的電纜固定至印表機。
將分頁裝訂器的電纜連接至印表機。
將電源線連接至印表機,然後再連接至電源插座。
請當心—潛在受傷危險性: 為避免發生火災或觸電的危險,請將電源線連接至產品附近額定電壓相符且正確接地的電源插座,以便於使用。開啟印表機電源。
請在列印驅動程式中新增此分頁裝訂器,才能將它用於列印工作。如需詳細資訊,請參閱 在列印驅動程式中新增可用選購品。
請當心—觸電危險: 為避免發生電擊的風險,若您是在安裝印表機之後,才要取用控制板或安裝選購性硬體或記憶裝置,請先關閉印表機電源,並從電源插座拔除電源線,再繼續作業。若您有任何其他裝置連接至印表機,請同時關閉它們的電源,並拔下所有連接到印表機的電纜。關閉印表機電源。
從電源插座拔除電源線,然後再從印表機拔除。
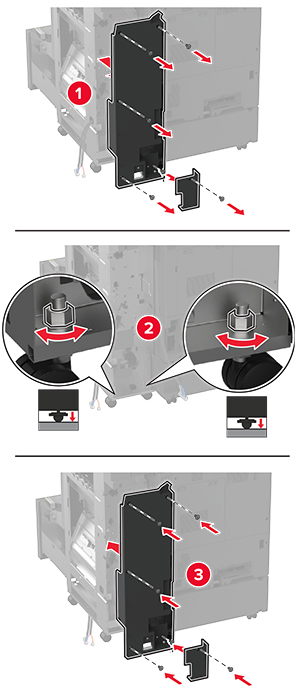
拆開裝訂打孔分頁裝訂器的包裝,並移除所有的包裝材料。
將裝釘匣容器插入分頁裝訂器中。
將支架連接至分頁裝訂器。
將出紙槽插入分頁裝訂器中。
卸下標準出紙槽。
打開前門,然後卸下藍色旋鈕。
移除標準出紙槽側蓋板。
關閉前門。
插入紙張傳輸,然後使用螺絲固定它。
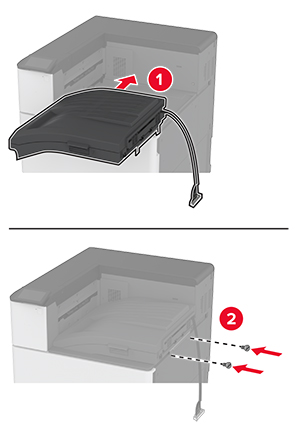
將分頁裝訂器連接至印表機。
調整水平調整螺絲,以確保分頁裝訂器周圍的高度都與印表機一樣。
打開分頁裝訂器門,將螺絲安裝在分頁裝訂器的左側部分。
關閉分頁裝訂器門。
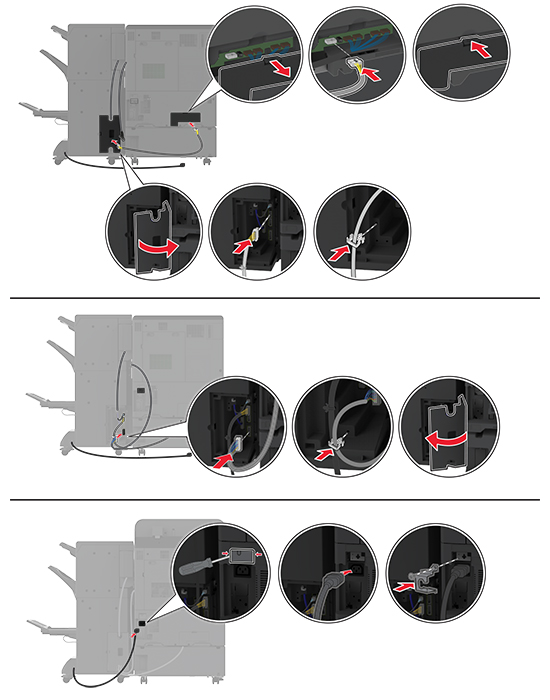
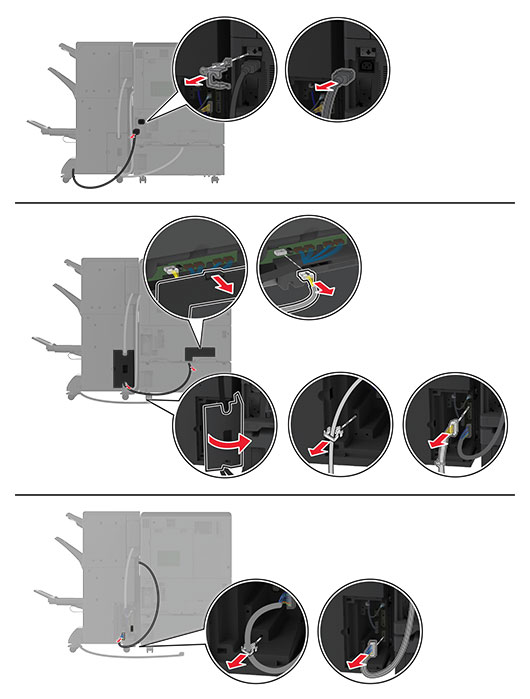
將紙張傳輸電纜安裝至分頁裝訂器的後方。
將分頁裝訂器電纜連接至印表機的後方。
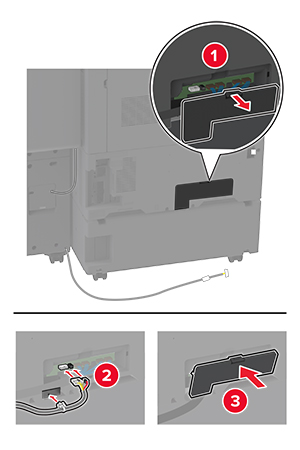
將電纜固定在印表機的後方。
將電源線連接至印表機,然後再連接至電源插座。
請當心—潛在受傷危險性: 為避免發生火災或觸電的危險,請將電源線連接至產品附近額定電壓相符且正確接地的電源插座,以便於使用。開啟印表機電源。
若要讓列印工作可以使用分頁裝訂器,從主畫面觸摸設定 > 裝置 > 維護 > 配置功能表 > 分頁裝訂器配置 > 打孔配置 > ,然後選擇配置。
請當心—觸電危險: 為避免發生電擊的風險,若您是在安裝印表機之後,才要取用控制板或安裝選購性硬體或記憶裝置,請先關閉印表機電源,並從電源插座拔除電源線,再繼續作業。若您有任何其他裝置連接至印表機,請同時關閉它們的電源,並拔下所有連接到印表機的電纜。關閉印表機電源。
從電源插座拔除電源線,然後再從印表機拔除。
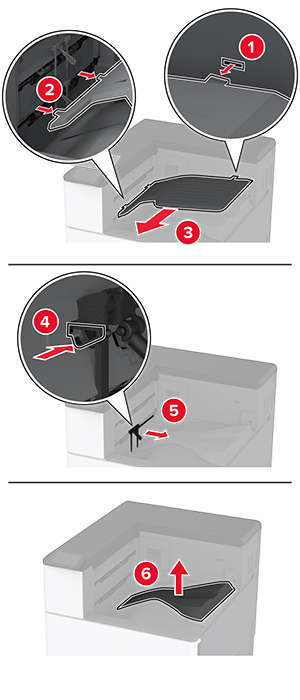
拆開小冊子分頁裝訂器的包裝,並移除所有的包裝材料。
打開小冊子分頁裝訂器門。
移除小冊子分頁裝訂器內部的包裝材料。
插入裝釘匣容器。
插入打孔箱。
關上小冊子分頁裝訂器門。
插入出紙槽。
插入小冊子分頁裝訂器電纜。
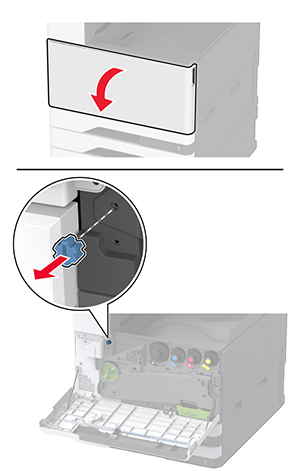
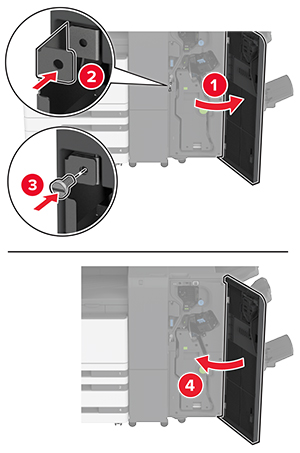
卸下標準出紙槽。
打開前門,然後卸下藍色旋鈕。
移除標準出紙槽側蓋板。
關閉前門。
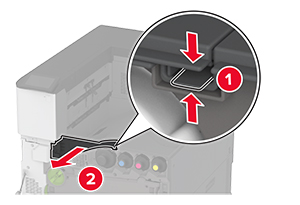
連接分頁裝訂器的支架。
插入紙張傳輸,然後使用螺絲固定它。
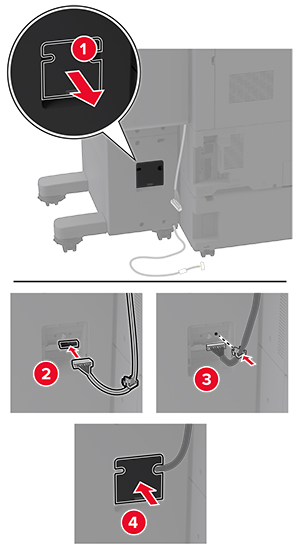
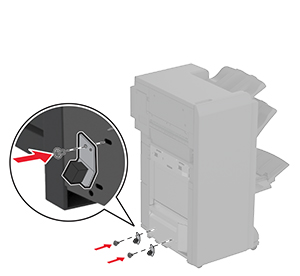
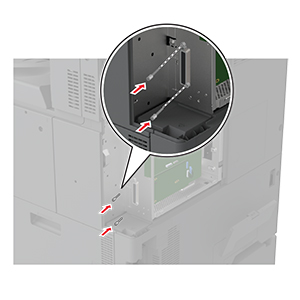
卸下後側連接埠蓋板。
固定電纜。
連接後側連接埠蓋板。
連接分頁裝訂器底部的支架。
打開小冊子分頁裝訂器門。
使用一字螺絲起子來移除螺絲,然後關閉分頁裝訂器門。
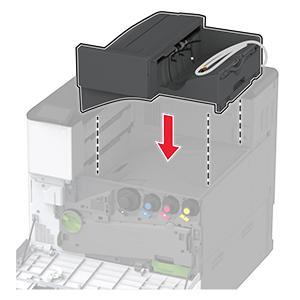
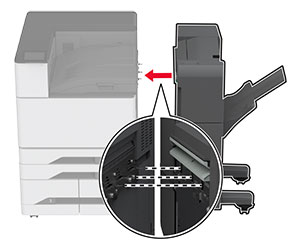
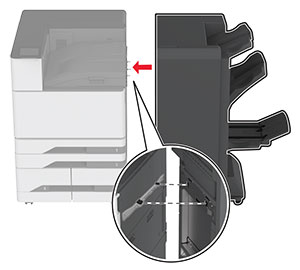
將分頁裝訂器連接至印表機。
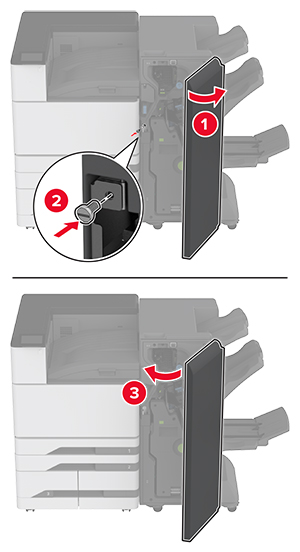
打開分頁裝訂器門,使用螺絲將分頁裝訂器固定至印表機,然後關上門。
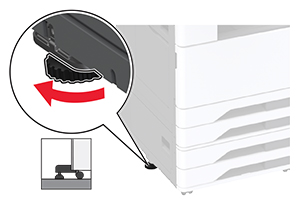
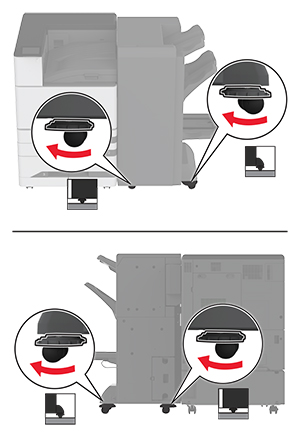
以順時針方向旋轉分頁裝訂器的側邊腳輪,請確認分頁裝訂器的周圍高度相同。
將電纜連接至印表機連接埠和分頁裝訂器連接埠。
將電源線連接至印表機,然後再連接至電源插座。
請當心—潛在受傷危險性: 為避免發生火災或觸電的危險,請將電源線連接至產品附近額定電壓相符且正確接地的電源插座,以便於使用。開啟印表機電源。
請在列印驅動程式中新增此分頁裝訂器,才能將它用於列印工作。如需詳細資訊,請參閱 在列印驅動程式中新增可用選購品。
請當心—觸電危險: 為避免發生電擊的風險,若您是在安裝印表機之後,才要取用控制板或安裝選購性硬體或記憶裝置,請先關閉印表機電源,並從電源插座拔除電源線,再繼續作業。若您有任何其他裝置連接至印表機,請同時關閉它們的電源,並拔下所有連接到印表機的電纜。關閉印表機電源。
從電源插座拔除電源線,然後再從印表機拔除。
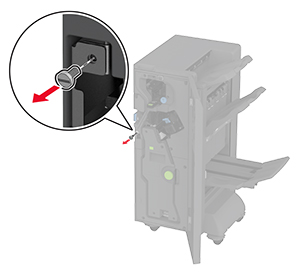
從印表機拔除小冊子分頁裝訂器電纜。
打開小冊子分頁裝訂器門,使用一字螺絲起子來卸下螺絲和金屬支架,然後關上門。
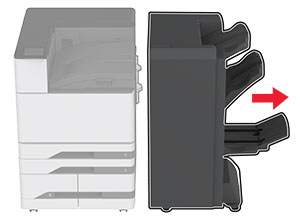
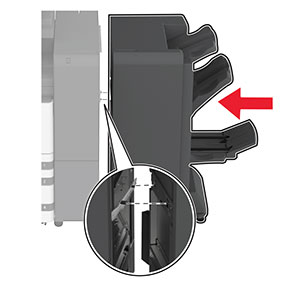
卸下小冊子分頁裝訂器。
拆開三摺/Z 型摺疊分頁裝訂器的包裝,並移除所有的包裝材料。
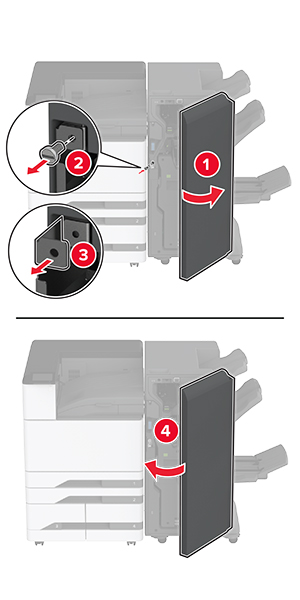
打開分頁裝訂器門。
卸下三摺出紙槽,將螺絲連接至出紙槽,然後插入出紙槽。
使用一字螺絲起子來連接三摺/Z 型摺疊分頁裝訂器的安裝支架,卸下螺絲,然後關閉分頁裝訂器門。

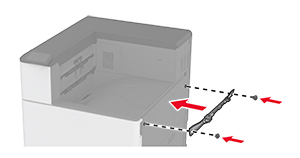
將三摺/Z 型摺疊分頁裝訂器連接至印表機。

打開三摺/Z 型摺疊分頁裝訂器門,使用螺絲將分頁裝訂器固定至印表機,然後關閉分頁裝訂器門。
卸下扳手,調整水平調整螺絲,以確保分頁裝訂器前方的高度與印表機一樣。
調整水平調整螺絲,以確保分頁裝訂器後方的高度與印表機一樣。
將扳手連接至三摺/Z 型摺疊分頁裝訂器。
將小冊子分頁裝訂器連接至三摺/Z 型摺疊分頁裝訂器。
打開小冊子分頁裝訂器門,使用螺絲將小冊子分頁裝訂器固定至三摺/Z 型摺疊分頁裝訂器,然後關上小冊子分頁裝訂器門。
調整水平調整螺絲,以確保分頁裝訂器周圍高度一樣。
將電纜連接至印表機連接埠和分頁裝訂器連接埠。
將印表機和分頁裝訂器電源線連接至印表機和分頁裝訂器,然後再連接至電源插座。
請當心—潛在受傷危險性: 為避免發生火災或觸電的危險,請將電源線連接至產品附近額定電壓相符且正確接地的電源插座,以便於使用。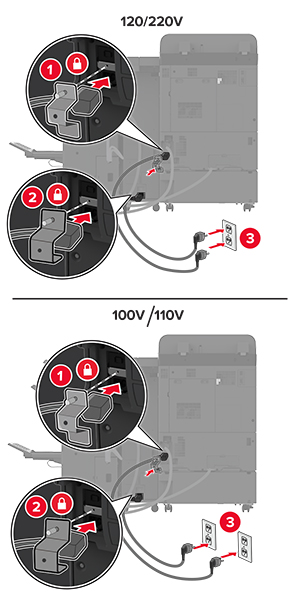
開啟印表機電源。
請在列印驅動程式中新增此分頁裝訂器,才能將它用於列印工作。如需詳細資訊,請參閱 在列印驅動程式中新增可用選購品。
請當心—觸電危險: 為避免發生電擊的風險,若您是在安裝印表機之後,才要取用控制板或安裝選購性硬體或記憶裝置,請先關閉印表機電源,並從電源插座拔除電源線,再繼續作業。若您有任何其他裝置連接至印表機,請同時關閉它們的電源,並拔下所有連接到印表機的電纜。關閉印表機電源。
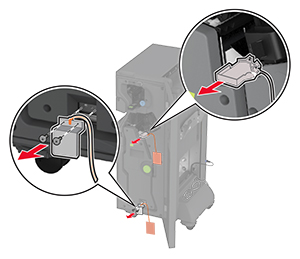
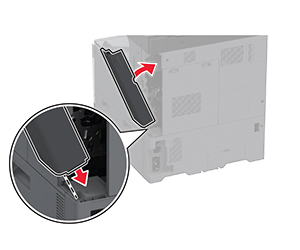
卸下後側連接埠蓋板。
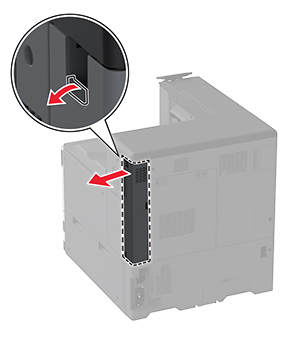
從電源插座拔除電源線,然後再從印表機拔除。
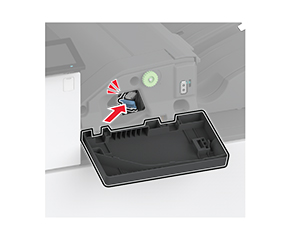
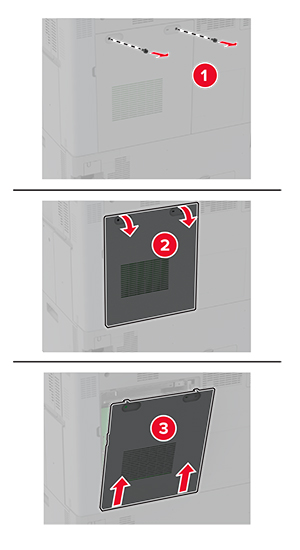
使用一字螺絲起子來卸下控制板存取蓋。

拆開硬碟的包裝。
將硬碟連接至控制板。
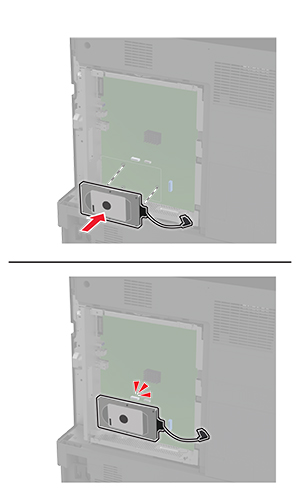
將硬碟連結器電纜連接至控制板。
連接控制板存取蓋。
連接後側連接埠蓋板。
將電源線連接至電源插座,然後開啟印表機電源。
請當心—潛在受傷危險性: 為避免發生火災或觸電的危險,請將電源線連接至產品附近額定電壓相符且正確接地的電源插座,以便於使用。 請當心—觸電危險: 為避免發生電擊的風險,若您是在安裝印表機之後,才要取用控制板或安裝選購性硬體或記憶裝置,請先關閉印表機電源,並從電源插座拔除電源線,再繼續作業。若您有任何其他裝置連接至印表機,請同時關閉它們的電源,並拔下所有連接到印表機的電纜。關閉印表機電源,然後從電源插座拔掉電源線。
使用一字螺絲起子來卸下控制板存取蓋。
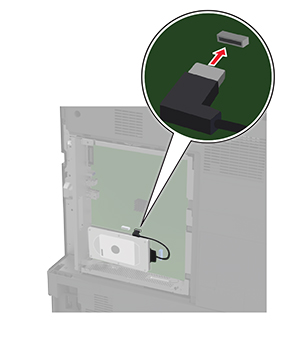
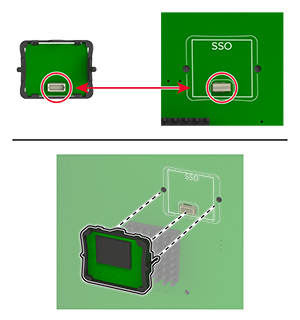
安裝智慧型儲存磁碟機 (ISD)。
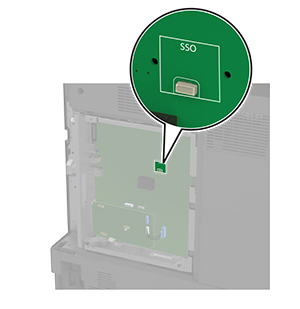
尋找 ISD 連結器。
將卡片插入 ISD 連結器。
連接控制板存取蓋。
將電源線連接至電源插座,然後開啟印表機電源。
請當心—潛在受傷危險性: 為避免發生火災或觸電的危險,請將電源線連接至產品附近額定電壓相符且正確接地的電源插座,以便於使用。關閉印表機電源。
將異丙醇噴灑在柔軟無棉絮的布料上,然後擦拭 USB 連接埠周圍的表面。
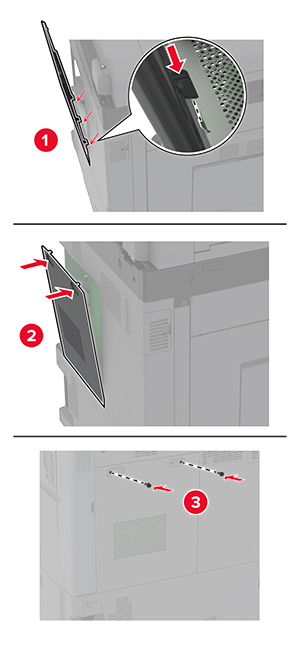
安裝無線模組。
請注意:
檢查模組與印表機之間是否有縫隙,如有必要,請連接間隔匣模組。

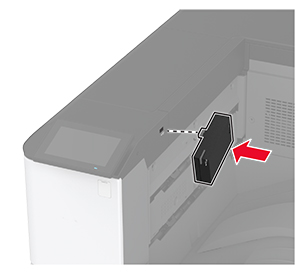
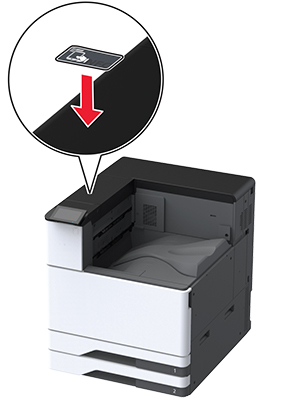
連接 NFC 卡片。
開啟印表機電源。
請當心—觸電危險: 為避免發生電擊的風險,若您是在安裝印表機之後,才要取用控制板或安裝選購性硬體或記憶裝置,請先關閉印表機電源,並從電源插座拔除電源線,再繼續作業。若您有任何其他裝置連接至印表機,請同時關閉它們的電源,並拔下所有連接到印表機的電纜。關閉印表機電源,然後從電源插座拔掉電源線。
卸下後側連接埠蓋板。
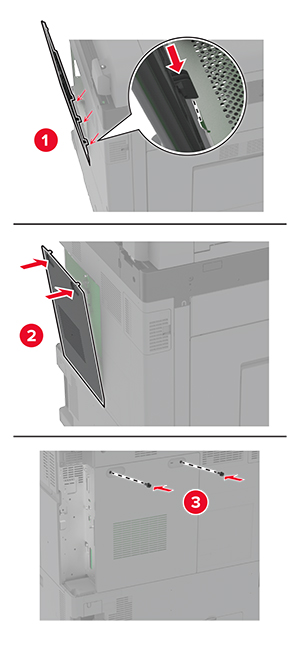
使用一字螺絲起子來卸下控制板存取蓋。
卸下內部解決方案連接埠 (ISP) 蓋板。
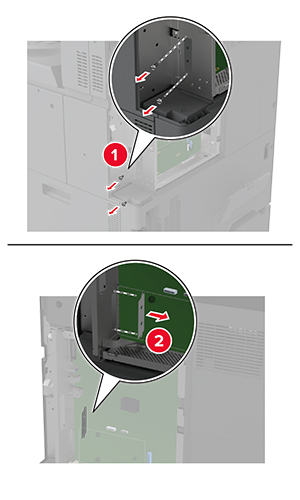
拆開 ISP 套件的包裝。
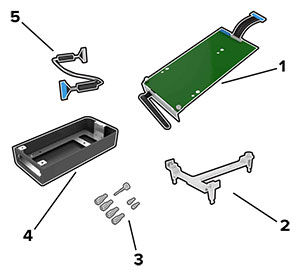
1 | ISP |
2 | 裝載支架 |
3 | 指旋螺絲 |
4 | 外殼 請注意: 此印表機型號不適用。 |
5 | ISP 延長電纜 |
將裝載支架連接至控制板。
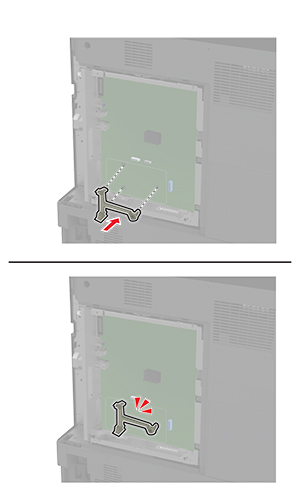
將 ISP 連接至裝載支架。
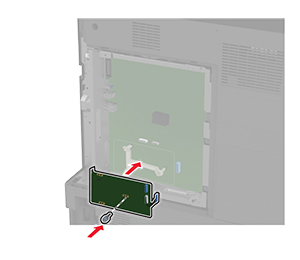
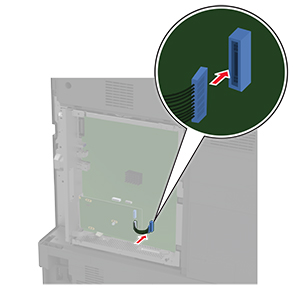
將 ISP 延長電纜連接至控制板上的 ISP 連結器。
將 ISP 固定至印表機。
連接控制板存取蓋。
連接後側連接埠蓋板。
將電源線連接至電源插座,然後開啟印表機電源。
請當心—潛在受傷危險性: 為避免發生火災或觸電的危險,請將電源線連接至產品附近額定電壓相符且正確接地的電源插座,以便於使用。