การเปลี่ยนตลับหมึก
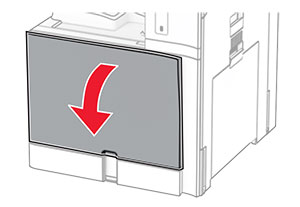
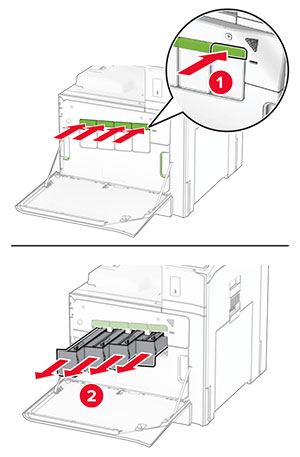
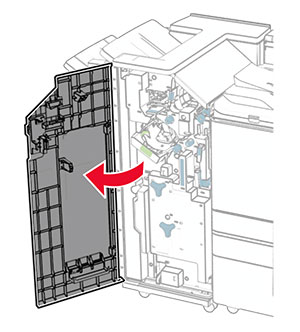
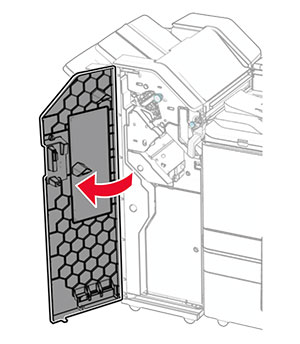
เปิดฝาด้านหน้า
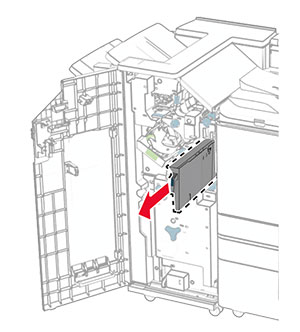
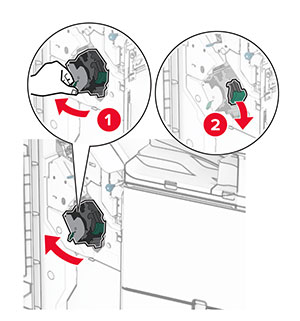
นำตลับหมึกที่ใช้แล้วออก
นำตลับหมึกใหม่ออกจากบรรจุภัณฑ์
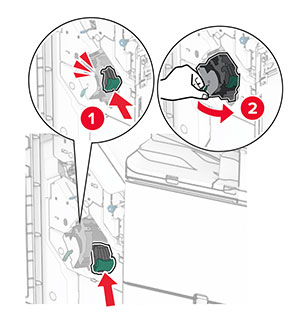
ใส่กลักหมึกใหม่เข้าไปให้มีเสียงคลิกเข้าที่
ปิดฝา
เปิดฝาด้านหน้า
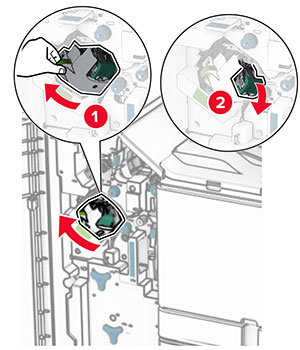
นำตลับหมึกที่ใช้แล้วออก
นำตลับหมึกใหม่ออกจากบรรจุภัณฑ์
ใส่กลักหมึกใหม่เข้าไปให้มีเสียงคลิกเข้าที่
ปิดฝา
เปิดฝาด้านหน้า
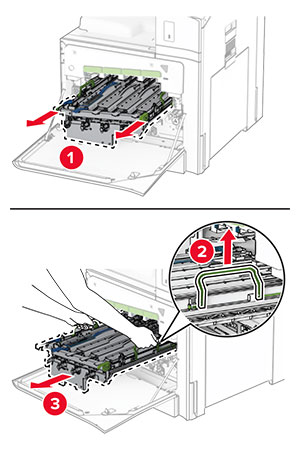
นำกลักหมึกออก
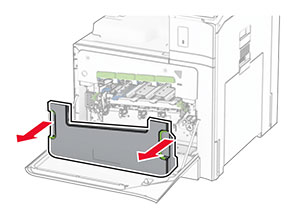
นำขวดผงหมึกสำหรับทิ้งออก
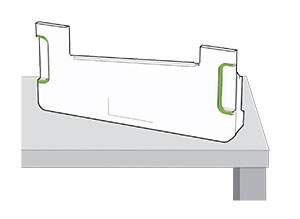
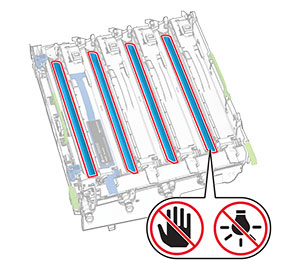
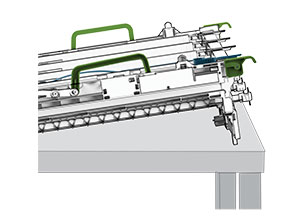
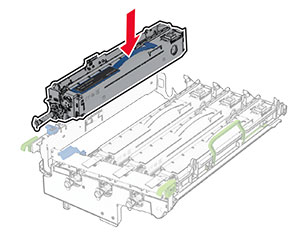
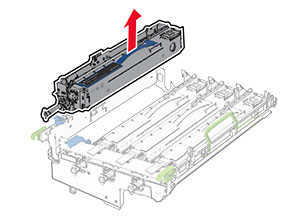
นำชุดสร้างภาพออก
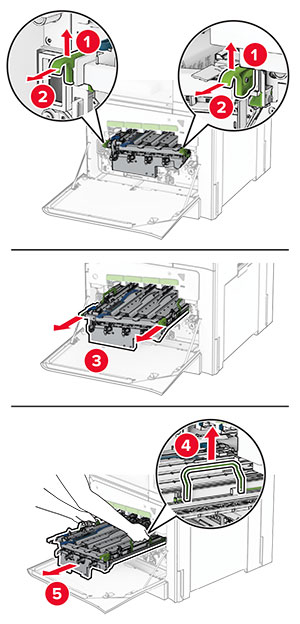
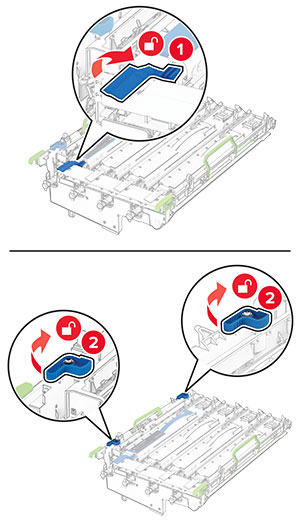
ปลดล็อคชุดสร้างภาพขาวดำที่ใช้แล้ว
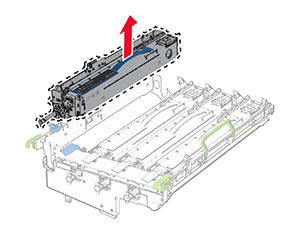
นำชุดสร้างภาพขาวดำที่ใช้แล้วออก
นำชุดสร้างภาพขาวดำใหม่ออกจากบรรจุภัณฑ์
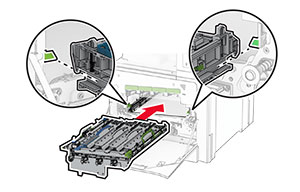
ใส่ชุดสร้างภาพขาวดำใหม่
ล็อคชุดสร้างภาพขาวดำใหม่ให้เข้าที่

ใส่ชุดสร้างภาพลงไปจนเข้าที่
ใส่ขวดผงหมึกสำหรับทิ้งให้มีเสียงคลิกเข้าที่

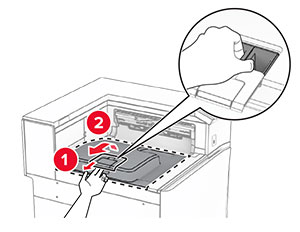
ค่อย ๆ ดันตัวเช็ดหัวพิมพ์ออก แล้วทำความสะอาดเลนส์หัวพิมพ์
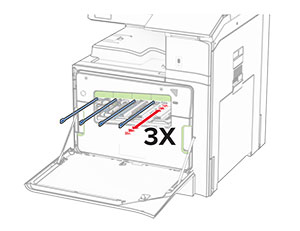
สำหรับข้อมูลเพิ่มเติมเกี่ยวกับการทำความสะอาดเลนส์หัวพิมพ์ โปรดดู การทำความสะอาดเลนส์หัวพิมพ์
ใส่กลักหมึก

ปิดฝา
เปิดฝาด้านหน้า
นำกลักหมึกออก
นำขวดผงหมึกสำหรับทิ้งออก
ถอดชุดสร้างภาพที่ใช้แล้วออก
ปลดล็อคชุดสร้างภาพ
นำชุดสร้างภาพขาวดำออก
นำชุดสร้างภาพใหม่ออกจากกล่อง
ใส่ชุดสร้างภาพขาวดำเข้ากับชุดสร้างภาพใหม่
ล็อคชุดสร้างภาพขาวดำให้เข้าที่
ใส่ชุดสร้างภาพใหม่ลงไปจนเข้าที่
ใส่ขวดผงหมึกสำหรับทิ้งให้มีเสียงคลิกเข้าที่
ค่อย ๆ ดันตัวเช็ดหัวพิมพ์ออก แล้วทำความสะอาดเลนส์หัวพิมพ์
สำหรับข้อมูลเพิ่มเติมเกี่ยวกับการทำความสะอาดเลนส์หัวพิมพ์ โปรดดู การทำความสะอาดเลนส์หัวพิมพ์
ใส่กลักหมึก
ปิดฝา
เปิดฝาด้านหน้า
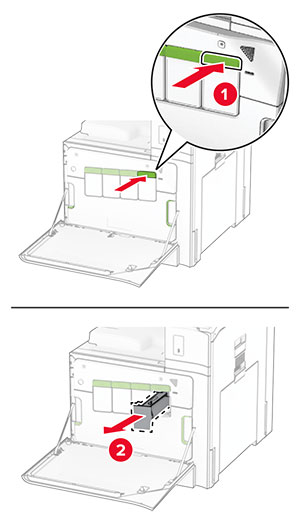
นำขวดผงหมึกสำหรับทิ้งที่ใช้แล้วออก
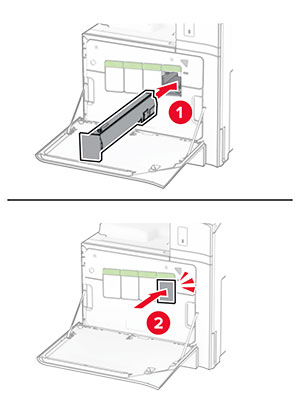
นำขวดผงหมึกสำหรับทิ้งขวดใหม่ออกมาจากบรรจุภัณฑ์
ใส่ขวดผงหมึกสำหรับทิ้งจนมีเสียงคลิกเข้าที่ แล้วจึงปิดฝา
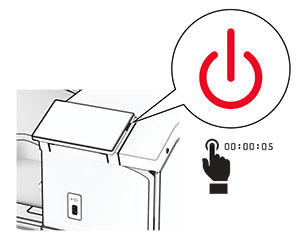
ปิดเครื่องพิมพ์
ถอดปลั๊กสายไฟของแหล่งจ่ายไฟออกจากเต้าเสียบ แล้วจึงปลดออกจากเครื่องพิมพ์
เปิดฝาปิด B
 ข้อควรระวัง—อันตรายจากการเอียง: ด้านในของเครื่องพิมพ์อาจร้อน เพื่อลดความเสี่ยงต่อการบาดเจ็บจากชิ้นส่วนที่ร้อน ควรปล่อยให้พื้นผิวเย็นลงก่อนสัมผัส
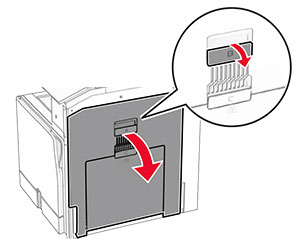
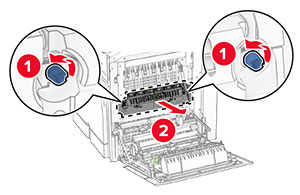
ปลดล็อค แล้วนำฟิวเซอร์ที่ใช้แล้วออก
ปลดล็อคฟิวเซอร์ใหม่
ใส่ฟิวเซอร์ใหม่จนกว่าจะมีเสียงคลิกเข้าที่ แล้วจึงทำการล็อค
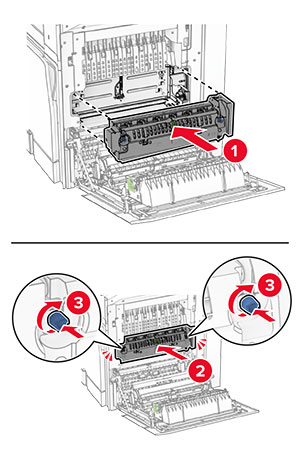
ปิดฝาปิด B
เสียบปลายด้านหนึ่งของสายไฟเข้ากับเครื่องพิมพ์ และอีกด้านหนึ่งเข้ากับเต้าเสียบ
 ข้อควรระวัง—อาจเกิดการบาดเจ็บ: เพื่อหลีกเลี่ยงความเสี่ยงต่อการเกิดไฟไหม้หรือไฟฟ้าช็อต เชื่อมต่อสายไฟเข้ากับเต้าเสียบที่ได้รับการจัดระดับที่เหมาะสมและต่อลงดินอย่างเหมาะสมซึ่งอยู่ใกล้ผลิตภัณฑ์และเข้าถึงได้ง่าย
เปิดเครื่องพิมพ์
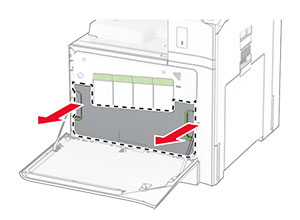
ดึงถาดรองกระดาษที่ใช้แล้วออก
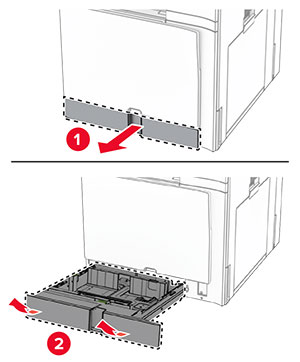
นำถาดรองกระดาษใหม่ออกจากบรรจุภัณฑ์
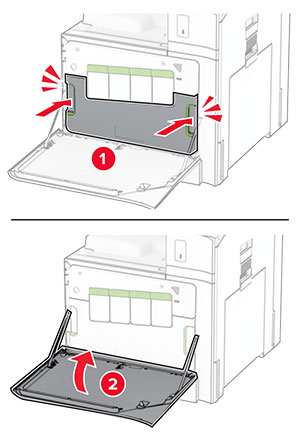
ใส่ถาดรองกระดาษใหม่

ดึงถาดออกมา
นำตัวนำกระดาษด้านข้างที่ใช้แล้วออก
นำตัวนำกระดาษด้านข้างใหม่ออกจากบรรจุภัณฑ์
ใส่ตัวนำกระดาษด้านข้างใหม่จนกระทั่งมีเสียงคลิกเข้าที่

ใส่ถาดกระดาษ
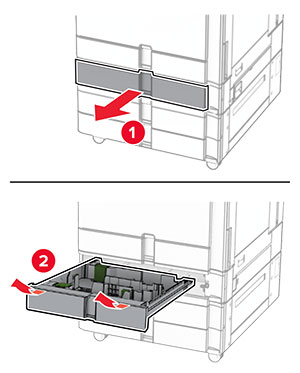
ถอดฝาครอบถาดที่ใช้แล้วออก
นำฝาครอบถาดใหม่ออกจากบรรจุภัณฑ์
ใส่ฝาครอบถาดใหม่ให้มีเสียงคลิกเข้าที่
นำส่วนขยายถาดด้านบนที่ใช้แล้วออก
นำส่วนขยายถาดด้านบนใหม่ออกจากบรรจุภัณฑ์
ใส่ส่วนขยายถาดด้านบนใหม่เข้าไป
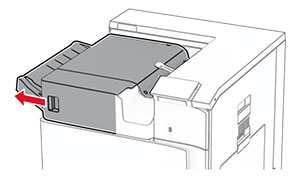
เปิดฝาปิดถาดรับงานพิมพ์
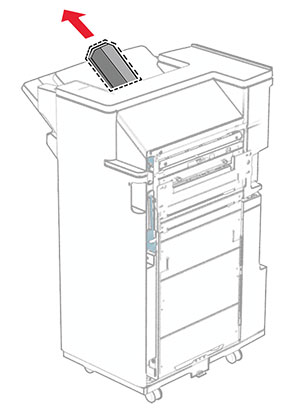
นำกล่องอุปกรณ์ตอกรูที่ใช้แล้วออก
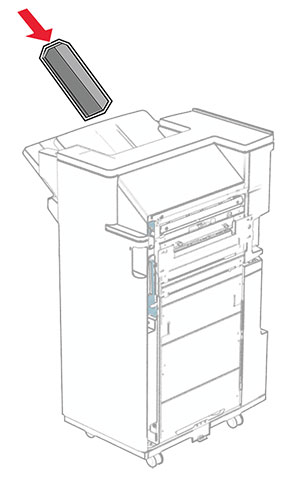
นำกล่องอุปกรณ์ตอกรูใหม่ออกจากบรรจุภัณฑ์
ใส่กล่องอุปกรณ์ตอกรูใหม่เข้าไป
ปิดฝาถาดรับงานพิมพ์
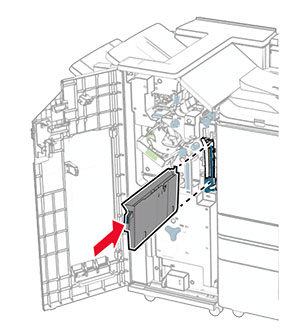
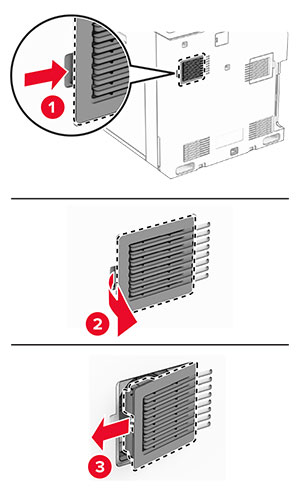
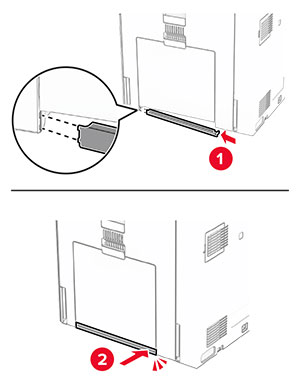
ถอดฝาครอบพัดลมที่ใช้แล้วออก
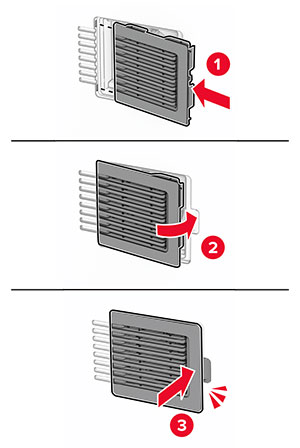
นำฝาครอบใหม่ออกจากบรรจุภัณฑ์
ใส่ฝาครอบใหม่ให้มีเสียงคลิกเข้าที่
ถอดฝาครอบด้านขวาที่ใช้แล้วออก
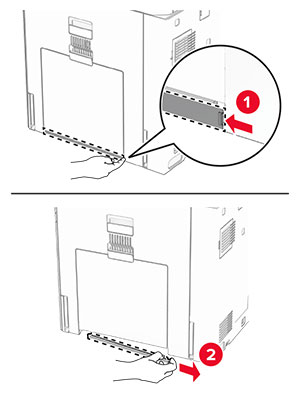
นำฝาครอบใหม่ออกจากบรรจุภัณฑ์
ใส่ฝาครอบใหม่ให้มีเสียงคลิกเข้าที่
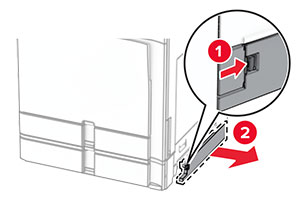
นำถาดมาตรฐานออก

นำฝาครอบจุดเชื่อมต่ออุปกรณ์ส่งกระดาษที่ใช้แล้วออก
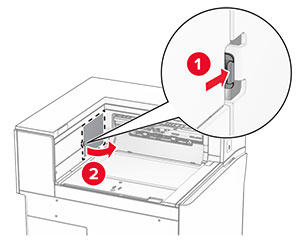
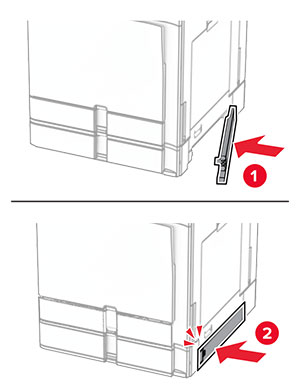
นำฝาครอบจุดเชื่อมต่อใหม่ออกจากบรรจุภัณฑ์
ติดฝาครอบจุดเชื่อมต่อใหม่จนมีเสียงคลิกเข้าที่
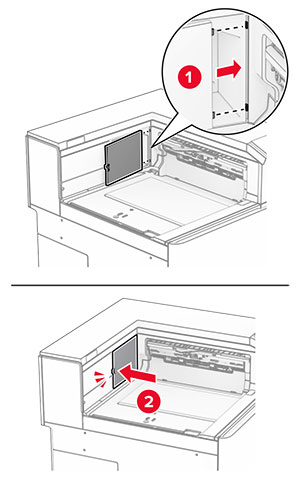
ติดถาดมาตรฐาน

จับที่จับ F แล้วเลื่อนอุปกรณ์เย็บเล่มแบบใช้ลวดเย็บไปทางซ้าย
นำตลับใส่ลวดเย็บกระดาษออก
นำตลับลวดเย็บที่ว่างออก
ใส่ตลับลวดเย็บใหม่เข้าไปให้มีเสียงคลิกเข้าที่
ใส่ที่ใส่ตลับลวดเย็บเข้าไปให้มีเสียงคลิกเข้าที่
เลื่อนอุปกรณ์เย็บเล่มแบบใช้ลวดเย็บไปทางขวา
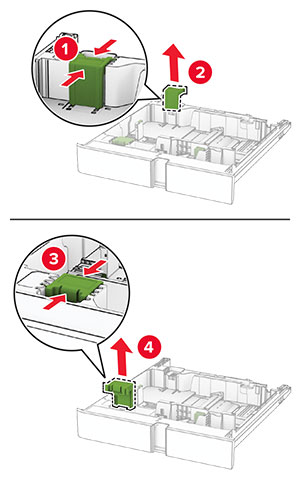
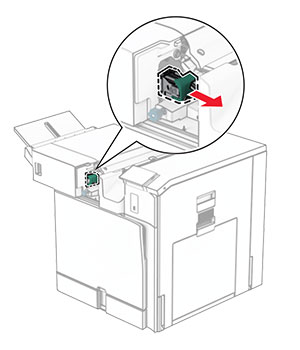
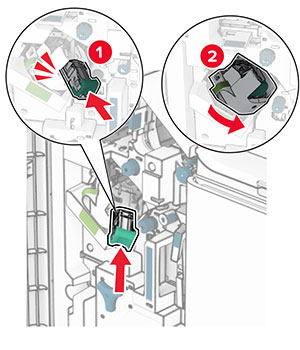
เปิดฝาปิด H
ดึงตัวจับสีเขียวออก แล้วนำที่ใส่ตลับลวดเย็บออก
นำตลับลวดเย็บที่ว่างออก
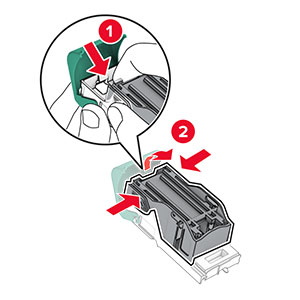
นำตลับลวดเย็บใหม่ออกมาจากบรรจุภัณฑ์
ใส่ตลับลวดเย็บใหม่เข้าไปให้มีเสียงคลิกเข้าที่
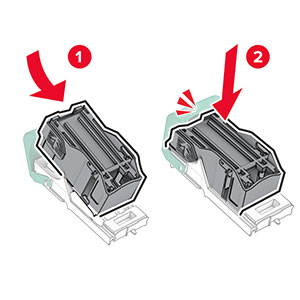
ใส่ที่ใส่ตลับลวดเย็บเข้าไปให้มีเสียงคลิกเข้าที่
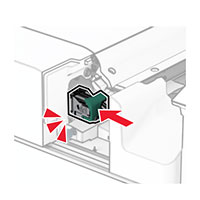
ปิดฝาปิด H
เปิดฝาปิด H
ดึงตัวจับสีเขียวออก แล้วนำที่ใส่ตลับลวดเย็บออก
นำตลับลวดเย็บที่ว่างออก
นำตลับลวดเย็บใหม่ออกมาจากบรรจุภัณฑ์
ใส่ตลับลวดเย็บใหม่เข้าไปให้มีเสียงคลิกเข้าที่
ใส่ที่ใส่ตลับลวดเย็บเข้าไปให้มีเสียงคลิกเข้าที่
ปิดฝาปิด H
เปิดฝาปิดถาดรับงานพิมพ์
ดึงตัวทำ Booklet ออก แล้วนำที่ใส่ตลับลวดเย็บที่ใช้แล้วออก
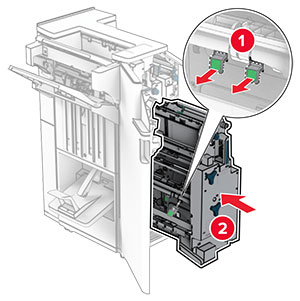
นำที่ใส่ตลับลวดเย็บใหม่ออกมาจากบรรจุภัณฑ์
ใส่ที่ใส่ตลับลวดเย็บใหม่เข้าไป
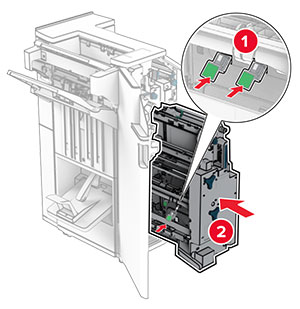
ใส่ตัวทำ Booklet แล้วปิดฝาปิดถาดรับงานพิมพ์
จากแผงควบคุม ไปที่ การตั้งค่า > อุปกรณ์ > การดูแลรักษา > เมนูการกำหนดค่า > การใช้วัสดุสิ้นเปลืองและตัวนับ
เลือกตัวนับที่คุณต้องการรีเซ็ต