安装信封进纸匣
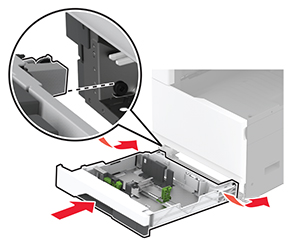
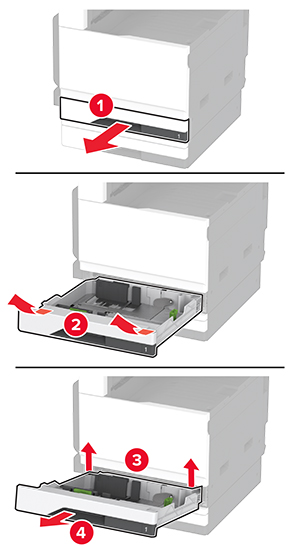
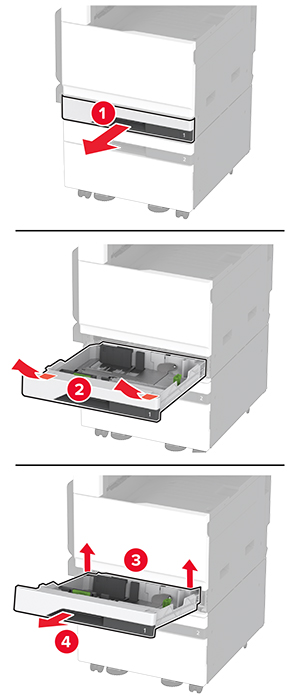
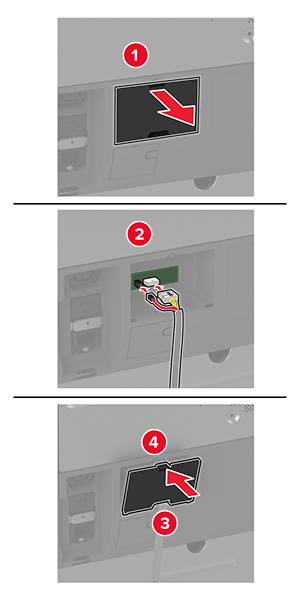
移除标准进纸匣。
注意: 不要扔掉标准进纸匣。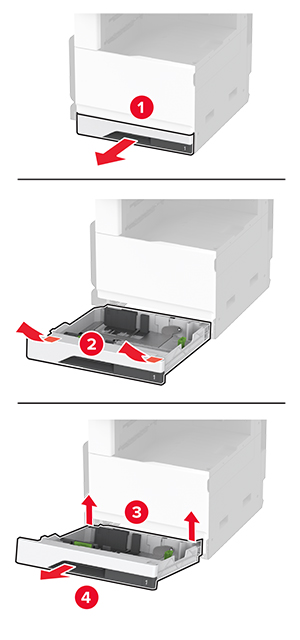
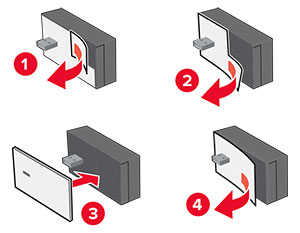
拆开信封进纸匣的包装,然后去除所有包装材料。
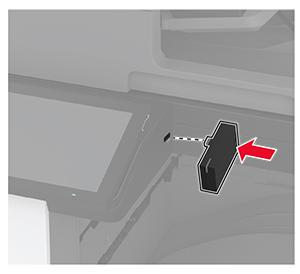
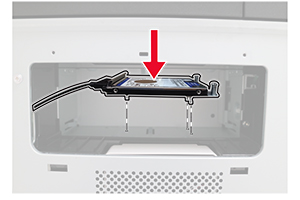
插入信封进纸匣。
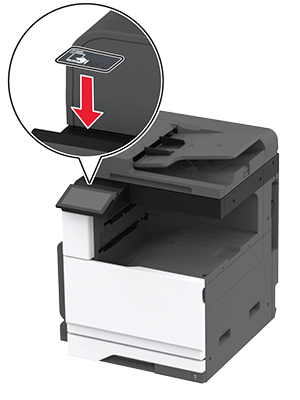
要使信封进纸匣可用于打印作业,请在主屏幕中触摸设置 > 设备 > 维护 > 配置菜单 > 进纸匣配置 > 信封进纸匣设置 > 开。
移除标准进纸匣。
拆开信封进纸匣的包装,然后去除所有包装材料。
插入信封进纸匣。
要使信封进纸匣可用于打印作业,请在主屏幕中触摸设置 > 设备 > 维护 > 配置菜单 > 进纸匣配置 > 信封进纸匣设置 > 开。
 小心—电击危险: 为避免电击危险,如果您在设置完打印机后访问控制器主板或者安装可选的硬件或内存设备,请在继续操作之前先关闭打印机电源并从电源插座中拔掉电源线。如果您还有其他设备连接在打印机上,也应关闭它们的电源并拔掉所有连接到打印机上的电缆。
关闭打印机电源。
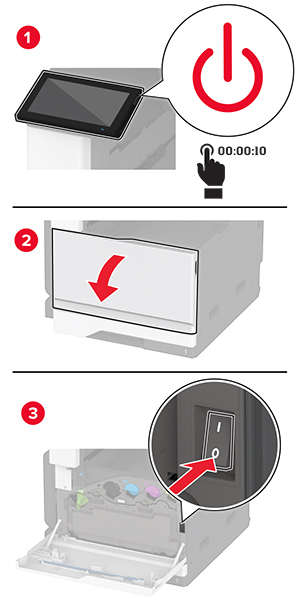
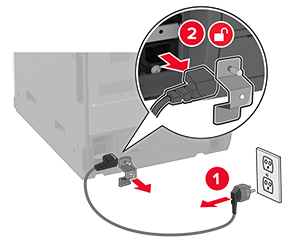
从电源插座上拔掉电源线,然后从打印机上拔掉电源线。
拆开进纸匣选件的包装,然后去除所有包装材料。
将打印机与进纸匣选件对齐,然后将打印机向下放到位。
 小心—可能的伤害: 如果打印机的重量大于 20 千克(44 磅),则可能需要两人或更多人才能安全地抬起它。
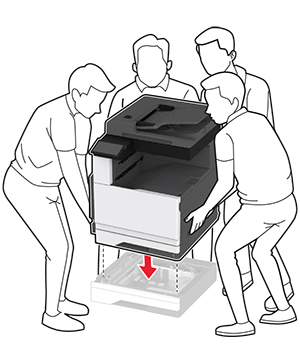
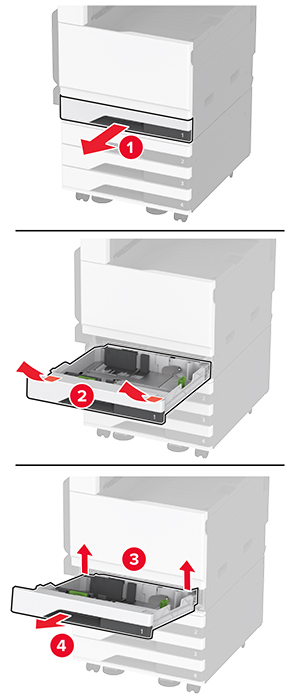
移除标准进纸匣。
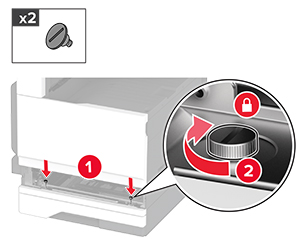
使用螺钉将进纸匣选件固定到打印机上。
插入标准进纸匣。
从打印机的后部移除连接器盖板。
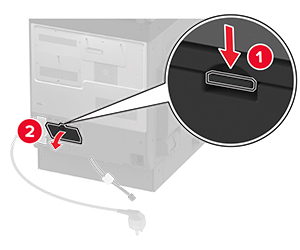
将进纸匣连接器连接到打印机上,然后安装盖板。
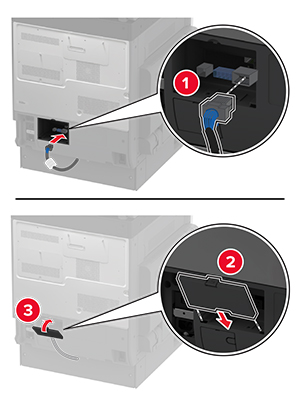
将进纸匣选件的后部固定到打印机上。
将电源线连接到打印机上,然后连接到电源插座上。
小心—可能的伤害: 为避免火灾或电击危险,请将电源线连接到具有适当额定电压并正确接地的电源插座上,该插座应该靠近产品并且便于使用。打开打印机电源。
在打印驱动程序中添加进纸匣以使它可用于打印作业。如需更多信息,请参阅在打印驱动程序中添加可用选件。
小心—电击危险: 为避免电击危险,如果您在设置完打印机后访问控制器主板或者安装可选的硬件或内存设备,请在继续操作之前先关闭打印机电源并从电源插座中拔掉电源线。如果您还有其他设备连接在打印机上,也应关闭它们的电源并拔掉所有连接到打印机上的电缆。关闭打印机电源。
从电源插座上拔掉电源线,然后从打印机上拔掉电源线。
拆开进纸匣选件的包装,然后去除所有包装材料。
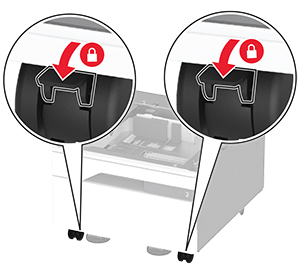
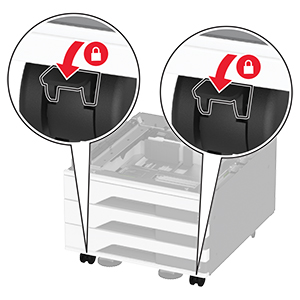
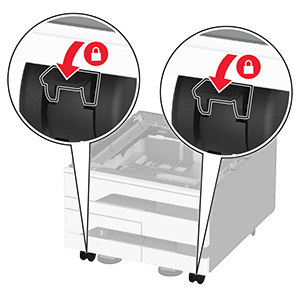
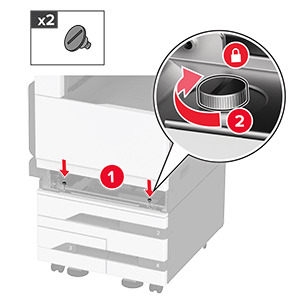
锁定脚轮以防止机柜移动。
将打印机与进纸匣选件对齐,然后将打印机向下放到位。
小心—可能的伤害: 如果打印机的重量大于 20 千克(44 磅),则可能需要两人或更多人才能安全地抬起它。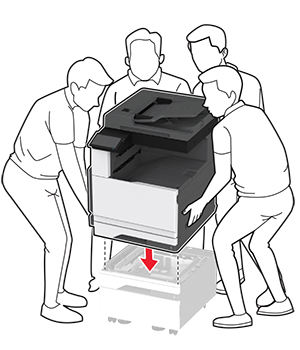
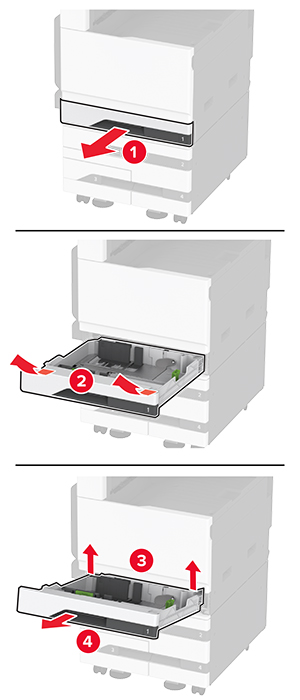
移除标准进纸匣。
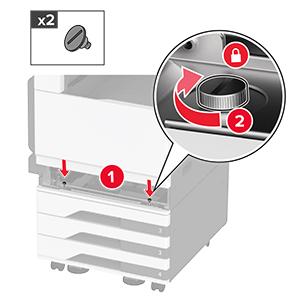
使用螺钉将进纸匣选件固定到打印机上。
插入标准进纸匣。
从打印机的后部移除连接器盖板。
将进纸匣连接器连接到打印机上,然后安装盖板。
将进纸匣选件的后部固定到打印机上。
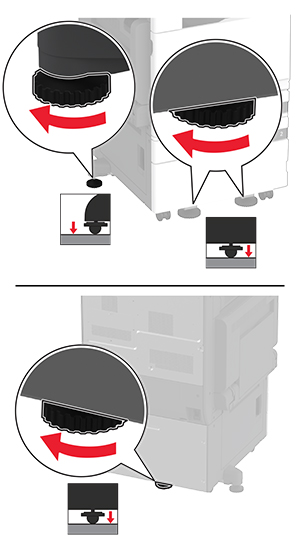
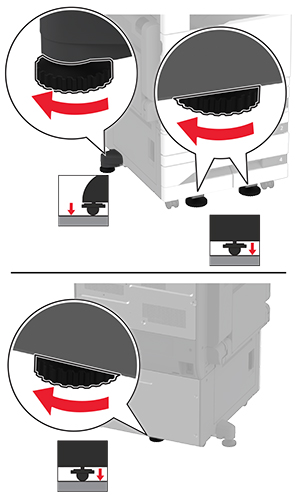
调整调平螺钉以确保打印机的所有侧面高度一致。
将电源线连接到打印机上,然后连接到电源插座上。
小心—可能的伤害: 为避免火灾或电击危险,请将电源线连接到具有适当额定电压并正确接地的电源插座上,该插座应该靠近产品并且便于使用。打开打印机电源。
在打印驱动程序中添加进纸匣以使它可用于打印作业。如需更多信息,请参阅在打印驱动程序中添加可用选件。
小心—电击危险: 为避免电击危险,如果您在设置完打印机后访问控制器主板或者安装可选的硬件或内存设备,请在继续操作之前先关闭打印机电源并从电源插座中拔掉电源线。如果您还有其他设备连接在打印机上,也应关闭它们的电源并拔掉所有连接到打印机上的电缆。关闭打印机电源。
从电源插座上拔掉电源线,然后从打印机上拔掉电源线。
拆开进纸匣选件的包装,然后去除所有包装材料。
锁定脚轮以防止进纸匣移动。
将打印机与进纸匣选件对齐,然后将打印机向下放到位。
小心—可能的伤害: 如果打印机的重量大于 20 千克(44 磅),则可能需要两人或更多人才能安全地抬起它。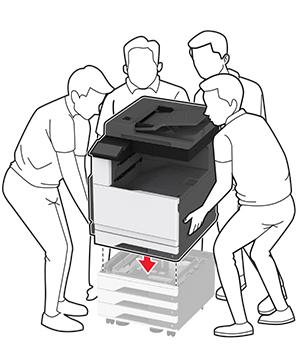
移除标准进纸匣。
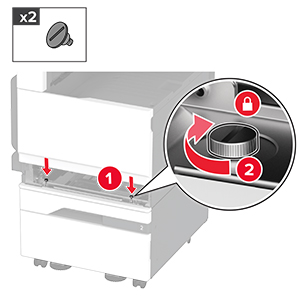
使用螺钉将进纸匣选件固定到打印机上。
插入标准进纸匣。
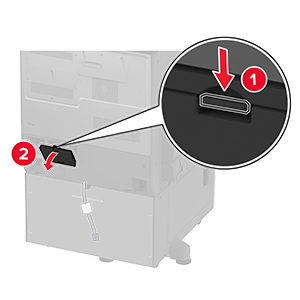
从打印机的后部移除连接器盖板。
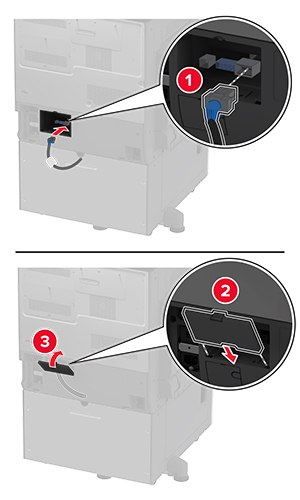
将进纸匣连接器连接到打印机上,然后安装盖板。
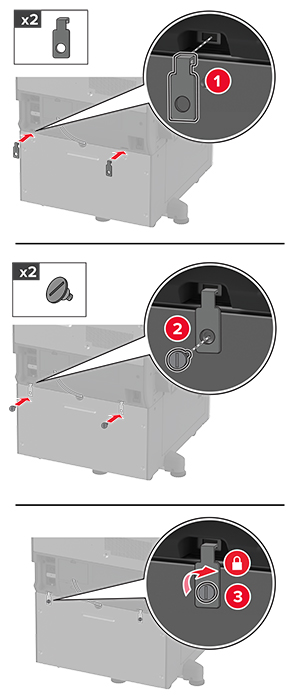
将进纸匣选件的后部固定到打印机上。
调整调平螺钉以确保打印机的所有侧面高度一致。

将电源线连接到打印机上,然后连接到电源插座上。
小心—可能的伤害: 为避免火灾或电击危险,请将电源线连接到具有适当额定电压并正确接地的电源插座上,该插座应该靠近产品并且便于使用。打开打印机电源。
在打印驱动程序中添加进纸匣以使它可用于打印作业。如需更多信息,请参阅在打印驱动程序中添加可用选件。
小心—电击危险: 为避免电击危险,如果您在设置完打印机后访问控制器主板或者安装可选的硬件或内存设备,请在继续操作之前先关闭打印机电源并从电源插座中拔掉电源线。如果您还有其他设备连接在打印机上,也应关闭它们的电源并拔掉所有连接到打印机上的电缆。关闭打印机电源。
从电源插座上拔掉电源线,然后从打印机上拔掉电源线。
拆开进纸匣选件的包装,然后去除所有包装材料。
锁定脚轮以防止进纸匣移动。
将打印机与进纸匣选件对齐,然后将打印机向下放到位。
小心—可能的伤害: 如果打印机的重量大于 20 千克(44 磅),则可能需要两人或更多人才能安全地抬起它。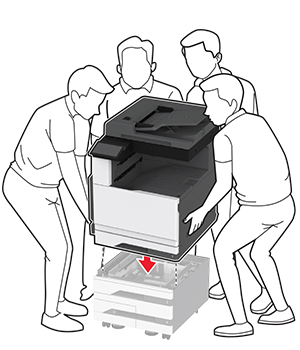
移除标准进纸匣。
使用螺钉将进纸匣选件固定到打印机上。
插入标准进纸匣。
从打印机的后部移除连接器盖板。
将进纸匣连接器连接到打印机上,然后安装盖板。
将进纸匣选件的后部固定到打印机上。
调整调平螺钉以确保打印机的所有侧面高度一致。
将电源线连接到打印机上,然后连接到电源插座上。
小心—可能的伤害: 为避免火灾或电击危险,请将电源线连接到具有适当额定电压并正确接地的电源插座上,该插座应该靠近产品并且便于使用。打开打印机电源。
在打印驱动程序中添加进纸匣以使它可用于打印作业。如需更多信息,请参阅在打印驱动程序中添加可用选件。
小心—电击危险: 为避免电击危险,如果您在设置完打印机后访问控制器主板或者安装可选的硬件或内存设备,请在继续操作之前先关闭打印机电源并从电源插座中拔掉电源线。如果您还有其他设备连接在打印机上,也应关闭它们的电源并拔掉所有连接到打印机上的电缆。关闭打印机电源。
从电源插座上拔掉电源线,然后从打印机上拔掉电源线。
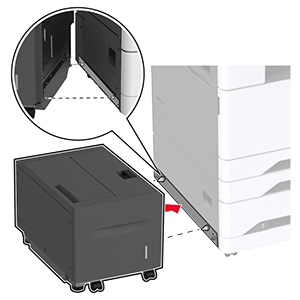
拆开进纸匣选件的包装,然后去除所有包装材料。
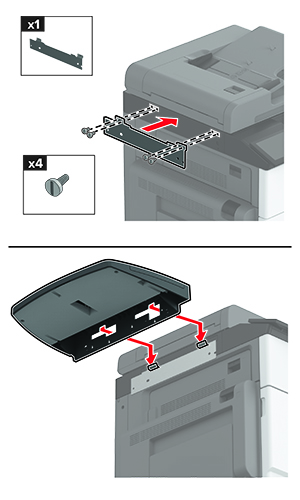
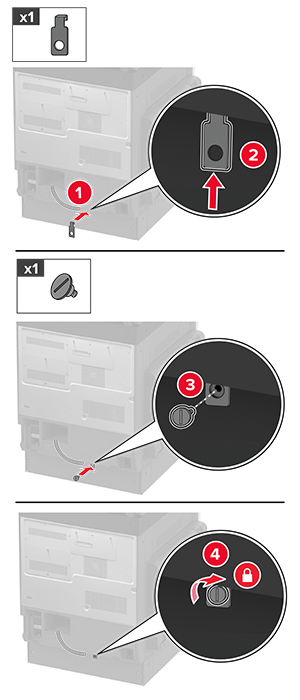
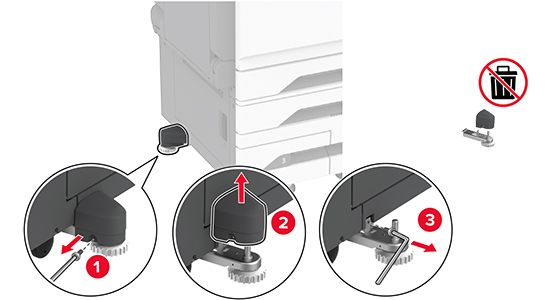
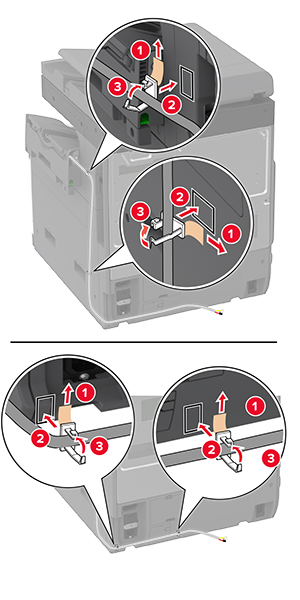
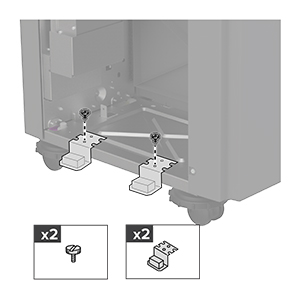
从打印机左侧移除调平螺钉。
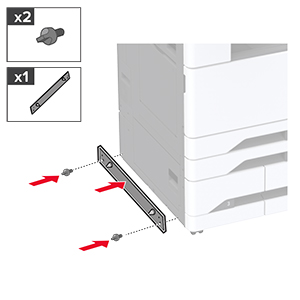
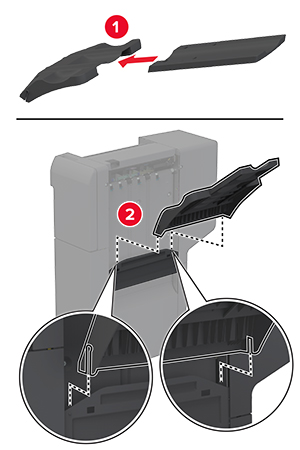
将对接支架安装到打印机上。
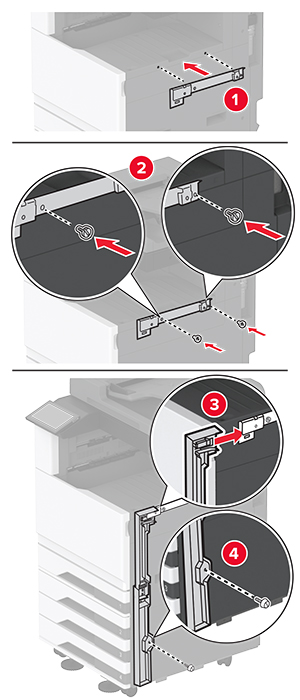
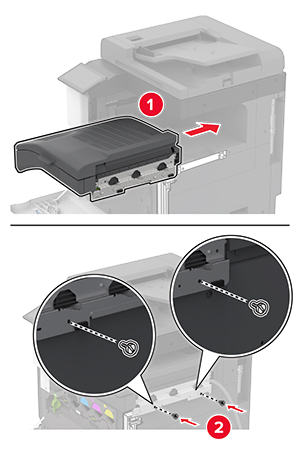
安装进纸匣选件。
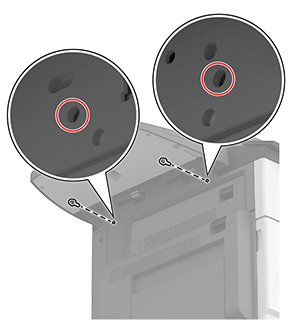
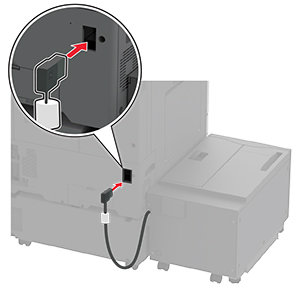
将进纸匣连接器连接到打印机上。
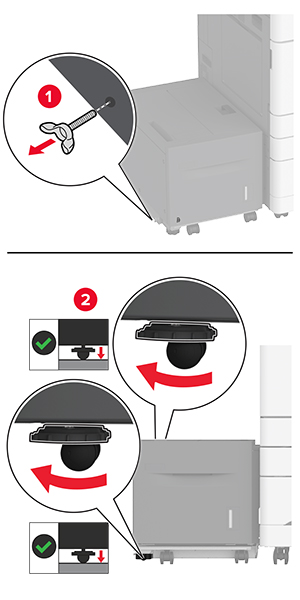
调整调平螺钉以确保进纸匣与打印机的高度一致。
将电源线连接到打印机上,然后连接到电源插座上。
小心—可能的伤害: 为避免火灾或电击危险,请将电源线连接到具有适当额定电压并正确接地的电源插座上,该插座应该靠近产品并且便于使用。打开打印机电源。
在打印驱动程序中添加进纸匣以使它可用于打印作业。如需更多信息,请参阅在打印驱动程序中添加可用选件。
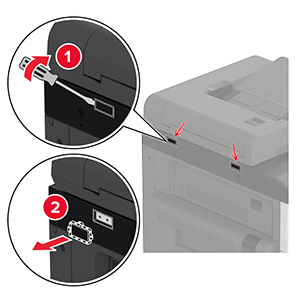
小心—电击危险: 为避免电击危险,如果您在设置完打印机后访问控制器主板或者安装可选的硬件或内存设备,请在继续操作之前先关闭打印机电源并从电源插座中拔掉电源线。如果您还有其他设备连接在打印机上,也应关闭它们的电源并拔掉所有连接到打印机上的电缆。关闭打印机电源。
从电源插座上拔掉电源线,然后从打印机上拔掉电源线。
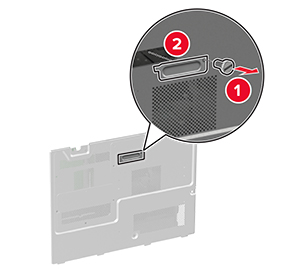
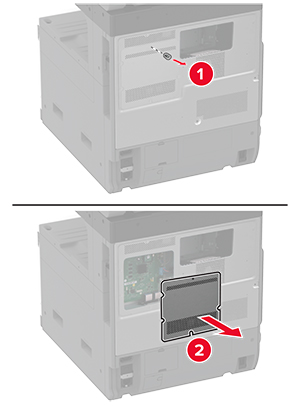
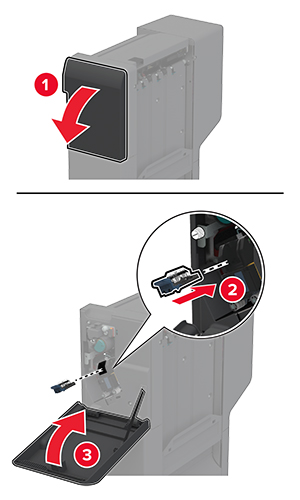
使用平头螺丝起子移除传真盖板。
移除硬盘盖板。

移除控制器板挡板。
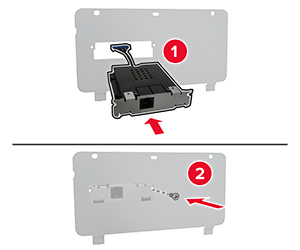
拆开传真卡的包装。
将传真卡安装到硬盘盖板上。
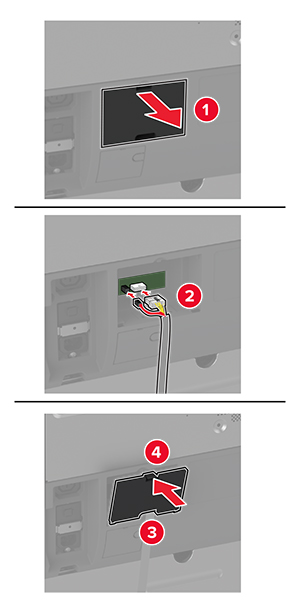
将传真连接器电缆插入控制器板隔层上。
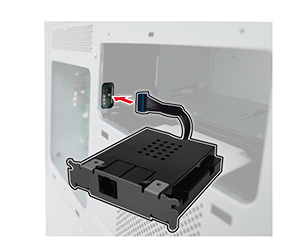
安装硬盘盖板。
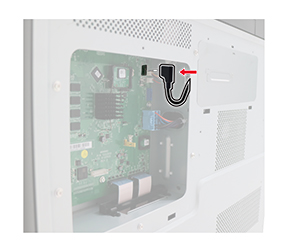
将传真连接器电缆连接到控制器板上。
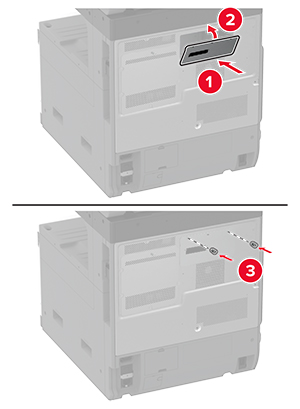
安装控制器板挡板。
将电源线连接到打印机上,然后连接到电源插座上。
小心—可能的伤害: 为避免火灾或电击危险,请将电源线连接到具有适当额定电压并正确接地的电源插座上,该插座应该靠近产品并且便于使用。打开打印机电源。
小心—电击危险: 为避免电击危险,如果您在设置完打印机后访问控制器主板或者安装可选的硬件或内存设备,请在继续操作之前先关闭打印机电源并从电源插座中拔掉电源线。如果您还有其他设备连接在打印机上,也应关闭它们的电源并拔掉所有连接到打印机上的电缆。关闭打印机电源。
从电源插座上拔掉电源线,然后从打印机上拔掉电源线。
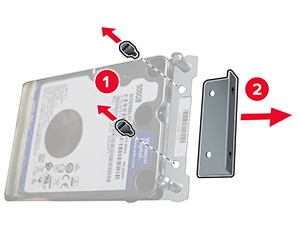
拆开硬盘的包装,然后移除支架。
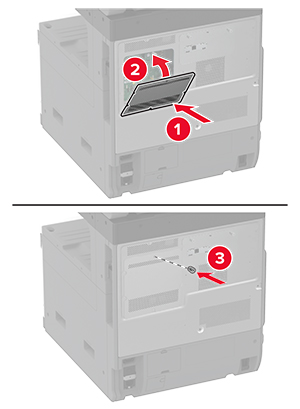
移除硬盘盖板。
移除控制器板挡板。
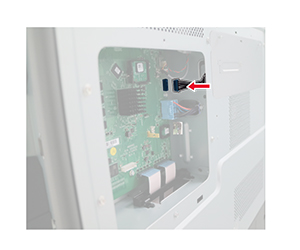
将硬盘连接器电缆插入控制器板隔层上。
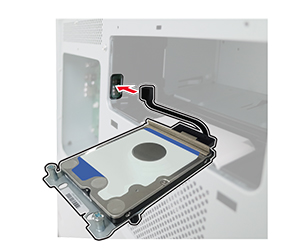
将硬盘放在安装孔上方,然后向下按压直至其卡入到位。
安装硬盘盖板。
将硬盘连接器电缆连接到控制器板上。
安装控制器板挡板。
将电源线连接到电源插座,然后打开打印机电源。
小心—可能的伤害: 为避免火灾或电击危险,请将电源线连接到具有适当额定电压并正确接地的电源插座上,该插座应该靠近产品并且便于使用。 小心—电击危险: 为避免电击危险,如果您在设置完打印机后访问控制器主板或者安装可选的硬件或内存设备,请在继续操作之前先关闭打印机电源并从电源插座中拔掉电源线。如果您还有其他设备连接在打印机上,也应关闭它们的电源并拔掉所有连接到打印机上的电缆。关闭打印机电源。
从电源插座上拔掉电源线,然后从打印机上拔掉电源线。
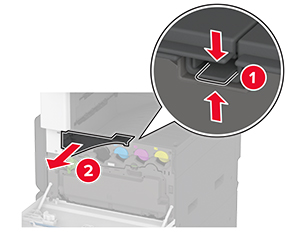
移除标准接纸架。
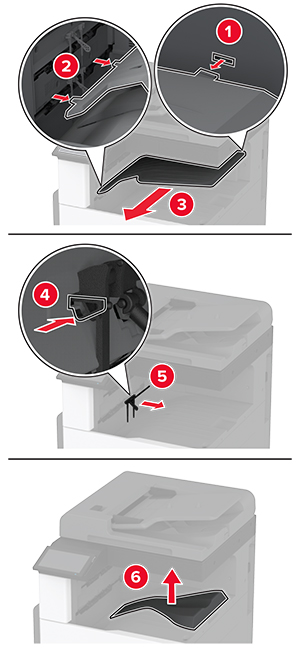
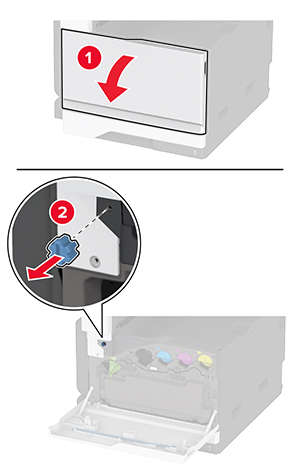
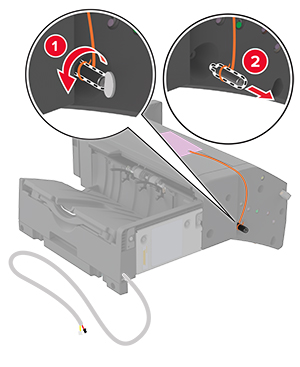
打开前部盖门,然后移除蓝色旋钮。
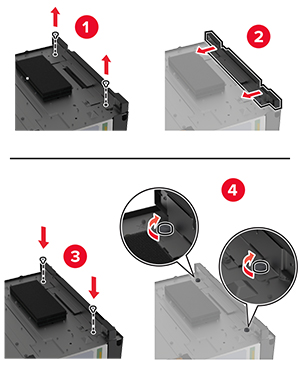
移除标准接纸架侧盖板。
拆开装订器的包装,然后移除包装材料。
将装订器背面朝下放置,然后移除包装材料。
调整支架。
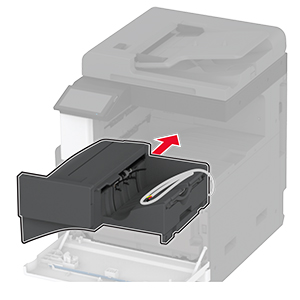
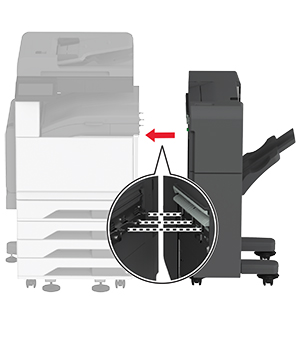
插入装订器。
关闭前部盖门。
将装订器固定到打印机上。
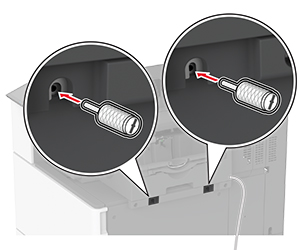
将装订器电缆固定到打印机上。
将装订器电缆连接到打印机上。
将电源线连接到打印机上,然后连接到电源插座上。
小心—可能的伤害: 为避免火灾或电击危险,请将电源线连接到具有适当额定电压并正确接地的电源插座上,该插座应该靠近产品并且便于使用。打开打印机电源。
在打印驱动程序中添加装订器以使它可用于打印作业。如需更多信息,请参阅在打印驱动程序中添加可用选件。
小心—电击危险: 为避免电击危险,如果您在设置完打印机后访问控制器主板或者安装可选的硬件或内存设备,请在继续操作之前先关闭打印机电源并从电源插座中拔掉电源线。如果您还有其他设备连接在打印机上,也应关闭它们的电源并拔掉所有连接到打印机上的电缆。关闭打印机电源。
从电源插座上拔掉电源线,然后从打印机上拔掉电源线。
拆开装订、打孔装订器的包装,然后移除所有包装材料。
将订书钉盒支架插入装订器中。
使用平头螺丝起子将支架安装到装订器上。
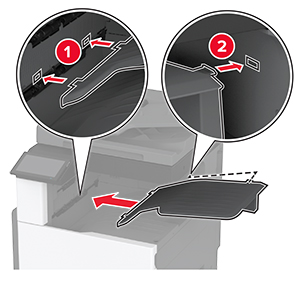
将接纸架插入装订器中。
移除标准接纸架。
打开前部盖门,然后移除蓝色旋钮。
移除标准接纸架侧盖板。
使用平头螺丝起子将支架安装到打印机右侧。
插入输纸器,然后用螺钉将其固定。
关闭前部盖门。
将装订器连接到打印机上。
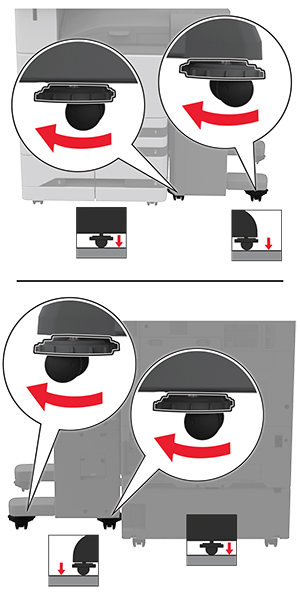
调整调平螺钉以确保装订器的所有侧面与打印机的高度一致。
打开装订器盖门,然后将螺钉安装在装订器的左侧部分。
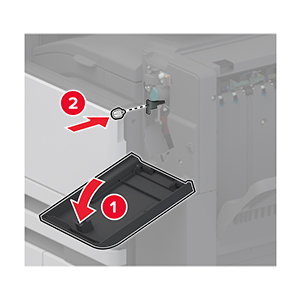
关闭装订器盖门。
将输纸器电缆连接到装订器的后部。
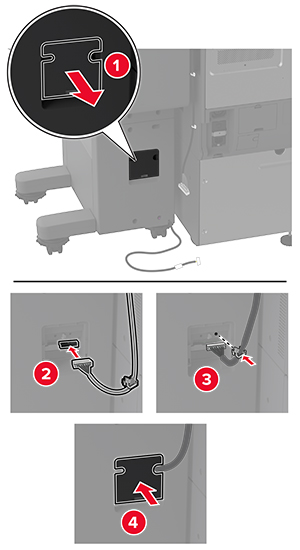
将装订器电缆连接到打印机的后部。
将电源线连接到打印机上,然后连接到电源插座上。
小心—可能的伤害: 为避免火灾或电击危险,请将电源线连接到具有适当额定电压并正确接地的电源插座上,该插座应该靠近产品并且便于使用。打开打印机电源。
在打印驱动程序中添加装订器以使它可用于打印作业。如需更多信息,请参阅在打印驱动程序中添加可用选件。
要使装订器可用于打印作业,请在主屏幕中触摸设置 > 设备 > 维护 > 配置菜单 > 装订器配置 > 打孔配置 > 选择配置。