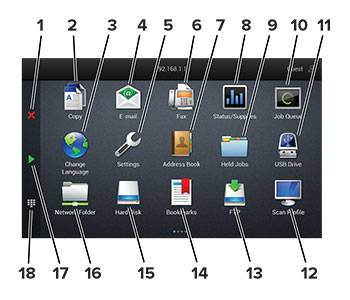
# |
Icon |
Function |
---|---|---|
1 |
Stop or Cancel button |
Stop the current job. |
2 |
Copy |
Make copies. |
3 |
Change Language |
Change the language on the printer display. |
4 |
|
Send e-mails. |
5 |
Settings |
Access the printer menus. |
6 |
Fax |
Send fax. |
7 |
Address Book |
Access, create, and organize contacts. |
8 |
Status/Supplies |
Note: You can also access this setting by touching the top section of the home screen. |
9 |
Held Jobs |
Show all the current held print jobs |
10 |
Job Queue |
Show all the current print jobs. Note: You can also access this setting by touching the top section of the home screen. |
11 |
USB Drive |
View, select, or print photos and documents from a flash drive. |
12 |
Scan Profiles |
Scan and save documents directly to the computer. |
13 |
FTP |
Scan and save documents directly to an FTP server. |
14 |
Bookmarks |
Organize all bookmarks. |
15 |
Hard Disk |
View, select, and manage documents from a hard drive or an intelligent storage drive. |
16 |
Network Folder |
Scan to a network folder or network location. |
17 |
Start button |
Start a job, depending on which mode is selected. |
18 |
On-screen keypad |
Enter numbers or symbols in an input field. |
Open a web browser, and then type the printer IP address in the address field.
Notes:
Click Settings > Device > Home Screen Customization .
Do one or more of the following:
To add an icon to the home screen, click
, select the app name, and then click
Add
.
To remove a home screen icon, select the app name, and then click Remove .
To customize an app name, select the app name, click Edit , and then assign a name.
To restore the name of an app, select the app name, click Edit , and then select Restore app label .
To add a space between apps, click
, select
BLANK SPACE
, and then click
Add
.
To arrange the apps, drag the app names in the order that you want.
To restore the default home screen, click Restore home screen .
Apply the changes.
Application |
Printer models |
---|---|
Scan Center |
CX942, CX943, CX944, XC9445, XC9455, XC9465 |
Shortcut Center |
CX942, CX943, CX944, XC9445, XC9455, XC9465 |
Card Copy |
CX942, CX943, CX944, XC9445, XC9455, XC9465 |
Display Customization |
CX942, CX943, CX944, XC9445, XC9455, XC9465 |
Customer Support |
XC9445, XC9455, XC9465 |
Device Quotas |
XC9445, XC9455, XC9465 |
From the home screen, touch Scan Center .
Select and create a destination, and then configure the settings.
Notes:
Apply the changes.
From the home screen, touch Shortcut Center .
Select a printer function, and then touch Create Shortcut .
Configure the settings, and then touch Save .
Type a unique shortcut name.
Touch OK .
The application automatically generates a unique shortcut number.
Open a web browser, and then type the printer IP address in the address field.
Notes:
Click Apps > Card Copy > Configure .
Notes:
Apply the changes.
Before using the application, make sure to do the following:
From the Embedded Web Server, click Apps > Display Customization > Configure .
Enable and configure the screen saver, slideshow, and wallpaper settings.
From the Screen Saver and Slideshow Images section, add, edit, or delete an image.
Notes:
Apply the changes.
From the home screen, touch Change Wallpaper .
Select an image to use.
Apply the changes.
Insert a flash drive into the USB port.
From the home screen, touch Slideshow .
Images appear in alphabetical order.
Notes:
From the home screen, touch Customer Support .
Print or e-mail the information.
Notes:
Open a web browser, and then type the printer IP address in the address field.
Notes:
Click Apps > Device Quotas > Configure .
In the User Accounts section, add or edit a user, and then set the user quota.
Apply the changes.