Loading paper and specialty media
The selection and handling of paper and specialty media can affect how reliably documents print. For more information, see Avoiding jams and Storing paper.
Setting the paper size and type
From the printer control panel, navigate to:
 > Settings >
  > Paper Menu > > Paper Size/Type >
Press the up or down arrow button to select the tray or feeder, and then press .
Press the up or down arrow button to select the paper size, and then press .
Press the up or down arrow button to select the paper type, and then press to change the settings.
Configuring Universal paper settings
The Universal paper size is a user-defined setting that lets you print on paper sizes that are not preset in the printer menus.
Notes:
- The smallest Universal paper size is 6 x 127 mm (3 x 5 inches), and is supported only from the multipurpose feeder.
- The largest Universal paper size is 216 x 355.6 mm (8.5 x 14 inches), and is supported from all paper sources.
From the printer control panel, navigate to:
> Settings > > Paper Menu > > Universal Setup > > Units of Measure > > select a unit of measure >
Select Portrait Width or Portrait Height, and then press .
Press the left or right arrow button to change the setting, and then press .
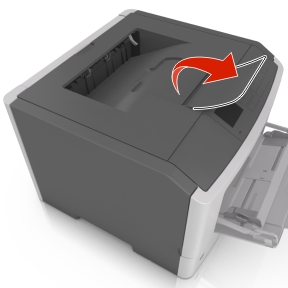
Using the standard bin and paper stop
The standard bin holds up to 150 sheets of 75-g/m2 (20-lb) paper. It collects prints facedown. The standard bin includes a paper stop that keeps paper from sliding out the front of the bin as it stacks.
To open the paper stop, pull it so that it flips forward.
| Note: Close the paper stop when moving the printer to another location. |
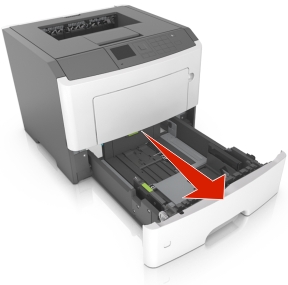
Loading trays
 | CAUTION—POTENTIAL INJURY: To reduce the risk of equipment instability, load each tray separately. Keep all other trays closed until needed. |
Pull out the tray completely.
| Note: Do not remove trays while a job prints or while Busy appears on the printer display. Doing so may cause a jam. |
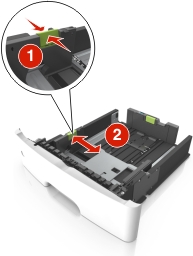
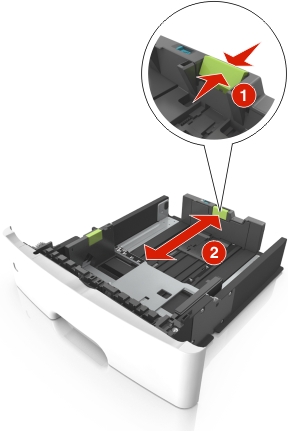
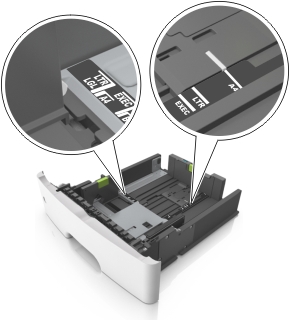
Squeeze and then slide the width guide tab to the correct position for the size of the paper you are loading.
Squeeze and then slide the length guide tab to the correct position for the size of the paper you are loading.
Notes:
- For some paper sizes like letter, legal, and A4, squeeze and slide the length guide tab backward to accommodate their length.
- When loading legal-size paper, the length guide extends beyond the base leaving the paper exposed to dust. To protect the paper from dust, you can purchase a dust cover separately. For more information, contact customer support.
- If you are loading A6-size paper in the standard tray, then squeeze and then slide the length guide tab toward the center of the tray to the A6-size position.
- Make sure the width and length guides are aligned with the paper size indicators on the bottom of the tray.
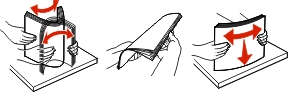
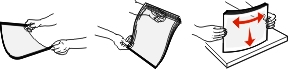
Flex the sheets back and forth to loosen them, and then fan them. Do not fold or crease the paper. Straighten the edges on a level surface.
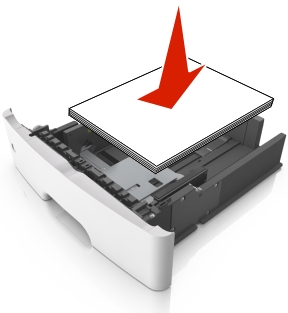
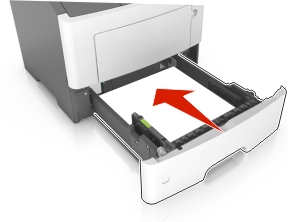
Load the paper stack.
Notes:
- Load with the printable side facedown when using recycled or preprinted paper.
- Load prepunched paper with the holes on the top edge toward the front of the tray.
- Load letterhead facedown, with the top edge of the sheet toward the front of the tray. For two-sided printing, load letterhead faceup with the bottom edge of the sheet toward the front of the tray.
- Make sure the paper is below the maximum paper fill indicator located on the side of the width guide.
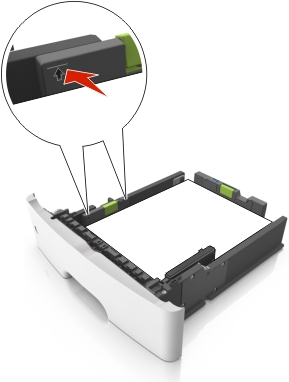
Insert the tray.
From the printer control panel, set the paper size and paper type in the Paper menu to match the paper loaded in the tray.
| Note: Set the correct paper size and type to avoid paper jams and print quality problems. |
Loading the multipurpose feeder
Use the multipurpose feeder when printing on different paper sizes and types or specialty media, such as card stock, transparencies, paper labels, and envelopes. You can also use it for single-page print jobs on letterhead.
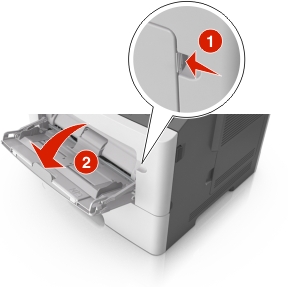
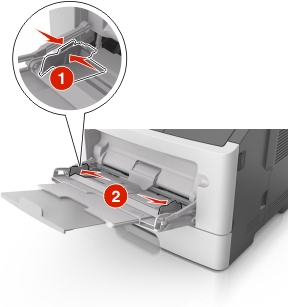
Open the multipurpose feeder.
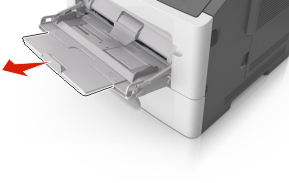
Pull the multipurpose feeder extender.
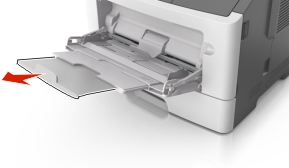
Pull the extender gently so that the multipurpose feeder is fully extended and open.
Squeeze the tab on the left width guide, and then move the guides for the paper you are loading.
Prepare the paper or specialty media for loading.
Flex sheets of paper back and forth to loosen them, and then fan them. Do not fold or crease the paper. Straighten the edges on a level surface.
Hold transparencies by the edges. Flex the stack of transparencies back and forth to loosen them, and then fan them. Straighten the edges on a level surface.
| Note: Avoid touching the printable side of the transparencies. Be careful not to scratch them. |
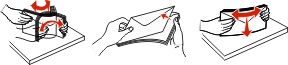
Flex the stack of envelopes back and forth to loosen them, and then fan them. Straighten the edges on a level surface.
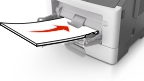
Load the paper or specialty media.
Notes:
- Do not force paper or specialty media into the multipurpose feeder.
- Make sure the paper or specialty media is below the maximum paper fill indicator located on the paper guides. Overfilling may cause paper jams.
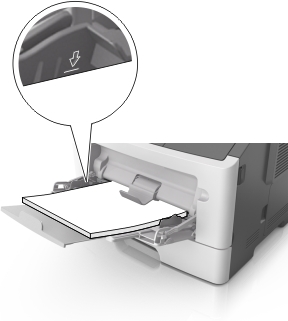
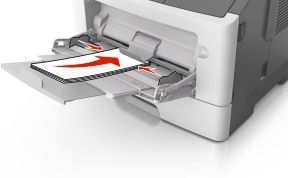
Load paper, transparencies, and card stock with the recommended printable side faceup and the top edge entering the printer first. For more information on loading transparencies, see the packaging that the transparencies came in.
| Note: When loading A6-size paper, make sure the multipurpose feeder extender rests lightly against the edge of the paper so that the last few sheets of paper remain in place. |
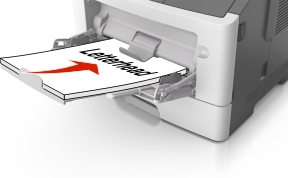
Load letterhead faceup with the top edge entering the printer first. For two-sided (duplex) printing, load letterhead facedown with the bottom edge entering the printer first.
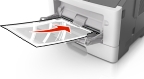
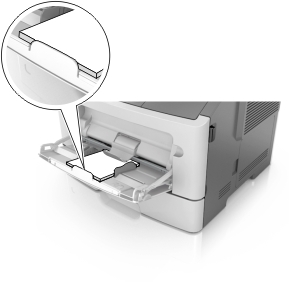
Load envelopes with the flap on the left side facedown.
| Warning—Potential Damage: Never use envelopes with stamps, clasps, snaps, windows, coated linings, or self-stick adhesives. These envelopes may severely damage the printer. |
From the printer control panel, set the paper size and paper type in the Paper menu to match the paper or specialty media loaded in the multipurpose feeder.
Linking and unlinking trays
Linking and unlinking trays
Open a Web browser, and then type the printer IP address in the address field.
Notes:
- View the printer IP address on the printer control panel in the TCP/IP section under the Network/Ports menu. The IP address appears as four sets of numbers separated by periods, such as 123.123.123.123.
- If you are using a proxy server, then temporarily disable it to load the Web page correctly.
Click Settings > Paper Menu.
Change the paper size and type settings for the trays you are linking.
To link trays, make sure the paper size and type for the tray match that of the other tray.
To unlink trays, make sure the paper size or type for the tray does not match that of the other tray.
Click Submit.
| Warning—Potential Damage: Paper loaded in the tray should match the paper type name assigned in the printer. The temperature of the fuser varies according to the specified paper type. Printing issues may occur if settings are not properly configured. |
Creating a custom name for a paper type
Using the Embedded Web Server
Open a Web browser, and then type the printer IP address in the address field.
Notes:
- View the printer IP address in the TCP/IP section in the Network/Ports menu. The IP address appears as four sets of numbers separated by periods, such as 123.123.123.123.
- If you are using a proxy server, then temporarily disable it to load the Web page correctly.
Click Settings > Paper Menu > Custom Names.
Select a custom name, and then type a new custom paper type name.
Click Submit.
Click Custom Types, and then verify if the new custom paper type name has replaced the custom name.
Using the printer control panel
From the printer control panel, navigate to:
> Settings > > Paper Menu > > Custom Names
Select a custom name, and then type a new custom paper type name.
Press .
Press Custom Types, and then verify if the new custom paper type name has replaced the custom name.
Assigning a custom paper type
Using the Embedded Web Server
Open a Web browser, and then type the printer IP address in the address field.
Notes:
- View the printer IP address in the TCP/IP section in the Network/Ports menu. The IP address appears as four sets of numbers separated by periods, such as 123.123.123.123.
- If you are using a proxy server, then temporarily disable it to load the Web page correctly.
Click Settings > Paper Menu > Custom Types.
Select a custom paper type name, and then select a paper type.
| Note: Paper is the factory default paper type for all user-defined custom names. |
Click Submit.
Using the printer control panel
From the printer control panel, navigate to:
> Settings > > Paper Menu > > Custom Types
Select a custom paper type name, and then select a paper type.
| Note: Paper is the factory default paper type for all user-defined custom names. |
Press .