Managing your printer
Finding advanced networking and administrator information
This chapter covers basic administrative support tasks using the Embedded Web Server. For more advanced system support tasks, see the Networking Guide on the Software and Documentation CD or the Embedded Web Server — Security: Administrator's Guide on the Lexmark support Web site at http://support.lexmark.com.
Accessing the remote control panel
The remote control panel on your computer screen lets you interact with the printer control panel, even when you are not physically near the network printer. From your computer screen, you can view the printer status and do print-related tasks you might normally do while standing at the network printer.
Open a Web browser, and then type the printer IP address in the address field.
Notes:
- Print a network setup page or menu settings page, and then locate the IP address in the TCP/IP section. The IP address appears as four sets of numbers separated by periods, such as 123.123.123.123.
- If you are using a proxy server, then temporarily disable it to load the Web page correctly.
Press Enter to open the Web page of your printer.
Click Applications.
Note: The remote control panel requires a Java plug-in to launch.
Configuring supply notifications from the Embedded Web Server
You can determine how you would like to be notified when supplies run nearly low, low, very low, or reach their end-of-life by setting the selectable alerts.
Notes:
- Selectable alerts can be set on the toner cartridge, imaging unit, and maintenance kit.
- All selectable alerts can be set for nearly low, low, and very low supply conditions. Not all selectable alerts can be set for the end-of-life supply condition. E-mail selectable alert is available for all supply conditions.
- The percentage of estimated remaining supply that prompts the alert can be set on some supplies for some supply conditions.
Open a Web browser, and then type the printer IP address in the address field.
Notes:
- View the printer IP address in the TCP/IP section in the Network/Ports menu. The IP address appears as four sets of numbers separated by periods, such as 123.123.123.123.
- If you are using a proxy server, then temporarily disable it to load the Web page correctly.
Click Settings > Print Settings > Supply Notifications.
From the drop-down menu for each supply, select one of the following notification options:
Off | The normal printer behavior for all supplies occurs. |
E-mail Only | The printer generates an e-mail when the supply condition is reached. The status of the supply appears on the menus page and status page. |
Warning | The printer displays the warning message and generates an e-mail about the status of the supply. The printer does not stop when the supply condition is reached. |
Continuable Stop1 | The printer stops processing jobs when the supply condition is reached, and the user needs to press a button to continue printing. |
Non Continuable Stop1,2 | The printer stops processing jobs when the supply condition is reached. The supply must be replaced to continue printing. |
Click Submit.
Modifying confidential print settings
Note: This feature is available only in network printers or printers connected to print servers.
Open a Web browser, and then type the printer IP address in the address field.
Notes:
- View the printer IP address in the TCP/IP section in the Network/Ports menu. The IP address appears as four sets of numbers separated by periods, such as 123.123.123.123.
- If you are using a proxy server, then temporarily disable it to load the Web page correctly.
Click Settings tab > Security > Confidential Print Setup.
Modify the settings:
Set a maximum number of PIN entry attempts. When a user exceeds a specific number of PIN entry attempts, all of the jobs for that user are deleted.
Set an expiration time for confidential print jobs. When a user has not printed the jobs within the specified time, all of the jobs for that user are deleted.
Save the modified settings.
Copying printer settings to other printers
Note: This feature is available only in network printers.
Open a Web browser, and then type the printer IP address in the address field.
Notes:
- View the printer IP address in the TCP/IP section in the Network/Ports menu. The IP address appears as four sets of numbers separated by periods, such as 123.123.123.123.
- If you are using a proxy server, then temporarily disable it to load the Web page correctly.
Click the Copy Printer Settings.
To change the language, select a language from the drop-down menu, and then click Click here to submit language.
Click Printer Settings.
Type the IP addresses of the source and target printers in their appropriate fields.
Note: If you want to add or remove a target printer, then click Add Target IP or Remove Target IP.
Click Copy Printer Settings.
Printing a menu settings page
Print a menu settings page to review the current menu settings and to verify if the printer options are installed correctly.
Note: If you have not changed any menu settings, then the menu settings page lists all the factory default settings. When you select and save other settings from the menus, they replace the factory default settings as user default settings. A user default setting remains in effect until you access the menu again, choose another value, and save it.
From the printer control panel, navigate to:
 > Settings >
  > Reports > > Menu Settings Page >
Printing a network setup page
If the printer is attached to a network, then print a network setup page to verify the network connection. This page also provides important information that aids network printing configuration.
From the printer control panel, navigate to:
> Settings > > Reports > > Network Setup Page >
Check the first section of the network setup page, and then confirm that the status is Connected.
If the status is Not Connected, then the LAN drop may not be active, or the network cable may be malfunctioning. Consult your system support person for a solution, and then print another network setup page.
Checking the status of parts and supplies
Notes:
- Each gauge shows the estimated life left for the supply or part.
- All page life estimates for supplies assume printing on a single side of a letter- or A4-size plain paper.
Checking the status of parts and supplies on the printer control panel
From the printer control panel, navigate to:
> Status/Supplies > View Supplies >
Checking the status of parts and supplies from the Embedded Web Server
Note: Make sure the computer and printer are connected to the same network.
Open a Web browser, and then type the printer IP address in the address field.
Notes:
- View the printer IP address in the TCP/IP section in the Network/Ports menu. The IP address appears as four sets of numbers separated by periods, such as 123.123.123.123.
- If you are using a proxy server, then temporarily disable it to load the Web page correctly.
Click Device Status > More Details.
Saving energy
Using Eco-Mode
Open a Web browser, and then type the printer IP address in the address field.
Notes:
- View the printer IP address in the TCP/IP section in the Network/Ports menu. The IP address appears as four sets of numbers separated by periods, such as 123.123.123.123.
- If you are using a proxy server, then temporarily disable it to load the Web page correctly.
Click Settings > General Settings > Eco-Mode.
Select a setting.
Off | Use the factory default settings for all settings associated with Eco-Mode. Notes: - Settings that were changed when other modes were selected are reset to the factory default settings.
- Off supports the performance specifications of the printer.
|
Energy | Reduce energy use, especially when the printer is idle. Notes: - Printer engine motors do not start until a document is ready to print. You may notice a short delay before the first page is printed.
- The printer enters Sleep mode after one minute of inactivity.
- The printer display is turned off when the printer is in Sleep mode.
- Lights on the staple finisher and other optional finishers are turned off when the printer is in Sleep mode.
|
Energy/Paper | Use all the settings associated with Energy and Paper modes. |
Plain Paper | Enable the automatic two-sided (duplex) printing feature. |
Click Submit.
Reducing printer noise
Enable Quiet mode to reduce the printer noise.
From the printer control panel, navigate to:
> Settings > > Settings > > General Settings > > Quiet Mode >
Select a setting.
On | Reduce printer noise. Notes: - Print jobs process at a reduced speed.
- Printer engine motors do not start until a document is ready to print. There is a short delay before the first page is printed.
- The alarm control and cartridge alarm sounds are turned off.
- The printer ignores the Advance Start command.
|
Off | Use factory default settings. Note: This setting supports the performance specifications of the printer. |
Press .
Adjusting Sleep mode
From the control panel, navigate to:
> Settings > > Settings > > General Settings > > Timeouts > > Sleep Mode >
In the Sleep Mode field, select the number of minutes the printer is idle before it enters Sleep mode.
Apply the changes.
Using Hibernate mode
Hibernate is an ultra-low-power saving mode.
Notes:
- Three days is the default amount of time before the printer enters Hibernate mode.
- Make sure to wake the printer from Hibernate mode before sending a print job. A hard reset or a long press of the Sleep button wakes the printer from Hibernate mode.
- If the printer is in Hibernate mode, then the Embedded Web Server is disabled.
From the control panel, navigate to:
> Settings > > Settings > > General Settings >
Select Press Sleep Button or Press and Hold Sleep Button, and then press .
Press Hibernate > .
Restoring factory default settings
If you want to keep a list of the current menu settings for reference, then print a menu settings page before restoring the factory default settings. For more information, see Printing a menu settings page.
If you want a more comprehensive method of restoring the printer factory default settings, then perform the Wipe All Settings option. For more information, see Erasing non-volatile memory.
Warning—Potential Damage: Restoring factory defaults returns most printer settings to the original factory default settings. Exceptions include the display language, custom sizes and messages, and network/port menu settings. All downloads stored in the RAM are deleted. Downloads stored in the flash memory or in the printer hard disk are not affected.
From the printer control panel, navigate to:
> Settings > > Settings > > General Settings > > Factory Defaults > > Restore Now >
Securing the printer
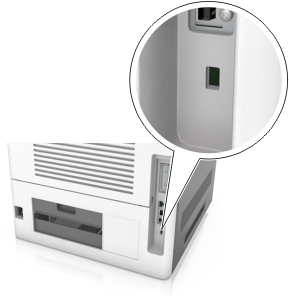
Using the security lock feature
The printer is equipped with a security lock feature. When a lock compatible with most laptop computers is attached, the printer is locked. When locked, the controller board shield and the controller board cannot be removed. Attach a security lock to the printer in the location shown.
Statement of Volatility
Your printer contains various types of memory that can store device and network settings, and user data.
Volatile memory | Your printer uses standard random access memory (RAM) to temporarily buffer user data during simple print jobs. |
Non-volatile memory | Your printer may use two forms of non-volatile memory: EEPROM and NAND (flash memory). Both types are used to store the operating system, device settings, network information, bookmark settings, and embedded solutions. |
Hard disk memory | Some printers have a hard disk drive installed. The printer hard disk is designed for device-specific functionality. This lets the device retain buffered user data from complex print jobs, as well as form data, and font data. |
Erase the content of any installed printer memory in the following circumstances:
The printer is being decommissioned.
The printer hard disk is being replaced.
The printer is being moved to a different department or location.
The printer is being serviced by someone from outside your organization.
The printer is being removed from your premises for service.
The printer is being sold to another organization.
Disposing of a printer hard disk
Note: Some printer models may not have a printer hard disk installed.
In high-security environments, it may be necessary to take additional steps to make sure that confidential data stored in the printer hard disk cannot be accessed when the printer—or its hard disk—is removed from your premises.
Degaussing—Flushes the hard disk with a magnetic field that erases stored data
Crushing—Physically compresses the hard disk to break component parts and render them unreadable
Milling—Physically shreds the hard disk into small metal bits
Note: Most data can be erased electronically, but the only way to guarantee that all data is completely erased is to physically destroy each hard disk where data is stored.
Erasing volatile memory
The volatile memory (RAM) installed in your printer requires a power source to retain information. To erase the buffered data, turn off the printer.
Erasing non-volatile memory
Erase individual settings, device and network settings, security settings, and embedded solutions by following these steps:
Turn off the printer.
Hold down 2 and 6 on the keypad while turning the printer on. Release the buttons only when the screen with the progress bar appears.
The printer performs a power-on sequence, and then the Configuration menu appears. When the printer is fully turned on, a list of functions appears on the printer display.
Press the up or down arrow button until Wipe All Settings appears.
The printer will restart several times during this process.
Note: Wipe All Settings securely removes device settings, solutions, jobs, and passwords from the printer memory.
Navigate to:
Back > Exit Config Menu
The printer will perform a power-on reset, and then return to normal operating mode.
Erasing printer hard disk memory
Notes:
- Some printer models may not have a printer hard disk installed.
- Configuring Erase Temporary Data Files in the printer menus lets you remove residual confidential material left by print jobs by securely overwriting files that have been marked for deletion.
Using the printer control panel
Turn off the printer.
Hold down 2 and 6 while turning the printer on. Release the buttons only when the screen with the progress bar appears.
The printer performs a power-on sequence, and then the Configuration menu appears. When the printer is fully turned on, a list of functions appears on the printer display.
Press the up or down arrow button until Wipe Disk appears, and then select one of the following:
Wipe disk (fast)—This lets you overwrite the disk with all zeroes in a single pass.
Wipe disk (secure)—This lets you overwrite the disk with random bit patterns several times, followed by a verification pass. A secure overwrite is compliant with the DoD 5220.22-M standard for securely erasing data from a hard disk. Highly confidential information should be wiped using this method.
Press the up or down arrow button until Yes appears, and then proceed with disk wiping.
Notes:
- A status bar will indicate the progress of the disk wiping task.
- Disk wiping can take from several minutes to more than an hour, during which the printer will be unavailable for other user tasks.
Navigate to:
Back > Exit Config Menu
The printer will perform a power-on reset, and then return to normal operating mode.
Configuring printer hard disk encryption
Enable hard disk encryption to prevent loss of sensitive data in the event the printer or its hard disk is stolen.
Note: Some printer models may not have a printer hard disk installed.
Using the Embedded Web Server
Open a Web browser, and then type the printer IP address in the address field.
Notes:
- View the printer IP address in the TCP/IP section in the Network/Ports menu. The IP address appears as four sets of numbers separated by periods, such as 123.123.123.123.
- If you are using a proxy server, then temporarily disable it to load the Web page correctly.
Click Settings > Security > Disk Encryption.
Note: Disk Encryption appears in the Security menu only when a formatted, non-defective printer hard disk is installed.
From the Disk Encryption menu, select Enable.
Notes:
- Enabling disk encryption will erase the content of the printer hard disk.
- Disk encryption can take from several minutes to more than an hour, during which the printer will be unavailable for other user tasks.
Using the printer control panel
Turn off the printer.
Hold down 2 and 6 while turning the printer on. Release the buttons only when the screen with the progress bar appears.
The printer performs a power-on sequence, and then the Configuration menu appears. When the printer is fully turned on, a list of functions appears on the printer display.
Navigate to:
Disk Encryption > Enable
Note: Enabling disk encryption will erase the contents of the printer hard disk.
Select Yes to proceed with disk wiping.
Notes:
- Do not turn off the printer during the encryption process. Doing so may result in loss of data.
- Disk encryption can take from several minutes to more than an hour, during which the printer will be unavailable for other user tasks.
- A status bar will indicate the progress of the disk wiping task. After the disk has been encrypted, the printer will return to the screen for enabling or disabling disk encryption.
Navigate to:
Back > Exit Config Menu
The printer will perform a power-on reset, and then return to normal operating mode.
Finding printer security information
In high-security environments, it may be necessary to take additional steps to make sure that confidential data stored in the printer cannot be accessed by unauthorized persons. For more information, visit the Lexmark security Web page.
You can also see the Embedded Web Server — Security: Administrator’s Guide for additional information:
Go to www.lexmark.com, and then navigate to Support & Downloads > select your printer.
Click the Manuals tab, and then select Embedded Web Server — Security: Administrator’s Guide.