Printing
Printing a document
Printing from a computer
Note: For labels, card stock, and envelopes, set the paper size and type in the printer before sending the print job.
From the document that you are trying to print, open the Print dialog.
If necessary, adjust the settings.
Send the print job.
Adjusting toner darkness
Using the Embedded Web Server
Open a Web browser, and then type the IP address of the printer in the address field.
Notes:
- View the printer IP address in the TCP/IP section in the Network/Ports menu. The IP address appears as four sets of numbers separated by periods, such as 123.123.123.123.
- If you are using a proxy server, then temporarily disable it to load the Web page correctly.
Click Settings > Print Settings > Quality Menu > Toner Darkness.
Adjust the toner darkness, and then click Submit.
Using the printer control panel
From the printer control panel, navigate to:
 > Settings >
  > Settings > > Print Settings > > Quality Menu > > Toner Darkness
Adjust the toner darkness, and then press .
Printing from a flash drive
Printing from a flash drive
Notes:
- Before printing an encrypted PDF file, you will be prompted to enter the file password from the printer control panel.
- You cannot print files for which you do not have printing permissions.
Insert a flash drive into the USB port.
Notes:
- A flash drive icon appears on the printer control panel and in the held jobs icon when a flash drive is installed.
- If you insert the flash drive when the printer requires attention, such as when a jam has occurred, then the printer ignores the flash drive.
- If you insert the flash drive while the printer is processing other print jobs, then Busy appears. After these print jobs are processed, you may need to view the held jobs list to print documents from the flash drive.
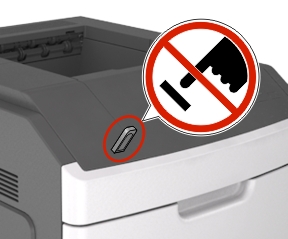
Warning—Potential Damage: Do not touch the printer or the flash drive in the area shown while actively printing, reading, or writing from the memory device. Loss of data can occur.
From the printer control panel, select the document you want to print.
Press the left or right arrow button to specify the number of copies for printing, and then press .
Notes:
- Do not remove the flash drive from the USB port until the document has finished printing.
- If you leave the flash drive in the printer after leaving the initial USB menu screen, then access held jobs from the printer control panel to print files from the flash drive.
Supported flash drives and file types
Notes:
- High-speed USB flash drives must support the full-speed standard. Low-speed USB devices are not supported.
- USB flash drives must support the File Allocation Table (FAT) system. Devices formatted with New Technology File System (NTFS) or any other file system are not supported.
Lexar JumpDrive FireFly (512MB and 1GB) SanDisk Cruzer Micro (512MB and 1GB) Sony Micro Vault Classic (512MB and 1GB)
| Documents: Images: .dcx .gif .jpeg or .jpg .bmp .pcx .tiff or .tif .png .fls
|
Printing from a mobile device
Notes:
- Make sure that the printer and mobile device share the same wireless network. For more information on configuring the wireless settings of your mobile device, see the documentation that came with the device.
- Mobile printing is available only in some printer models.
Printing from a mobile device using Mopria Print Service
Mopria® Print Service is a mobile printing solution for mobile devices running on Android version 4.4 or later. It allows you to print directly to any Mopria-certified printer.
Note: Before printing, make sure that the Mopria Print Service is enabled.
From the home screen of your mobile device, launch a compatible application.
Tap Print, and then select the printer.
Send the print job.
Printing from a mobile device using Google Cloud Print
Google Cloud PrintTM is a mobile printing service that allows enabled applications on mobile devices to print to any Google Cloud Print-ready printer.
From the home screen of your mobile device, launch an enabled application.
Tap Print, and then select the printer.
Send the print job.
Printing from a mobile device using AirPrint
AirPrint is a mobile printing solution that allows you to print directly from Apple devices to an AirPrint-certified printer.
Notes:
- This application is supported only in some Apple devices.
- This application is supported only in some printer models.
From the home screen of your mobile device, launch a compatible application.
Select an item to print, and then tap the share icon.
Tap Print, and then select a printer.
Print the document.
Printing from a mobile device using Lexmark Mobile Print
Lexmark Mobile Print allows you to send documents and images directly to a supported Lexmark printer.
Open the document, and then send or share the document to Lexmark Mobile Print.
Note: Some third-party applications may not support the send or share feature. For more information, see the documentation that came with the application.
Select a printer.
Print the document.
Printing confidential and other held jobs
Storing print jobs in the printer
From the printer control panel, navigate to:
> Settings > > Security > > Confidential Print > select the print job type
Max Invalid PIN | Limits the number of times an invalid PIN can be entered. Note: When the limit is reached, the print jobs for that user name and PIN are deleted. |
Confidential Job Expiration | Lets you hold print jobs in the computer until you enter the PIN from the printer control panel. Note: The PIN is set from the computer. It must be four digits, using the numbers 0–9. |
Repeat Job Expiration | Lets you print and store print jobs in the printer memory for reprinting. |
Verify Job Expiration | Lets you print one copy of a print job while the printer holds the remaining copies. It allows you to examine if the first copy is satisfactory. The print job is automatically deleted from the printer memory once all copies are printed. |
Reserve Job Expiration | Lets you store print jobs for printing at a later time. The print jobs are held until deleted from the Held Jobs menu. |
Press .
Printing held jobs
From the document you are trying to print, open the Print dialog.
Select the printer, and then do either of the following:
For Windows users, click Properties or Preferences, and then click Print and Hold.
For Macintosh users, select Print and Hold.
Select the print job type.
If necessary, assign a user name.
Send the print job.
From the printer home screen, select Held Jobs.
Send the print job.
Printing information pages
Printing a font sample list
From the printer control panel, navigate to:
> Settings > > Reports > > Print Fonts
Press the up or down arrow button to select the font setting.
Press .
Note: The PPDS fonts appear only when the PPDS data stream is activated.
Printing a directory list
From the printer control panel, navigate to:
> Settings > > Reports > > Print Directory >
Note: The Print Directory menu item appears only when an optional flash memory or printer hard disk is installed.
Canceling a print job
Canceling a print job from the printer control panel
From the printer control panel, press  .
.
When a list of print jobs appears, select the job to cancel, and then press .
Press to go back to the home screen.
Canceling a print job from the computer
For Windows users
Open the printers folder, and then select your printer.
From the print queue, select the print job you want to cancel, and then delete it.
For Macintosh users
From System Preferences in the Apple menu, navigate to your printer.
From the print queue, select the print job you want to cancel, and then delete it.