Printing problems

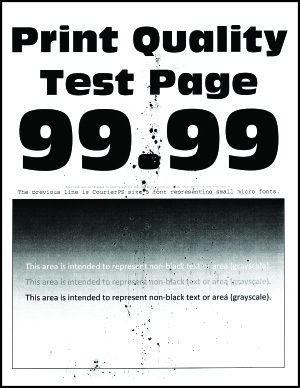
Print quality is poor

Blank or white pages

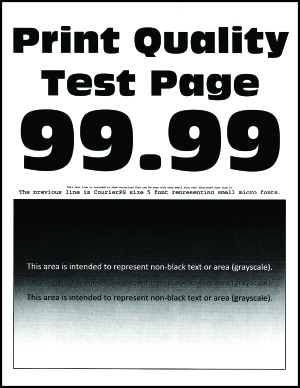
Note: Before solving the problem, print the Print Quality Test Pages. From the control panel, navigate to Settings > Troubleshooting > Print Quality Test Pages. For non-touch-screen printer models, press the select button to navigate through the settings.
Action

Yes

No

Step 1

  1. Check if the printer is using a genuine and supported Lexmark toner cartridge.

    Note: If the cartridge is not supported, then install a supported one.

  2. Print the document.


Is the printer printing blank or white pages?

Go to step 2.

The problem is solved.

Step 2

  1. Remove any packing material that is left on the imaging unit.

    1. Remove the toner cartridge, and then remove the imaging unit.

      Warning—Potential Damage: Do not expose the imaging unit to direct light for more than 10 minutes. Extended exposure to light may cause print quality problems.

      Warning—Potential Damage: Do not touch the photoconductor drum under the imaging unit. Doing so may affect the quality of future print jobs.

    2. Check the imaging unit for signs of damage.

      Note: Make sure that the photoconductor drum contact is not bent or out of place.

    3. Firmly shake the imaging unit to redistribute the toner.

    4. Insert the imaging unit, and then insert the toner cartridge.

  2. Print the document.


Is the printer printing blank or white pages?

Go to step 3.

The problem is solved.

Step 3

Check the transfer roller for proper installation.


Is the transfer roller installed properly?

Go to step 5.

Go to step 4.

Step 4

  1. Remove, and then insert the transfer roller.

  2. Print the document.


Is the printer printing blank or white pages?

Go to step 5.

The problem is solved.

Step 5

  1. Replace the imaging unit.

  2. Print the document.


Is the printer printing blank or white pages?

Contact customer support.

The problem is solved.


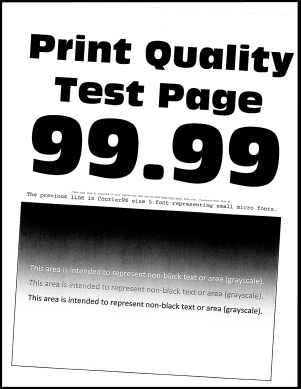
Dark print

Note: Before solving the problem, print the Print Quality Test Pages. From the control panel, navigate to Settings > Troubleshooting > Print Quality Test Pages. For non-touch-screen printer models, press the select button to navigate through the settings.
Action

Yes

No

Step 1

  1. Check if the printer is using a genuine and supported Lexmark toner cartridge.

    Note: If the cartridge is not supported, then install a supported one.

  2. Print the document.


Is the print dark?

Go to step 2.

The problem is solved.

Step 2

  1. Turn off the printer, wait for about 10 seconds, and then turn on the printer.

  2. Reduce toner darkness.

    From the control panel, navigate to:

    Settings > Print > Quality > Toner Darkness

  3. Print the document.


Is the print dark?

Go to step 3.

The problem is solved.

Step 3

  1. Depending on your operating system, specify the paper type from the Printing Preferences or Print dialog.

    Notes:

    • Make sure that the setting matches the paper loaded.
    • You can also change the setting on the printer control panel. Navigate to Settings > Paper > Tray Configuration > Paper Size/Type.
  2. Print the document.


Is the print dark?

Go to step 4.

The problem is solved.

Step 4

Check if the paper has texture or rough finishes.


Are you printing on textured or rough paper?

Go to step 5.

Go to step 6.

Step 5

  1. Replace textured paper with plain paper.

  2. Print the document.


Is the print dark?

Go to step 6.

The problem is solved.

Step 6

  1. Load paper from a fresh package.

    Note: Paper absorbs moisture due to high humidity. Store paper in its original wrapper until you are ready to use it.

  2. Print the document.


Is the print dark?

Go to step 7.

The problem is solved.

Step 7

  1. Remove, and then insert the imaging unit.

    Warning—Potential Damage: Do not expose the imaging unit to direct light for more than 10 minutes. Extended exposure to light may cause print quality problems.

    Warning—Potential Damage: Do not touch the photoconductor drum under the imaging unit. Doing so may affect the quality of future print jobs.

  2. Print the document.


Is the print dark?

Go to step 8.

The problem is solved.

Step 8

  1. Replace the imaging unit.

  2. Print the document.


Is the print dark?

Contact customer support.

The problem is solved.


Fine lines are not printed correctly

Note: Before solving the problem, print the Print Quality Test Pages. From the control panel, navigate to Settings > Troubleshooting > Print Quality Test Pages. For non-touch-screen printer models, press the select button to navigate through the settings.

Action

Yes

No

Step 1

  1. Check if the printer is using a genuine and supported Lexmark toner cartridge.

    Note: If the cartridge is not supported, then install a supported one.

  2. Print the document.


Are fine lines not printed correctly?

Go to step 2.

The problem is solved.

Step 2

  1. Adjust the print quality settings.

    1. From the control panel, navigate to:

      Settings > Print > Quality > Pixel Boost > Fonts

    2. Adjust Toner Darkness to 7. From the control panel, navigate to:

      Settings > Print > Quality

  2. Print the document.


Are fine lines not printed correctly?

Contact customer support.

The problem is solved.


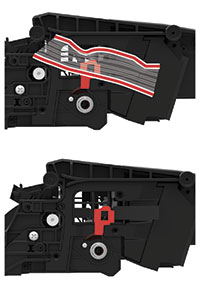
Folded or wrinkled paper

Note: Before solving the problem, print the Print Quality Test Pages. From the control panel, navigate to Settings > Troubleshooting > Print Quality Test Pages. For non-touch-screen printer models, press the select button to navigate through the settings.
Action

Yes

No

Step 1

  1. Check if the printer is using a genuine and supported Lexmark toner cartridge.

    Note: If the cartridge is not supported, then install a supported one.

  2. Print the document.


Is the paper folded or wrinkled?

Go to step 2.

The problem is solved.

Step 2

  1. Load paper from a fresh package.

    Note: Paper absorbs moisture due to high humidity. Store paper in its original wrapper until you are ready to use it.

  2. Print the document.


Is the paper folded or wrinkled?

Go to step 3.

The problem is solved.

Step 3

  1. Depending on your operating system, specify the paper type from the Printing Preferences or Print dialog.

    Notes:

    • Make sure that the setting matches the paper loaded.
    • You can also change the setting from the printer control panel. Navigate to Settings > Paper > Tray Configuration > Paper Size/Type.
  2. Print the document.


Is the paper folded or wrinkled?

Contact customer support.

The problem is solved.


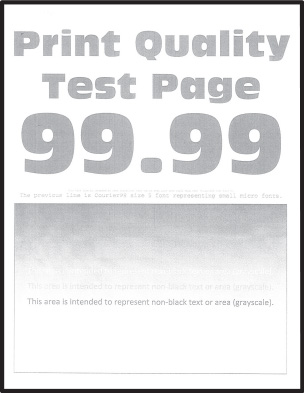
Gray background

A page with gray or colored background.
Note: Before solving the problem, print the Print Quality Test Pages. From the control panel, navigate to Settings > Troubleshooting > Print Quality Test Pages.

Action

Yes

No

Step 1

  1. Turn off the printer, wait for 10 seconds, and then turn on the printer.

  2. Decrease toner darkness.

    From the control panel, navigate to Settings > Print > Quality > Toner Darkness.

  3. Print the document.


Does gray background appear on prints?

Go to step 2.

The problem is solved.

Step 2

  1. Check if the printer is using a genuine and supported Lexmark toner cartridge.

    Note: If the cartridge is not supported, then install a supported one.

  2. Print the document.


Does gray background appear on prints?

Go to step 3.

The problem is solved.

Step 3

  1. Depending on your operating system, specify the paper type from the Printing Preferences or Print dialog.

    Notes:

    • Make sure that the setting matches the paper loaded.
    • You can also change the setting from the printer control panel. Navigate to Settings > Paper > Tray Configuration > Paper Size/Type.
  2. Print the document.


Does gray background appear on prints?

Go to step 4.

The problem is solved.

Step 4

  1. Remove, and then insert the imaging unit.

    Warning—Potential Damage: Do not expose the imaging unit to direct light. Extended exposure to light may cause print quality problems.

    Warning—Potential Damage: Do not touch the photoconductor drum. Doing so may affect the quality of future print jobs.

  2. Print the document.


Does gray background appear on prints?

Go to step 5.

The problem is solved.

Step 5

  1. Update the printer firmware. For more information, see the “Updating firmware” section.

  2. Print the document.


Does gray background appear on prints?

Go to step 6.

The problem is solved.

Step 6

  1. Replace the imaging unit.

  2. Print the document.


Does gray background appear on prints?

Contact customer support.

The problem is solved.


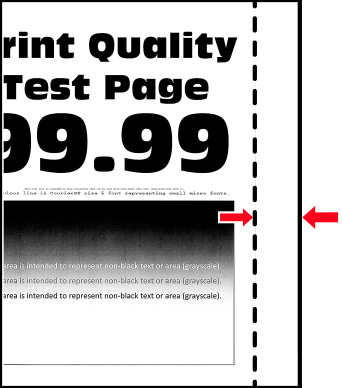
Incorrect margins

Action

Yes

No

Step 1

  1. Adjust the paper guides to the correct position for the paper loaded.

  2. Print the document.


Are the margins correct?

The problem is solved.

Go to step 2.

Step 2

  1. Set the paper size.

    From the control panel, navigate to:

    Settings > Paper > Tray Configuration > Paper Size/Type

  2. Print the document.


Are the margins correct?

The problem is solved.

Go to step 3.

Step 3

  1. Depending on your operating system, specify the paper size from the Printing Preferences or Print dialog.

    Note: Make sure that the setting matches the paper loaded.

  2. Print the document.


Are the margins correct?

The problem is solved.

Contact customer support.


Light print

Note: Before solving the problem, print the Print Quality Test Pages. From the control panel, navigate to Settings > Troubleshooting > Print Quality Test Pages. For non-touch-screen printer models, press the select button to navigate through the settings.

Action

Yes

No

Step 1

  1. Check if the printer is using a genuine and supported Lexmark toner cartridge.

    Note: If the cartridge is not supported, then install a supported one.

  2. Print the document.


Is the print light?

Go to step 2.

The problem is solved.

Step 2

  1. Turn off the printer, wait for about 10 seconds, and then turn on the printer.

  2. Increase toner darkness.

    From the control panel, navigate to:

    Settings > Print > Quality > Toner Darkness

  3. Print the document.


Is the print light?

Go to step 3.

The problem is solved.

Step 3

  1. Depending on your operating system, specify the paper type from the Printing Preferences or Print dialog.

    Notes:

    • Make sure that the setting matches the paper loaded.
    • You can also change the setting on the printer control panel. Navigate to Settings > Paper > Tray Configuration > Paper Size/Type.
  2. Print the document.


Is the print light?

Go to step 4.

The problem is solved.

Step 4

  1. Depending on your operating system, specify the print resolution from the Printing Preferences or Print dialog.

  2. Set the resolution to 600 dpi.

  3. Print the document.


Is the print light?

Go to step 5.

The problem is solved.

Step 5

  1. Remove the imaging unit.

    Warning—Potential Damage: Do not expose the imaging unit to direct light for more than 10 minutes. Extended exposure to light can cause print quality problems.

    Warning—Potential Damage: Do not touch the photoconductor drum under the imaging unit. Doing so may affect the quality of future print jobs.

  2. Firmly shake the imaging unit to redistribute the toner.

  3. Insert the imaging unit.

  4. Turn off the printer, wait for 10 seconds, and then turn on the printer.

  5. Print the document.


Is the print light?

Go to step 6.

The problem is solved.

Step 6

  1. Check the status of the toner cartridge.

    From the control panel, navigate to:

    Settings > Reports > Device > Device Statistics

  2. From the Supply Information section of the pages printed, check the status of the toner cartridge.


Is the toner cartridge near end of life?

Go to step 7.

Contact customer support.

Step 7

  1. Replace the toner cartridge.

  2. Print the document.


Is the print light?

Contact customer support.

The problem is solved.


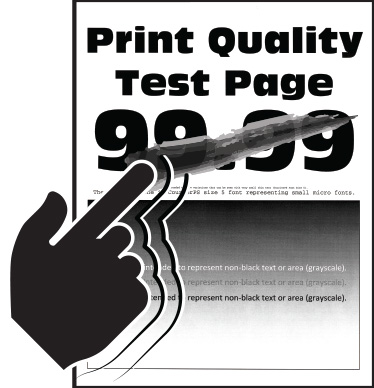
Mottled print and dots

Note: Before solving the problem, print the Print Quality Test Pages. From the control panel, navigate to Settings > Troubleshooting > Print Quality Test Pages. For non-touch-screen printer models, press the select button to navigate through the settings.
Action

Yes

No

Step 1

  1. Check if the printer is using a genuine and supported Lexmark toner cartridge.

    Note: If the cartridge is not supported, then install a supported one.

  2. Print the document.


Is the print mottled?

Go to step 2.

The problem is solved.

Step 2

Check the printer for leaked toner contamination.


Is the printer free of leaked toner?

Go to step 3.

Contact customer support.

Step 3

Check the status of the imaging unit. From the control panel, navigate to:

Status/Supplies > Supplies


Is the imaging unit near end of life?

Go to step 4.

Contact customer support.

Step 4

  1. Replace the imaging unit.

  2. Print the document.


Is the print mottled?

Contact customer support.

The problem is solved.


Print crooked or skewed

A print with skewed characters
Note: Before solving the problem, print the Print Quality Test Pages. From the home screen, touch Settings > Troubleshooting > Print Quality Test Pages.

Action

Yes

No

Step 1

  1. Pull out the tray.

  2. Remove the paper, and then load paper from a fresh package.

    Note: Paper absorbs moisture due to high humidity. Store paper in its original wrapper until you are ready to use it.

  3. Squeeze and slide the paper guides to the correct position for the size of the paper you are loading.

  4. Insert the tray.

  5. Print the document.


Is the print crooked or skewed?

Go to step 2.

The problem is solved.

Step 2

  1. Check if you are printing on a supported paper.

  2. Print the document.


Is the print crooked or skewed?

Contact customer support.

The problem is solved.


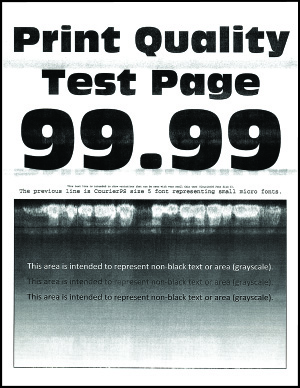
Solid black pages

A print that is mostly black
Note: Before solving the problem, print the Print Quality Test Pages. From the control panel, navigate to Settings > Troubleshooting > Print Quality Test Pages. For non-touch-screen printer models, press the select button to navigate through the settings.
Action

Yes

No

Step 1

  1. Check if the printer is using a genuine and supported Lexmark toner cartridge.

    Note: If the toner cartridge is not supported, then install a supported one.

  2. Print the document.


Is the printer printing solid black pages?

Go to step 2.

The problem is solved.

Step 2

  1. Remove, and then insert the imaging unit.

    Warning—Potential Damage: Do not expose the imaging unit to direct light for more than 10 minutes. Extended exposure to light may cause print quality problems.

    Warning—Potential Damage: Do not touch the photoconductor drum under the imaging unit. Doing so may affect the quality of future print jobs.

  2. Print the document.


Is the printer printing solid black pages?

Go to step 3.

The problem is solved.

Step 3

  1. Remove the imaging unit.

    Warning—Potential Damage: Do not expose the imaging unit to direct light for more than 10 minutes. Extended exposure to light may cause print quality problems.

    Warning—Potential Damage: Do not touch the photoconductor drum under the imaging unit. Doing so may affect the quality of future print jobs.

  2. Remove any packing material that is stuck on the imaging unit.

    Note: Make sure to remove any obstruction between the charge roller and photoconductor drum.

  3. Insert the imaging unit.

  4. Print the document.


Is the printer printing solid black pages?

Go to step 4.

The problem is solved.

Step 4

Check the imaging unit for signs of damage.


Is the imaging unit free from damage?

Contact customer support.

Go to step 5.

Step 5

  1. Replace the imaging unit.

  2. Print the document.


Is the printer printing solid black pages?

Contact customer support.

The problem is solved.


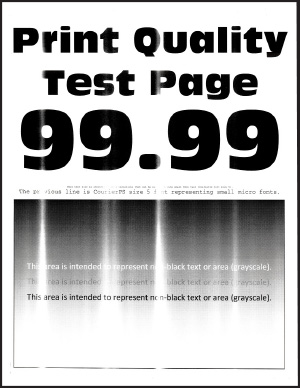
Text or images cut off

Note: Before solving the problem, print the Print Quality Test Pages. From the control panel, navigate to Settings > Troubleshooting > Print Quality Test Pages. For non-touch-screen printer models, press the select button to navigate through the settings.
Action

Yes

No

Step 1

  1. Check if the printer is using a genuine and supported Lexmark toner cartridge.

    Note: If the toner cartridge is not supported, then install a supported one.

  2. Print the document.


Are text or images cut off?

Go to step 2.

The problem is solved.

Step 2

  1. Remove, and then insert the imaging unit.

    Warning—Potential Damage: Do not expose the imaging unit to direct light for more than 10 minutes. Extended exposure to light may cause print quality problems.

    Warning—Potential Damage: Do not touch the photoconductor drum under the imaging unit. Doing so may affect the quality of future print jobs.

  2. Print the document.


Are text or images cut off?

Go to step 3.

The problem is solved.

Step 3

  1. Remove the imaging unit.

    Warning—Potential Damage: Do not expose the imaging unit to direct light for more than 10 minutes. Extended exposure to light may cause print quality problems.

    Warning—Potential Damage: Do not touch the photoconductor drum under the imaging unit. Doing so may affect the quality of future print jobs.

  2. Remove any packing material that is stuck on the imaging unit.

    Note: Make sure to remove any obstruction between the charge roller and photoconductor drum.

  3. Insert the imaging unit.

  4. Print the document.


Are text or images cut off?

Go to step 4.

The problem is solved.

Step 4

  1. Replace the imaging unit.

  2. Print the document.


Are text or images cut off?

Contact customer support.

The problem is solved.


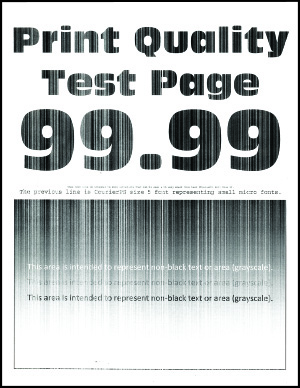
Toner easily rubs off

Note: Before solving the problem, print the Print Quality Test Pages. From the control panel, navigate to Settings > Troubleshooting > Print Quality Test Pages. For non-touch-screen printer models, press the select button to navigate through the settings.
Action

Yes

No

Step 1

  1. Check if the printer is using a genuine and supported Lexmark toner cartridge.

    Note: If the cartridge is not supported, then install a supported one.

  2. Print the document.


Does toner easily rub off?

Go to step 2.

The problem is solved.

Step 2

  1. Depending on your operating system, specify the paper type from the Printing Preferences or Print dialog.

    Notes:

    • Make sure that the setting matches the paper loaded.
    • You can also change the setting on the printer control panel.
  2. Print the document.


Does toner easily rub off?

Go to step 3.

The problem is solved.

Step 3

  1. Remove, and then insert the fuser.

  2. Print the document.


Does toner easily rub off?

Contact customer support.

The problem is solved.


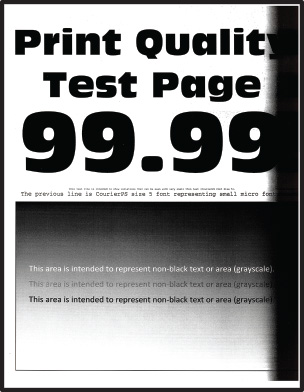
Horizontal light bands

Note: Before solving the problem, print the Print Quality Test Pages. From the control panel, navigate to Settings > Troubleshooting > Print Quality Test Pages. For non-touch-screen printer models, press the select button to navigate through the settings.
Action

Yes

No

Step 1

  1. Check if the printer is using a genuine and supported Lexmark toner cartridge.

    Note: If the cartridge is not supported, then install a supported one.

  2. Print the document.


Do horizontal light bands appear on prints?

Go to step 2.

The problem is solved.

Step 2

  1. Turn off the printer, wait for about 10 seconds, and then turn on the printer.

  2. Print the document.


Do horizontal light bands appear on prints?

Contact customer support.

The problem is solved.


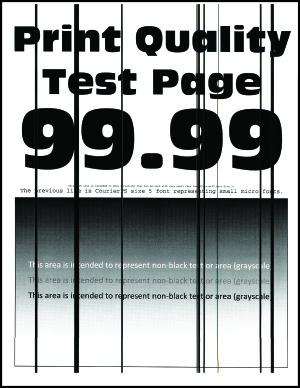
Vertical light bands

Note: Before solving the problem, print the Print Quality Test Pages. From the control panel, navigate to Settings > Troubleshooting > Print Quality Test Pages. For non-touch-screen printer models, press the select button to navigate through the settings.
Action

Yes

No

  1. Check if the printer is using a genuine and supported Lexmark toner cartridge.

    Note: If the cartridge is not supported, then install a supported one.

  2. Print the document.


Do vertical light bands appear on prints?

Contact customer support.

The problem is solved.


Vertical white lines

Note: Before solving the problem, print the Print Quality Test Pages. From the control panel, navigate to Settings > Troubleshooting > Print Quality Test Pages. For non-touch-screen printer models, press the select button to navigate through the settings.
Action

Yes

No

Step 1

  1. Check if the printer is using a genuine and supported Lexmark toner cartridge.

    Note: If the cartridge is not supported, then install a supported one.

  2. Print the document.


Do vertical white lines appear on prints?

Go to step 2.

The problem is solved.

Step 2

Fix slow printing problems. For more information, see Slow printing.


Do vertical white lines appear on prints?

Go to step 3.

The problem is solved.

Step 3

  1. Replace the imaging unit.

  2. Print the document.


Do vertical white lines appear on prints?

Contact customer support.

The problem is solved.


Vertical dark bands

Note: Before solving the problem, print the Print Quality Test Pages. From the control panel, navigate to Settings > Troubleshooting > Print Quality Test Pages. For non-touch-screen printer models, press the select button to navigate through the settings.
Action

Yes

No

Step 1

  1. Check if the printer is using a genuine and supported Lexmark toner cartridge.

    Note: If the toner cartridge is not supported, then install a supported one.

  2. Print the document.


Do vertical dark bands appear on prints?

Go to step 2.

The problem is solved.

Step 2

  1. Remove the toner cartridge, and then remove the imaging unit.

    Warning—Potential Damage: Do not expose the imaging unit to direct light for more than 10 minutes. Extended exposure to light may cause print quality problems.

    Warning—Potential Damage: Do not touch the photoconductor drum under the imaging unit. Doing so may affect the quality of future print jobs.

  2. Insert the imaging unit, and then insert the cartridge.

  3. Print the document.


Do vertical dark bands appear on prints?

Go to step 3.

The problem is solved.

Step 3

  1. Remove the imaging unit.

    Warning—Potential Damage: Do not expose the imaging unit to direct light for more than 10 minutes. Extended exposure to light may cause print quality problems.

    Warning—Potential Damage: Do not touch the photoconductor drum under the imaging unit. Doing so may affect the quality of future print jobs.

  2. Remove any packing material that is stuck on the imaging unit.

    Note: Make sure to remove any obstruction between the charge roller and photoconductor drum.

  3. Insert the imaging unit.

  4. Print the document.


Do vertical dark bands appear on prints?

Go to step 4.

The problem is solved.

Step 4

  1. Check if a bright light enters the right side of the printer, and move the printer if necessary.

  2. Print the document.


Do vertical dark bands appear on prints?

Contact customer support.

The problem is solved.


Vertical dark lines

Note: Before solving the problem, print the Print Quality Test Pages. From the control panel, navigate to Settings > Troubleshooting > Print Quality Test Pages. For non-touch-screen printer models, press the select button to navigate through the settings.

Action

Yes

No

Step 1

Using a blank sheet of paper, make a two-sided copy using the ADF.


Do vertical dark lines or streaks appear on prints?

Go to step 2.

Go to step 3.

Step 2

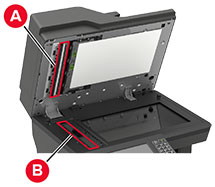
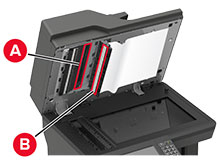
Using a damp, soft, lint-free cloth, wipe the following areas:

  • ADF glass pad (A) and ADF glass (B)

  • ADF glass (A) and ADF glass pad (B) in door E


Do vertical dark lines or streaks appear on prints?

Go to step 3.

The problem is solved.

Step 3

  1. Depending on your operating system, specify the paper type from the Printing Preferences or Print dialog.

    Notes:

    • Make sure that the setting matches the paper loaded.
    • You can also change the setting on the printer control panel. Navigate to Settings > Paper > Tray Configuration > Paper Size/Type.
  2. Print the document.


Do vertical dark lines or streaks appear on prints?

Go to step 4.

The problem is solved.

Step 4

  1. Load paper from a fresh package.

    Note: Paper absorbs moisture due to high humidity. Store paper in its original wrapper until you use it.

  2. Print the document.


Do vertical dark lines or streaks appear on prints?

Go to step 5.

The problem is solved.

Step 5

  1. Remove, and then insert the imaging kit.

    Warning—Potential Damage: Do not expose the imaging kit to direct light. Extended exposure to light can cause print quality problems.

    Warning—Potential Damage: Do not touch the photoconductor drum under the imaging kit. Doing so may affect the quality of future print jobs.

  2. Print the document.


Do vertical dark lines or streaks appear on prints?

Contact customer support.

The problem is solved.


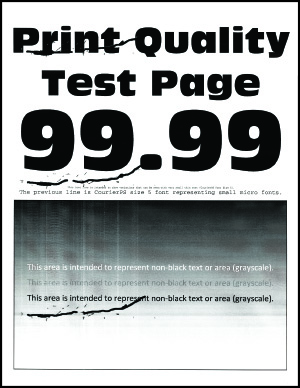
Vertical dark lines or streaks

Note: Before solving the problem, print the Print Quality Test Pages. From the control panel, navigate to Settings > Troubleshooting > Print Quality Test Pages. For non-touch-screen printer models, press the select button to navigate through the settings.
Action

Yes

No

Step 1

  1. Check if the printer is using a genuine and supported Lexmark toner cartridge.

    Note: If the toner cartridge is not supported, then install a supported one.

  2. Print the document.


Do vertical dark lines or streaks appear on prints?

Go to step 2.

The problem is solved.

Step 2

  1. Remove, and then reinstall the imaging unit.

    Warning—Potential Damage: Do not expose the imaging unit to direct light for more than 10 minutes. Extended exposure to light can cause print quality problems.

    Warning—Potential Damage: Do not touch the photoconductor drum under the imaging unit. Doing so may affect the quality of future print jobs.

  2. Print the document.


Do vertical dark lines or streaks appear on prints?

Go to step 3.

The problem is solved.

Step 3

  1. Replace the imaging unit.

  2. Print the document.


Do vertical dark lines or streaks appear on prints?

Contact customer support.

The problem is solved.


Vertical dark streaks with print missing

Note: Before solving the problem, print the Print Quality Test Pages. From the control panel, navigate to Settings > Troubleshooting > Print Quality Test Pages. For non-touch-screen printer models, press the select button to navigate through the settings.

Action

Yes

No

Step 1

  1. Remove the imaging unit.

    Warning—Potential Damage: Do not expose the imaging unit to direct light for more than 10 minutes. Extended exposure to light may cause print quality problems.

    Warning—Potential Damage: Do not touch the photoconductor drum under the imaging unit. Doing so may affect the quality of future print jobs.

  2. Remove any packing material that is stuck on the imaging unit.

    Note: Make sure to remove any obstruction between the charge roller and photoconductor drum.

  3. Insert the imaging unit.

  4. Print the document.


Do vertical dark streaks with missing images appear on prints?

Go to step 2.

The problem is solved.

Step 2

  1. Check if the printer is using a genuine and supported Lexmark toner cartridge.

    Note: If the toner cartridge is not supported, then install a supported one.

  2. Print the document.


Do vertical dark streaks with missing images appear on prints?

Contact customer support.

The problem is solved.


Repeating defects

Note: Before solving the problem, print the Print Quality Test Pages. From the control panel, navigate to Settings > Troubleshooting > Print Quality Test Pages. For non-touch-screen printer models, press the select button to navigate through the settings.

Action

Yes

No

Step 1

Using the Print Quality Test Pages, check if the distance between the repeating defects is equal to any of the following:

  • 96 mm (3.78 in.)

  • 49 mm (1.93 in.)

  • 47.5 mm (1.87 in.)

  • 30.2 mm (1.18 in.)


Does the distance between the repeating defects match any of the measurements?

Go to step 2.

Take note of the distance, and then contact customer support.

Step 2

  1. Replace the imaging unit.

  2. Print the document.


Do the repeating defects appear?

Contact customer support.

The problem is solved.


Print jobs do not print

Action

Yes

No

Step 1

  1. From the document you are trying to print, open the Print dialog, and then check if you have selected the correct printer.

  2. Print the document.


Is the document printed?

The problem is solved.

Go to step 2.

Step 2

  1. Check if the printer is on.

  2. Resolve any error messages that appear on the display.

  3. Print the document.


Is the document printed?

The problem is solved.

Go to step 3.

Step 3

  1. Check if the ports are working and if the cables are securely connected to the computer and the printer.

    For more information, see the setup documentation that came with the printer.

  2. Print the document.


Is the document printed?

The problem is solved.

Go to step 4.

Step 4

  1. Turn off the printer, wait for about 10 seconds, and then turn on the printer.

  2. Print the document.


Is the document printed?

The problem is solved.

Go to step 5.

Step 5

  1. Remove, and then reinstall the print driver.

  2. Print the document.


Is the document printed?

The problem is solved.

Contact customer support.


Slow printing

Action

Yes

No

Step 1

Make sure that the printer cable is securely connected to the printer and to the computer, print server, option, or other network device.


Is the printer printing slow?

Go to step 2.

The problem is solved.

Step 2

  1. Make sure that the printer is not in Quiet Mode.

    From the home screen, touch Settings > Device > Maintenance > Configuration Menu > Device Operations > Quiet Mode.

  2. Print the document.


Is the printer printing slow?

Go to step 3.

The problem is solved.

Step 3

  1. Depending on your operating system, specify the print resolution from the Printing Preferences or Print dialog.

  2. Set the resolution to 600 dpi.

  3. Print the document.


Is the printer printing slow?

Go to step 4.

The problem is solved.

Step 4

  1. From the home screen, touch Settings > Print > Quality > Print Resolution.

  2. Set the resolution to 600 dpi.

  3. Print the document.


Is the printer printing slow?

Go to step 5.

The problem is solved.

Step 5

  1. Depending on your operating system, specify the paper type from the Printing Preferences or Print dialog.

    Notes:

    • Make sure that the setting matches the paper loaded.
    • You can also change the setting on the printer control panel.
    • Heavier paper prints more slowly.
    • Paper narrower than letter, A4, and legal may print more slowly.
  2. Print the document.


Is the printer printing slow?

Go to step 6.

The problem is solved.

Step 6

  1. Make sure that the printer settings for texture and weight match the paper being loaded.

    From the home screen, touch Settings > Paper > Media Configuration > Media Types.

    Note: Rough paper textures and heavy paper weights may print more slowly.

  2. Print the document.


Is the printer printing slow?

Go to step 7.

The problem is solved.

Step 7

Remove held jobs.


Is the printer printing slow?

Go to step 8.

The problem is solved.

Step 8

  1. Make sure that the printer is not overheating.

    Notes:

  2. Print the document.


Is the printer printing slow?

Contact customer support.

The problem is solved.


Adjusting toner darkness

  1. From the home screen, touch Settings > Print > Quality.

  2. In the Toner Darkness menu, adjust the settings.

Job prints from the wrong tray or on the wrong paper

Action

Yes

No

Step 1

  1. Check if you are printing on the correct paper.

  2. Print the document.


Is the document printed on the correct paper?

Go to step 2.

Load the correct paper size and paper type.

Step 2

  1. Depending on your operating system, specify the paper size and paper type from the Printing Preferences or Print dialog.

    Note: You can also change the settings on the printer control panel. Navigate to:

    Settings > Paper > Tray Configuration > Paper Size/Type

  2. Make sure that the settings match the paper loaded.

  3. Print the document.


Is the document printed on the correct paper?

The problem is solved.

Go to step 3.

Step 3

  1. Check if the trays are linked.

    For more information, see Linking trays.

  2. Print the document.


Is the document printed from the correct tray?

The problem is solved.

Contact customer support.


Confidential and other held documents do not print

Action

Yes

No

Step 1

  1. From the control panel, check if the documents appear in the Held Jobs list.

    Note: If the documents are not listed, then print the documents using the Print and Hold options.

  2. Print the documents.


Are the documents printed?

The problem is solved.

Go to step 2.

Step 2

The print job may contain a formatting error or invalid data.

  • Delete the print job, and then send it again.

  • For PDF files, generate a new file, and then print the documents.


Are the documents printed?

The problem is solved.

Go to step 3.

Step 3

If you are printing from the Internet, then the printer may be reading the multiple job titles as duplicates.

For Windows users
  1. Open the Printing Preferences dialog.

  2. From the Print and Hold tab, click Use Print and Hold, and then click Keep duplicate documents.

  3. Enter a PIN, and then save the changes.

  4. Send the print job.

For Macintosh users
  1. Save and name each job differently.

  2. Send the job individually.


Are the documents printed?

The problem is solved.

Go to step 4.

Step 4

  1. Delete some held jobs to free up printer memory.

  2. Print the documents.


Are the documents printed?

The problem is solved.

Go to step 5.

Step 5

  1. Add printer memory.

  2. Print the documents.


Are the documents printed?

The problem is solved.

Contact customer support.