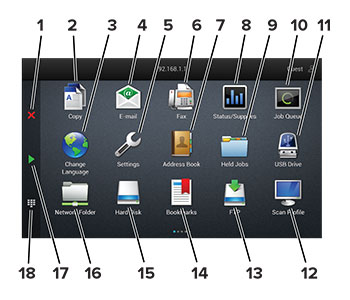
# |
Icon |
Function |
---|---|---|
1 |
Stop or Cancel button |
Stop the current job. |
2 |
Copy |
Make copies. |
3 |
Change Language |
Change the language on the printer display. |
4 |
|
Send e-mails. |
5 |
Settings |
Access the printer menus. |
6 |
Fax |
Send fax. |
7 |
Address Book |
Access, create, and organize contacts. |
8 |
Status/Supplies |
Note: You can also access this setting by touching the top section of the home screen. |
9 |
Held Jobs |
Show all the current held print jobs |
10 |
Job Queue |
Show all the current print jobs. Note: You can also access this setting by touching the top section of the home screen. |
11 |
USB Drive |
View, select, or print photos and documents from a flash drive. |
12 |
Scan Profiles |
Scan and save documents directly to the computer. |
13 |
FTP |
Scan and save documents directly to an FTP server. |
14 |
Bookmarks |
Organize all bookmarks. |
15 |
Hard Disk |
View, select, and manage documents from a hard drive or an intelligent storage drive. |
16 |
Network Folder |
Scan to a network folder or network location. |
17 |
Start button |
Start a job, depending on which mode is selected. |
18 |
On-screen keypad |
Enter numbers or symbols in an input field. |
Open a web browser, and then type the printer IP address in the address field.
Notes:
Click Settings > Device > Home Screen Customization .
Do one or more of the following:
To add an icon to the home screen, click
, select the app name, and then click
Add
.
To remove a home screen icon, select the app name, and then click Remove .
To customize an app name, select the app name, click Edit , and then assign a name.
To restore the name of an app, select the app name, click Edit , and then select Restore app label .
To add a space between apps, click
, select
BLANK SPACE
, and then click
Add
.
To arrange the apps, drag the app names in the order that you want.
To restore the default home screen, click Restore home screen .
Apply the changes.
From the home screen, touch Scan Center .
Select and create a destination, and then configure the settings.
Notes:
Apply the changes.
From the home screen, touch Shortcut Center .
Select a printer function, and then touch Create Shortcut .
Configure the settings, and then touch Save .
Type a unique shortcut name.
Touch OK .
The application automatically generates a unique shortcut number.
Open a web browser, and then type the printer IP address in the address field.
Notes:
Click Apps > Card Copy > Configure .
Notes:
Apply the changes.
Before using the application, make sure to do the following:
From the Embedded Web Server, click Apps > Display Customization > Configure .
Enable and configure the screen saver, slideshow, and wallpaper settings.
From the Screen Saver and Slideshow Images section, add, edit, or delete an image.
Notes:
Apply the changes.
From the home screen, touch Change Wallpaper .
Select an image to use.
Apply the changes.
Insert a flash drive into the USB port.
From the home screen, touch Slideshow .
Images appear in alphabetical order.
Notes:
From the home screen, touch Customer Support .
Print or e-mail the information.
Notes:
Open a web browser, and then type the printer IP address in the address field.
Notes:
Click Apps > Device Quotas > Configure .
In the User Accounts section, add or edit a user, and then set the user quota.
Apply the changes.
Use bookmarks to print frequently accessed documents that are stored in servers or on the web.
Open a web browser, and then type the printer IP address in the address field.
Notes:
Click Bookmarks > Add Bookmark , and then type a bookmark name.
Select an Address protocol type, and then do one of the following:
For HTTP and HTTPS, type the URL that you want to bookmark.
For HTTPS, make sure to use the host name instead of the IP address. For example, type
instead of typing . Make sure that the host name also matches the Common Name (CN) value in the server certificate. For more information on obtaining the CN value in the server certificate, see the help information for your web browser.For FTP, type the FTP address. For example,
. Enter the FTP port number. Port 21 is the default port for sending commands.For SMB, type the network folder address. For example,
. Type the network domain name.If necessary, select the Authentication type for FTP and SMB.
To limit access to the bookmark, enter a PIN.
Click Save .
Open a web browser, and then type the printer IP address in the address field.
Notes:
Click Bookmarks > Add Folder , and then type a folder name.
Click Save .
From the home screen, touch Address Book.
Do one or more of the following:
To add a contact, touch
on top of the screen, and then touch
Create Contact
. If necessary, specify a login method to allow application access.
To delete a contact, touch
on top of the screen, touch
Delete Contacts
, and then select the contact.
To edit contact information, touch the contact name.
To create a group, touch
on top of the screen, and then touch
Create Group
. If necessary, specify a login method to allow application access.
To delete a group, touch
on top of the screen, touch
Delete Groups
, and then select the group.
To edit a contact group, touch
GROUPS
> select a group name >
> select the action you want to make.
Apply the changes.