Item | Description | |
|---|---|---|
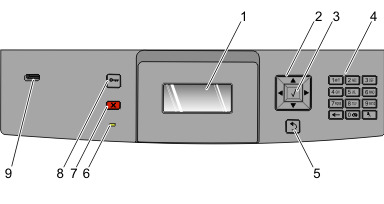
1 | Display | Shows messages and pictures that communicate the status of the printer |
2 | Navigation buttons  | Press the up or down arrow buttons to scroll through menus or menu items, or to increase or decrease a value when entering numbers. Press the left or right arrow buttons to scroll through menu settings (also called values or options), or to scroll through text that rolls to another screen. |
3 | Select  |
Notes:
|
4 | Keypad | Enter numbers or symbols on the display. |
5 | Back  | Returns the display to the previous screen |
6 | Indicator light | Indicates the printer status:
|
7 | Stop  | Stops all printer activity A list of options is offered once appears on the display. |
8 | Menu  | Opens the menu index Note: The menus are available only when the printer is in the state. |
9 | USB port | Insert a flash drive into the front of the printer to print saved files. Note: Only the front USB port supports flash drives. |