Order of installation
 | CAUTION—TIPPING HAZARD: Floor-mounted configurations require additional furniture for stability. You must use either a printer stand or printer base if you are using a high-capacity input tray, a duplex unit and an input option, or more than one input option. If you purchased a multifunction printer (MFP) that scans, copies, and faxes, you may need additional furniture. For more information, see www.lexmark.com/multifunctionprinters. |
 | CAUTION—SHOCK HAZARD: If you are accessing the system board or installing optional hardware or memory devices sometime after setting up the printer, then turn the printer off, and unplug the power cord from the wall outlet before continuing. If you have any other devices attached to the printer, then turn them off as well, and unplug any cables going into the printer. |
Install the printer and any options you have purchased in the following order:
Printer stand or caster base
2000-sheet tray
250- or 550-sheet tray
Printer
 | CAUTION—POTENTIAL INJURY: The printer weight is greater than 18 kg (40 lb) and requires two or more trained personnel to move it safely. |
For more information on installing a printer stand, caster base, or 2000-sheet tray, see the setup documentation that came with the option.
Installing drawers
The printer supports up to four optional drawers. A drawer consists of a tray and a support unit. All drawers are installed the same way.
| | CAUTION—SHOCK HAZARD: If you are accessing the system board or installing optional hardware or memory devices sometime after setting up the printer, then turn the printer off, and unplug the power cord from the wall outlet before continuing. If you have any other devices attached to the printer, then turn them off as well, and unplug any cables going into the printer. |
Unpack the drawer, and then remove any packing material.
Place the drawer in the location chosen for the printer.
| Note: If you have multiple options to install, then see the section about the recommended order of installation. The 2000-sheet drawer must be the bottom drawer. |
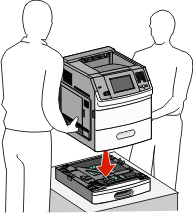
Align the printer with the drawer, and then lower the printer into place.
| | CAUTION—POTENTIAL INJURY: The printer weight is greater than 18 kg (40 lb) and requires two or more trained personnel to move it safely. |
Update the options in the printer driver after you have completed installation.
Removing an optional drawer
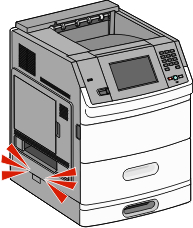
| Warning—Potential Damage: Lifting the printer from a drawer without pushing in the safety latches could damage the latches. |
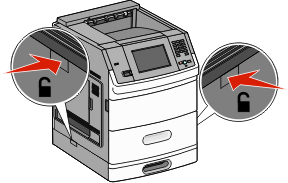
To remove an optional drawer, push in the safety latches on both sides of the drawer until they click. The safety latches stay recessed, so it is easier to lift the printer.