Unexpected page breaks occur
Action | Yes | No |
|---|---|---|
Increase the printing timeout.
Did the file print correctly? | The problem is solved. | Check the original file for manual page breaks. |
Action | Yes | No |
|---|---|---|
Step 1
Are the documents printed? | The problem is solved. | Go to step 2. |
Step 2 The print job may contain a formatting error or invalid data.
Are the documents printed? | The problem is solved. | Go to step 3. |
Step 3 If you are printing from the Internet, then the printer may be reading the multiple job titles as duplicates. For Windows users
For Macintosh users
Are the documents printed? | The problem is solved. | Go to step 4. |
Step 4
Are the documents printed? | The problem is solved. | Go to step 5. |
Step 5
Are the documents printed? | The problem is solved. | Contact customer support. |
Action | Yes | No |
|---|---|---|
Step 1 Check if the flash drive is inserted into the front USB port. Note: The flash drive will not work if it is inserted into the rear USB port. Is the flash drive inserted into the front USB port? | Go to step 2. | Insert the flash drive into the front USB port. |
Step 2 Check if the indicator light on the printer control panel is blinking green. Note: A green blinking light indicates that the printer is busy. Is the indicator light blinking green? | Wait until the printer is ready, then view the held jobs list, and then print the documents. | Go to step 3. |
Step 3
Does the error message still appear? | Go to step 4. | The problem is solved. |
Step 4 Check if the flash drive is supported.
Does the error message still appear? | Go to step 5. | The problem is solved. |
Step 5 Check if the USB port is disabled by the system support person. Does the error message still appear? | Contact customer support. | The problem is solved. |
Action | Yes | No |
|---|---|---|
Step 1 Make sure the printer is not in Hex Trace mode. Note: If appears on the printer display, then turn off the printer, and then turn it back on to deactivate Hex Trace mode. Is the printer in Hex Trace mode? | Deactivate Hex Trace mode. | Go to step 2. |
Step 2
Do incorrect characters print? | Contact customer support. | The problem is solved. |
Action | Yes | No |
|---|---|---|
Step 1
Did the job print from the correct tray or on the correct paper? | The problem is solved. | Go to step 2. |
Step 2
Did the job print from the correct tray or on the correct paper? | The problem is solved. | Go to step 3. |
Step 3
Did the job print from the correct tray or on the correct paper? | The problem is solved. | Go to step 4. |
Step 4
Did the job print from the correct tray or on the correct paper? | The problem is solved. | Contact customer support. |
Action | Yes | No |
|---|---|---|
Step 1
Did the job print and collate correctly? | The problem is solved. | Go to step 2. |
Step 2
Did the job print and collate correctly? | The problem is solved. | Go to step 3. |
Step 3 Reduce the complexity of the print job by eliminating the number and size of fonts, the number and complexity of images, and the number of pages in the job. Did the job print and collate correctly? | The problem is solved. | Contact customer support. |
Action | Yes | No |
|---|---|---|
Step 1
Do the files print? | The problem is solved. | Go to step 2. |
Step 2
Do the files print? | The problem is solved. | Contact customer support. |
Notes:
Action | Yes | No |
|---|---|---|
Step 1
Does the print speed increase? | The problem is solved. | Go to step 2. |
Step 2
Does the print speed increase? | The problem is solved. | Contact customer support. |
Action | Yes | No |
|---|---|---|
Step 1
Do the jobs print? | The problem is solved. | Go to step 2. |
Step 2
Do the jobs print? | The problem is solved. | Go to step 3. |
Step 3 If an error message appears on the printer display, then clear the message. Note: The printer continues to print after clearing the message. Do the jobs print? | The problem is solved. | Go to step 4. |
Step 4
Do the jobs print? | The problem is solved. | Go to step 5. |
Step 5
Do the jobs print? | The problem is solved. | Go to step 6. |
Step 6
Do the jobs print? | The problem is solved. | Contact customer support. |
Action | Yes | No |
|---|---|---|
Step 1 Change the environmental settings of the printer.
Did the job print? | The problem is solved. | Go to step 2. |
Step 2 Reduce the number and size of fonts, the number and complexity of images, and the number of pages in the print job, and then resend the job Did the job print? | The problem is solved. | Go to step 3. |
Step 3
Did the job print? | The problem is solved. | Go to step 4. |
Step 4
Did the job print? | The problem is solved. | Go to step 5. |
Step 5
Did the job print? | The problem is solved. | Go to step 6. |
Step 6 Install additional printer memory, and then resend the print job. Did the job print? | The problem is solved. | Contact customer support. |
Notes:
Action | Yes | No |
|---|---|---|
Step 1
Do the trays link correctly? | The problem is solved. | Go to step 2. |
Step 2
Do the trays link correctly? | The problem is solved. | Contact customer support. |
Action | Yes | No |
|---|---|---|
Increase the printing timeout.
Did the file print correctly? | The problem is solved. | Check the original file for manual page breaks. |

Action | Yes | No |
|---|---|---|
Step 1
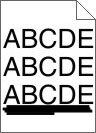
Do prints still contain characters that have jagged or uneven edges? | Go to step 2. | The problem is solved. |
Step 2
Do prints still contain characters that have jagged or uneven edges? | Contact customer support. | The problem is solved. |

Action | Yes | No |
|---|---|---|
Step 1
Is the printer still printing blank pages? | Go to step 2. | The problem is solved. |
Step 2
Is the printer still printing blank pages? | Go to step 3. | The problem is solved. |
Step 3 Replace the imaging unit, and then resend the print job. Is the printer still printing blank pages? | Contact customer support. | The problem is solved. |
Action | Yes | No |
|---|---|---|
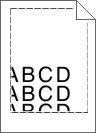
Step 1
Is the page or image clipped? | Go to step 2. | The problem is solved. |
Step 2 From the printer control panel, set the paper size and type in the Paper menu to match the paper loaded in the tray. Do the paper size and type match the paper loaded in the tray? | Go to step 3. | Do one or more of the following:
|
Step 3
Is the page or image clipped? | Go to step 4. | The problem is solved. |
Step 4
Is the page or image clipped? | Contact customer support. | The problem is solved. |
| Note: This problem occurs when projecting transparencies with reflective overhead projectors. To obtain the highest projected color quality, transmissive overhead projectors are recommended. |
Action | Yes | No |
|---|---|---|
Step 1 From the printer control panel, make sure the paper type setting is set to Transparency. Is the paper type setting correct? | Go to step 2. | Set the paper type to Transparency. |
Step 2 Reduce the toner darkness, and then resend the print job. Does the print on the color transparency look lighter? | The problem is solved. | Go to step 3. |
Step 3 Make sure you are using a recommended type of color transparency, and then resend the print job. Does the print on the color transparency look lighter? | The problem is solved. | Contact customer support. |
Action | Yes | No |
|---|---|---|
Step 1 Load paper with the correct paper type and weight in the tray. Is paper with the correct paper type and weight loaded in the tray? | Go to step 2. | Load paper with the correct paper type and weight in the tray. |
Step 2 From the printer control panel, set the paper type and weight in the Paper menu to match the paper loaded in the tray. Is the tray set to the type and weight of the paper loaded? | Go to step 3. | Change the paper loaded in the tray to match the paper type and weight specified in the tray settings. |
Step 3
Do shadow images still appear on prints? | Go to step 4. | The problem is solved. |
Step 4 Replace the imaging unit, and then resend the print job. Do shadow images still appear on prints? | Contact customer support. | The problem is solved. |
Action | Yes | No |
|---|---|---|
Step 1 Check if Allow Background Removal is set to Off.
Did the background disappear from the prints? | The problem is solved. | Go to step 2. |
Step 2 Adjust the toner darkness to a lighter setting.
Did the background disappear from the prints? | The problem is solved. | Go to step 3. |
Step 3 Reinstall the toner cartridge.
Did the background disappear from the prints? | The problem is solved. | Go to step 4. |
Step 4 Check if off-white background is selected.
Did the background disappear from the prints? | The problem is solved. | Contact customer support. |
Action | Yes | No |
|---|---|---|
Step 1
Are the margins correct? | The problem is solved. | Go to step 2. |
Step 2 From the printer control panel, set the paper size in the Paper menu to match the paper loaded in the tray. Does the paper size match the paper loaded in the tray? | Go to step 3. | Do one or more of the following:
|
Step 3
Are the margins correct? | The problem is solved. | Contact customer support. |
Action | Yes | No |
|---|---|---|
Step 1 Move the width and length guides in the tray to the correct positions for the size of the paper loaded. Are the width and length guides positioned correctly? | Go to step 2. | Adjust the width and length guides. |
Step 2 From the printer control panel, set the paper type and weight in the Paper menu to match the paper loaded in the tray. Do the paper type and weight match the type and weight of the paper in the tray? | Go to step 3. | Specify the paper type and weight from the tray settings to match the paper loaded in the tray. |
Step 3
Is the paper still curled? | Go to step 4. | The problem is solved. |
Step 4
Is the paper still curled? | Go to step 5. | The problem is solved. |
Step 5
Is the paper still curled? | Contact customer support. | The problem is solved. |
Action | Yes | No |
|---|---|---|
Step 1
Do print irregularities still appear? | Go to step 2. | The problem is solved. |
Step 2 From the printer control panel, set the paper size and type in the Paper menu to match the paper loaded in the tray. Do the printer settings match the type and weight of the paper loaded in the tray? | Go to step 3. | Specify the paper size and type from the tray settings to match the paper loaded in the tray. |
Step 3
Do print irregularities still appear? | Go to step 4. | The problem is solved. |
Step 4 Check if the paper loaded in the tray has texture or rough finishes. Are you printing on textured or rough paper? | From the printer control panel, set the paper texture in the Paper menu to match the paper loaded in the tray. | Go to step 5. |
Step 5
Do print irregularities still appear? | Go to step 6. | The problem is solved. |
Step 6 Replace the imaging unit, and then resend the print job. Do print irregularities still appear? | Contact customer support at http://support.lexmark.com or your service representative. | The problem is solved. |
Action | Yes | No |
|---|---|---|
Step 1 Measure the distance between the defects.
Is the distance between defects equal to one of the listed measurements? | Go to step 2. |
|
Step 2 Replace the imaging unit, and then resend the print job. Do the repeating defects still appear? | Contact customer support at http://support.lexmark.com or your service representative. | The problem is solved. |
Action | Yes | No |
|---|---|---|
Step 1
Is the print still too dark? | Go to step 2. | The problem is solved. |
Step 2
Is the tray set to the type, texture, and weight of the paper loaded? | Go to step 3. | Do one or more of the following:
|
Step 3
Is the print still too dark? | Go to step 4. | The problem is solved. |
Step 4 Check if the paper loaded in the tray has texture or rough finishes. Are you printing on textured or rough paper? | From the printer control panel, change the texture settings in the Paper Texture menu to match the paper you are printing on. | Go to step 5. |
Step 5
Is the print still too dark? | Go to step 6. | The problem is solved. |
Step 6 Replace the imaging unit, and then resend the print job. Is the print still too dark? | Contact customer support. | The problem is solved. |

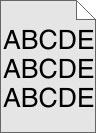
Action | Yes | No |
|---|---|---|
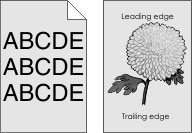
Step 1
Is the print still too light? | Go to step 2. | The problem is solved. |
Step 2 From the printer control panel, set the paper type, texture, and weight in the Paper menu to match the paper loaded in the tray. Is the tray set to the type, texture, and weight of the paper loaded? | Go to step 3. | Change the paper type, texture, and weight to match the paper loaded in the tray. |
Step 3
Is the print still too light? | Go to step 4. | The problem is solved. |
Step 4 Make sure that the paper has no texture or rough finishes. Are you printing on textured or rough paper? | From the printer control panel, change the texture settings in the Paper Texture menu to match the paper you are printing on. | Go to step 5. |
Step 5
Is the print still too light? | Go to step 6. | The problem is solved. |
Step 6
Is the print still too light? | Go to step 7. | The problem is solved. |
Step 7 Replace the imaging unit, and then resend the print job. Is the print still too light? | Contact customer support. | The problem is solved. |
Action | Yes | No |
|---|---|---|
Step 1
Is the print still skewed? | Go to step 2. | The problem is solved. |
Step 2
Is the print still skewed? | Contact customer support. | The problem is solved. |

Action | Yes | No |
|---|---|---|
Step 1
Is the printer printing solid black pages? | Go to step 2. | The problem is solved. |
Step 2 Replace the imaging unit, and then resend the print job. Is the printer printing solid black pages? | Contact customer support. | The problem is solved. |
Action | Yes | No |
|---|---|---|
Step 1 From the printer control panel, set the paper type in the Paper menu to match the paper loaded in the tray. Is the paper type for the tray set to Transparency? | Go to step 2. | Set the paper type to Transparency. |
Step 2
Is the print quality still poor? | Contact customer support. | The problem is solved. |
Action | Yes | No |
|---|---|---|
Step 1
Do streaked horizontal lines appear on prints? | Go to step 2. | The problem is solved. |
Step 2 From the printer control panel, set the paper type and weight in the Paper menu to match the paper loaded in the tray. Do the paper type and weight match the type and weight of the paper in the tray? | Go to step 3. | Change the paper type and weight to match the paper loaded in the tray. |
Step 3
Do streaked horizontal lines appear on prints? | Go to step 4. | The problem is solved. |
Step 4
Do streaked horizontal lines appear on prints? | Go to step 5. | The problem is solved. |
Step 5 Replace the imaging unit, and then resend the print job. Do streaked horizontal lines appear on prints? | Contact customer support. | The problem is solved. |
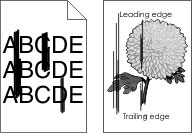
Action | Yes | No |
|---|---|---|
Step 1
Do streaked vertical lines appear on prints? | Go to step 2. | The problem is solved. |
Step 2 From the printer control panel, set the paper texture, type, and weight in the Paper menu to match the paper loaded in the tray. Do the paper texture, type, and weight match the paper in the tray? | Go to step 3. | Do one or more of the following:
|
Step 3
Do streaked vertical lines appear on prints? | Go to step 4. | The problem is solved. |
Step 4
Do streaked vertical lines appear on prints? | Go to step 5. | The problem is solved. |
Step 5 Replace the imaging unit, and then resend the print job. Do streaked vertical lines appear on prints? | Contact customer support at http://support.lexmark.com or your service representative. | The problem is solved. |

Action | Yes | No |
|---|---|---|
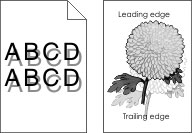
Step 1
Do horizontal voids appear on prints? | Go to step 2. | The problem is solved. |
Step 2
Do horizontal voids appear on prints? | Go to step 3. | The problem is solved. |
Step 3
Do horizontal voids appear on prints? | Go to step 4. | The problem is solved. |
Step 4 Replace the imaging unit, and then resend the print job. Do horizontal voids appear on prints? | Contact customer support. | The problem is solved. |

Action | Yes | No |
|---|---|---|
Step 1
Do vertical voids appear on prints? | Go to step 2. | The problem is solved. |
Step 2
Do vertical voids appear on prints? | Go to step 3. | The problem is solved. |
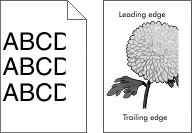
Step 3 Check if you are using a recommended type of paper.
Do vertical voids appear on prints? | Go to step 4. | The problem is solved. |
Step 4
Do vertical voids appear on prints? | Go to step 5. | The problem is solved. |
Step 5 Replace the imaging unit, and then resend the print job. Do vertical voids appear on prints? | Contact customer support. | The problem is solved. |
Action | Yes | No |
|---|---|---|
Replace the imaging unit, and then resend the print job. Do toner specks appear on prints? | Contact customer support. | The problem is solved. |
Action | Yes | No |
|---|---|---|
Step 1 Reinstall the imaging unit.
Does fog or shading appear on prints? | Go to step 2. | The problem is solved. |
Step 2 Replace the imaging unit, and then resend the print job. Does fog or shading appear on prints? | Contact customer support at http://support.lexmark.com or your service representative. | The problem is solved. |
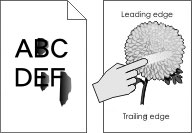
Action | Yes | No |
|---|---|---|
Step 1 From the Paper menu on the printer control panel, check the paper type, texture, and weight. Do the paper type, texture, and weight match the paper loaded in the tray? | Go to step 2. | Specify the paper type, texture, and weight from the tray settings to match the paper loaded in the tray. |
Step 2 Resend the print job. Does the toner still rub off? | Contact customer support. | The problem is solved. |

Action | Yes | No |
|---|---|---|
Replace the imaging unit, and then resend the print job. Is the print density uneven? | Contact customer support. | The problem is solved. |
 > Settings > General Settings > Timeouts