Using the graphical user interface
Understanding the home screen
Understanding the home screen
The following lets you navigate and use DDU:
|
1
|
Add New
|
Lets you create workflows. A workflow is a set of tasks that are performed on printers.
Note:
For information on creating workflows, see
Creating deployment workflows
.
|
|
2
|
Browse
|
Lets you browse workflows.
|
|
3
|
Create CSV File
|
Lets you discover printers, and then create .csv files for deploying workflows and creating packages from the Package Builder utility.
Note:
To obtain the eSF application and license packages from the Package Builder utility, go to
https://cdp.lemark.com/package-builder/
.
|
|
4
|
Export Device Data
|
Lets you discover printers, and then export its certificate signing request (CSR), all device settings, shortcuts, logs, and reports information.
|
|
5
|
Workflow panel
|
Shows the list of created workflows. You can run, edit, or delete workflows from this panel.
|
|
6
|
Deployment Name
|
The name of the workflow.
|
|
7
|
Deployment Description
|
The description of the workflow.
Note:
This field is optional.
|
Creating deployment workflows
Understanding the workflows
Understanding the workflows
|
1
|
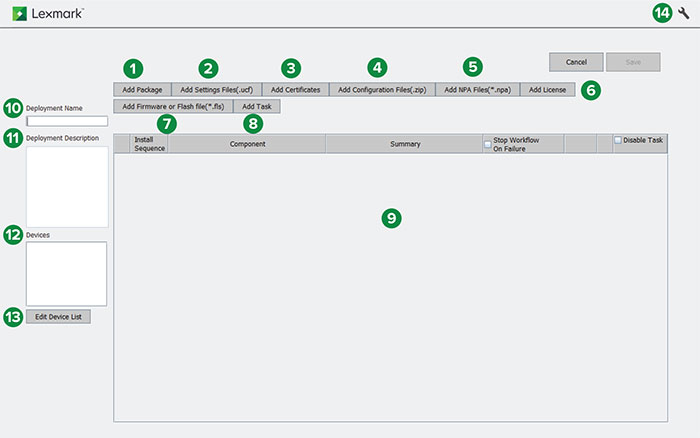
Add Package
|
Lets you add a custom package or a package from the Package Builder utility.
Note:
For more information, see
Adding packages
.
|
|
2
|
Add Settings Files(.ucf)
|
Lets you add .ucf settings files for deployment. When adding printer settings files, make sure that the printer is running on eSF version 4 or earlier. You can add eSF settings files to any supported printer model.
Notes:
|
|
3
|
Add Certificates
|
Lets you add printer certificates for deployment.
Note:
For more information, see
Adding certificates
.
|
|
4
|
Add Configuration Files(.zip)
|
Lets you add .zip configuration files for deployment to printers running on eSF version 4 or later. The configuration files can contain printer settings or eSF settings.
Notes:
|
|
5
|
Add NPA files(*.npa)
|
Lets you add .npa command files for deployment.
Note:
For more information, see
Adding npa files (.npa)
.
|
|
6
|
Add License
|
Lets you add printer licenses for deployment.
Note:
For more information, see
Adding licenses
.
|
|
7
|
Add Firmware or Flash file(*.fls)
|
Lets you add the following for deployment:
-
Firmware files
-
Application flash files
-
Engine codes
-
Scanner codes
Note:
For more information, see
Adding a firmware or flash file
.
|
|
8
|
Add Task
|
Lets you add the following tasks for deployment:
-
Start, stop, or uninstall an application
-
Restart printers
-
Remove held print jobs
-
Increase the interval between tasks
-
Update a device certificate
-
Delete device certificate
Note:
For more information, see
Adding tasks
.
|
|
9
|
Workflow panel
|
Shows the list of created workflows.
|
|
10
|
Deployment Name
|
The name of the workflow.
|
|
11
|
Deployment Description
|
The description of the workflow.
Note:
This field is optional.
|
|
12
|
Devices
|
The printers added for the workflow.
|
|
13
|
Edit Device List
|
Lets you edit the printers added for the workflow.
Note:
For more information, see
Adding printers
.
|
|
14
|
Advanced Settings
|
Lets you configure the deployment and discovery settings.
Note:
For more information, see
Configuring deployment and discovery settings using DDU
.
|
Adding printers
Adding printers
Note:
If a workflow is clicked for the first time, then the user is prompted to add devices where the items are deployed to.
-
From DDU, click
Add New
.
-
Type the deployment name and description.
-
Click
Edit Device List
.
-
Do either of the following:
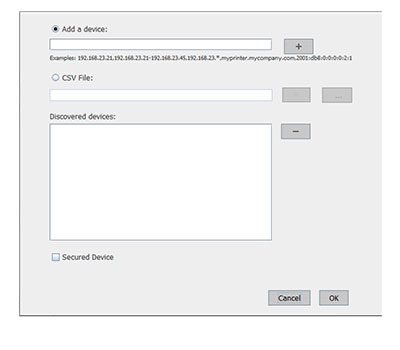
Add devices manually
-
Select
Add a device
.
-
In the "Add a device" field, type the IP addresses or host names of the devices, and then click
 .
.
Use the following formats to add IP addresses:
-
10.195.*.*
(wildcards for only the last two octets)
-
10.195.
y
.
yy
(single IP address)
-
10.195.1.3-10.195.1.255
(IP address range)
-
printerHostname.company.com
(host name)
-
2001:db8:0:0:0:0:2:1
(single full IPv6 address; wildcards are not supported)
Note:
To remove an IP address or host name, select the IP address or host name in the "Discovered devices" list, and then click

.
Add devices using the CSV file
-
Select
CSV File
.
-
Browse to the CSV input file.
Note:
The default file name is
DduInput.csv
. For information on creating a CSV file, see
Creating CSV files
.
-
If necessary, select
Secured Device
to prompt the user to type the authentication credentials used to access secured devices when deploying the workflow.
-
Click
OK
.
After a printer is added, DDU checks if the printer is online. If it is not, then a
Discovery Failed
error message appears.
Adding packages
Adding packages
Note:
If you are deploying Scan Center Basic or Premium version 1.0, then make sure that the printer is running on eSF version 5 firmware. If you are deploying Scan Center Basic or Premium version 1.1, then make sure that the printer is running on eSF version 6 firmware. For information on checking the eSF version of your printer, see the
help information documentation
.
-
From DDU, do either of the following:
-
Select
Package Builders Package
or
Custom Package
.
Note:
When creating a custom package, printer information such as the serial number is not required.
If
Package Builder Package
is selected, then do the following:
-
Create a PkgBldrInput.csv file. For more information, see
Creating CSV files
.
-
Access the Package Builder application.
-
From the application, upload the PkgBldrInput.csv file.
Note:
For more information, see the
Package Builder User's Guide
.
-
Specify the location of the package file.
-
Click
OK
.
Adding settings files (.ucf)
Adding settings files (.ucf)
Note:
When adding printer settings files, make sure that the printer is running on eSF version 4 or earlier. You can add eSF settings files to any supported printer model. For information on checking the eSF version of your printer, see the
help information documentation
.
-
From DDU, do either of the following:
-
Select either of the following:
-
Select either of the following:
-
Do either of the following:
-
If
Standard UCF File
is selected, then in the Settings File field, specify the location of the updated settings file.
-
If
Variable UCF File
is selected, then do the following:
-
If you have already created the variable settings file based on the template manually, then in the Settings File field, specify its location. If you do not have a variable settings file, then click
Create Template File
to create the file using DDU.
-
If you have already created the lookup .csv file with different values for the variable setting names based on the template, then in the Lookup File field, specify its location. If you do not have a lookup .csv file, then click
Create Lookup CSV File
to create the file using DDU.
Notes:
-
Click
OK
.
Adding certificates
Adding certificates
Printer certificates are unique identifiers that are used to authenticate the following:
-
HTTPS
-
SSL
-
TLS
-
IPSec
-
802.11 connections
-
From DDU, do either of the following:
-
Do either of the following:
Add a CA certificate
-
Click
Add CA Certificate
.
-
Specify the location of the certificate.
Add a signed device certificate
-
Click
Add Signed Device Certificate
.
-
Specify the directory of the signed certificate.
Add a PKCS certificate
-
Click
Add PKCS Certificate
.
-
Specify the location of the certificate.
-
Type a friendly name for the certificate.
-
Type the password for the PKCS file.
Notes:
-
Check the Do hostname validation checkbox to validate hostname with common name of the certificate. By default, it is checked.
-
PKCS file deployment from DDU is only supported in devices with latest version of firmware.
-
Click
OK
.
Adding configuration files (.zip)
Adding configuration files (.zip)
Note:
This feature is applicable only to printers running on eSF version 4 or later. The configuration files can contain printer settings or eSF settings. For information on checking the eSF version of your printer, see the
help information documentation
.
-
From DDU, do either of the following:
-
Select either of the following:
-
Do either of the following:
-
If
Standard Configuration File
is selected, then in the Configuration File field, specify the location of the updated configuration file.
-
If
Variable Configuration File
is selected, then do the following:
-
If you have already created the variable settings file based on the template manually, then in the Settings File field, specify its location. If you do not have a variable settings file, then click
Create Template File
to create the file using DDU.
-
If you have already created the lookup .csv file with different values for the variable setting names based on the template, then in the Lookup File field, specify its location. If you do not have a lookup .csv file, then click
Create Lookup CSV File
to create the file using DDU.
Notes:
-
Click
OK
.
Adding npa files (.npa)
Adding npa files (.npa)
-
From DDU, do either of the following:
-
Do either of the following:
-
Click
Select NPA File (*.npa)
.
-
Specify the location of the file.
-
Select the NPA Port.
Note:
The default port number is 9500.
-
Click
OK
.
Adding licenses
Adding licenses
This feature lets you add licenses for eSF applications.
Note:
Make sure that the application specific for the license is installed on the printer.
-
From DDU, do either of the following:
-
Select the license type.
Notes:
-
If
eSF 1.x,2.x and 3.x licenses
is selected, then select the application where you want to deploy the license. Select this option when using printers running on eSF version 3 or earlier.
-
Printers running on eSF version 4 or later support only licenses with the .zip format.
-
Printers running on eSF version 3 or earlier support only licenses with the .lic format.
-
For information on checking the eSF version of your printer, see the
help information documentation
.
-
Specify the location of the license file.
-
Click
OK
.
Adding a firmware or flash file
Use this feature when deploying firmware files, application flash files, or engine codes and scanner codes.
Note:
Deploying a raw firmware flash file may take some time to finish. Make sure that the firmware deployment settings are configured accordingly.
-
From DDU, do either of the following:
-
Specify the location of the flash file.
-
Select one of the following:
-
Firmware File
—Deploy a firmware flash file.
Notes:
-
If
Save File Path Only
is selected, then make sure that the file is located and accessible in the specified file path during the deployment. This setting does not include the firmware file in the workflow. Clearing this setting compresses the file and saves it in the workflow.
-
If the firmware version in the file is later than the firmware version on the printer, then the firmware on the printer is upgraded. Otherwise, it is downgraded. If the firmware version in the file is the same as the version on the printer, then the firmware is not deployed. To deploy the firmware without checking the firmware version of the printer, select
Force Deployment
.
-
You can add only one firmware file in a workflow.
-
The firmware file is the first in the installation sequence by default. For example, if you add a firmware file in the fifth sequence, then it moves to the first sequence automatically. However, the sequence of the firmware task can be altered.
-
Application file
—Deploy application .fls files.
-
Others
—Deploy engine codes, scanner codes, or other flash files. The Others option does not validate the flash file.
Warning—Potential Damage:
Deploying inappropriate flash files may damage the printer.
-
Click
OK
.
Adding tasks
This feature lets you add multiple tasks to a workflow.
-
From DDU, do either of the following:
-
Do any of the following:
Add a task to start, stop, or uninstall an application
-
Select a task.
-
In the Application Id/Name menu, select an application.
If the application is not on the list, then do either of the following:
Update the app-id-version.txt file
Note:
You can find the configuration file at
DDUAppFolder
\config
, where
DDUAppFolder
is the location of the DDU folder.
-
Using a text editor, open the
app-id-version.txt
file.
-
Type
AppID
=
AppName
:
ver1,ver2,ver3
, where
AppName
is the friendly name,
AppID
is the application ID, and
ver1,ver2,ver3
are application versions separated by a comma.
-
Save the file.
Notes:
-
To show only the application ID in the menu, type
AppID
=:
ver1,ver2,ver3
. Adding
AppID
using this method applies it on the entire session.
-
You can find the file in
DDUAppFolder
\Config\
, where
DDUAppFolder
is the location of the DDU folder.
Type the application ID
In the Application Id/Name menu, type the application ID.
Note:
This option does not update the app-id-version.txt file. The added application ID is only available for the created workflow. Adding
AppID
using this method does not apply it on the entire session.
-
If necessary, in the Version menu, select or type the version of the application that you selected.
Note:
If
Any
is selected, then DDU starts, stops, or uninstalls any version of the application that is installed on the printer.
-
Click
OK
.
Note:
For more information on obtaining the application ID and version number, contact your solution provider.
Add a task to restart the printers
Select
Reboot printer
.
Add a task to remove held print jobs
Select
Remove Held Jobs
.
Note:
The
Remove Held Jobs
option is applicable to printers running on eSF version 4 or earlier.
Add a task to increase the interval between tasks
-
Select
Add Delay
.
-
Specify the interval in milliseconds.
Add a task to update a device certificate
Select
Update Device Certificate
.
Add a task to delete device certificate
Select
Delete Device Certificate
.
-
Click
OK
.
-
Type the deployment name and description.
-
Click
Save
.
Notes:
-
The firmware file is the first in the installation sequence by default. For example, if you add a firmware file in the fifth sequence, then it moves to the first sequence automatically.
-
To move tasks, click the up and down arrows.
-
To stop a task, in the Stop Workflow On Failure column, select the task that stops the workflow when a failure occurs.
-
You can edit and delete tasks.
-
To add a printer, click
Edit Device List
. For more information, see
Adding printers
.
-
To configure the deployment and discover settings, click
 . For more information on configuring DDU, see
Configuring the utility
.
. For more information on configuring DDU, see
Configuring the utility
.
Creating a variable configuration file and a lookup .csv file
Creating a variable configuration .ucf or .xml file and a lookup .csv file using DDU
Creating a variable configuration .ucf or .xml file and a lookup .csv file using DDU
Creating a variable configuration .ucf or .xml file
A variable configuration file contains the variable setting names based on the template of the original settings file or configuration file.
Note:
Use a text editor that supports UTF-8.
-
From DDU, add a settings file or a configuration file.
-
Select
Variable UCF File
or
Variable Configuration File
.
-
Click
Create Template File
.
-
In the Base UCF Path or Base VCC Path field, specify the location of the settings file or configuration file of the standard configuration file.
-
Click
.
-
On the left panel, select a file, and then click
>>
. The properties and values of all settings available in the file are shown in the right panel.
-
In the right panel, select the settings. Selecting a setting updates its current value to a variable,
${Var_
PropertyName
}
, where
PropertyName
is the name of the setting. For example, if you selected
WS_SCAN_ENABLED
, then the automatically generated variable is
${Var_WS_SCAN_ENABLED}
.
Notes:
-
To change the automatically generated variable name, double-click it.
-
When changing the automatically generated variable, make sure that the variable name format is
${
VariableName
}
, where
VariableName
is a unique property name. Variable names are used when creating the lookup .csv file.
-
To sort the settings alphabetically, double-click the
Property
column.
-
If necessary, repeat steps 6 and 7 to select multiple files.
-
Select either of the following:
-
Save All Settings
—Create a variable configuration file that contains all the settings.
-
Save Changes Only
—Create a variable configuration file that contains only the settings that you have updated. For example, if you have updated only two settings, then only those settings are included in the configuration file. Other settings are not copied.
Note:
For the variable configuration file of Scan to Network, all settings are saved by default.
-
If necessary, specify the location where you want to save the new variable configuration file in Out Directory.
Notes:
-
By default, the new file name contains the suffix
_Var
and is saved in the location of the original settings file or configuration file.
-
The file name of the new variable configuration file cannot be changed.
-
Click
Save
.
Creating a lookup .csv file
A .csv file contains different values for the variable setting names based on the template.
Notes:
-
You can create or specify a lookup .csv file only after creating or specifying a variable configuration file.
-
We recommend creating the .csv file using a spreadsheet that supports CSV file format.
-
From DDU, add a settings file or a configuration file.
-
Select
Variable UCF File
or
Variable Configuration File
.
-
In the Settings File or Configuration File field, specify the location of the variable configuration file or create a template.
-
Click
Create Lookup CSV File
.
-
Depending on the identifier used when adding a printer, select either
IP Address Header
or
Host Name Header
.
Notes:
-
For more information, see
Adding printers
.
-
Use the same identifier when adding a printer. For example, if you used the printer IP address when adding a printer, then use the same when creating the lookup .csv file.
-
The first row contains the identifier and the specified variable name in the configuration file.
-
The variable name in the first row appears only when the variable configuration file is created using DDU.
-
In the list, double-click on the fields to specify the values of the variable name for each printer.
-
If necessary, specify the location where you want to save the lookup .csv file in Out Directory.
Notes:
-
By default, the file name contains the prefix
CSV_
and is saved in the location of the original settings file or configuration file.
-
The file name of the new variable configuration file cannot be changed.
-
Click
Save
.
Understanding the files
Sample standard settings file
nvOemMfgLongName "Lexmark International"
HTTPSENABLE TRUE
LPDTIMEOUT 90
printTimeout "90"
Sample variable .ucf file
nvOemMfgLongName $(variable_1)
HTTPSENABLE $(variable_2)
LPDTIMEOUT $(variable_3)
printTimeout $(variable_4)
The lookup file contains the values of the variable names in the configuration file. These values are deployed to printers that are specified in the lookup file.
Understanding the lookup .csv file
Understanding the lookup .csv file
The file contains the values for each variable defined in the variable configuration file. These values are deployed to the printers defined in the lookup file.
The following lookup file deploys the configuration file to three printers and retains the current value of
printTimeout
for the third printer:
Sample lookup file
IP_ADDRESS,variable_1,variable_2,variable_3,variable_4
192.168.1.1,"abc International",TRUE,60,"80"
192.168.1.2,"xyz International",FALSE,70,"60"
192.168.1.5,"mno International",FALSE,50,CUR_VAL
The first row contains the headers of the lookup file and the variable names defined in the variable configuration file. Use the same identifier when adding a printer. For example, if you used the printer IP address when adding a printer, then use the same when creating a lookup .csv file.
The succeeding rows are the printers where you want to deploy the configuration file and the values for each variable.
Notes:
-
Make sure that the values of the variable names have the same format as the variable names in the original .ucf or .xml configuration files. For example, if the value in the original .ucf or .xml configuration file has double quotes, then add double quotes. If the value in the original .ucf or .xml configuration file is in capital letters, then use capital letters.
-
If the value of a setting contains a back slash, then type another back slash before the first. For example, if the value is
\\192.168.1.2\share
, then enter
\\\192.168.1.2\\share
.
-
If you do not want to update the current value of a variable setting, then set the value to
CUR_VAL
.
Creating a variable configuration .ucf or .xml file and a lookup .csv file manually
Creating a variable configuration .ucf or .xml file and a lookup .csv file manually
Creating a variable .ucf or .xml file
A variable file contains the variable setting names based on the template of the original settings file or configuration file.
Note:
Use a text editor that supports UTF-8.
-
Using a text editor, open the .ucf file.
-
From the setting that you want to have a variable value, change its value to
${
VariableName
}
, where
VariableName
is a unique variable name.
-
Save the file.
Notes:
-
We recommend saving the .ucf file with a different name to distinguish it from the original file. For example, you can add the prefix
Var_
to the file name.
-
Take note of the variable names in the configuration file. These variable names are used when creating the lookup .csv file.
Sample standard settings file
nvOemMfgLongName "Lexmark International"
HTTPSENABLE TRUE
LPDTIMEOUT 90
printTimeout "90"
Sample variable .ucf file
nvOemMfgLongName $(variable_1)
HTTPSENABLE $(variable_2)
LPDTIMEOUT $(variable_3)
printTimeout $(variable_4)
Creating a VCC variable configuration file bundle
Note:
Use a text editor that supports UTF-8.
-
Extract the .xml or .ucf files in the bundle that you want to have variable settings.
-
Using a text editor, open the .xml or .ucf files.
-
From the setting that you want to have a variable value, change the value to
${
VariableName
}
, where
VariableName
is a unique variable name.
-
Save the file.
-
Compress the updated .xml or .ucf files in another bundle.
Notes:
-
We recommend saving the bundle with a different name to distinguish it from the original bundle. For example, you can add the prefix
Var_
in the file name.
-
When updating multiple configuration files, use unique variable names. A variable name used in an .xml or .ucf file must not be used in a different .xml or .ucf file contained in the VCC bundle.
-
Take note of the variable names in the configuration file. These variable names are used when creating the lookup .csv file.
The following are updated configuration files in a VCC configuration file bundle:
Sample bundle.xml file
<?xml version="1.0" encoding="UTF-8"?>
<bundle>
<bundleInfo>
<name> Exported Bundle </name>
<description>
Settings exported on Mon May 30 02:54:47 2016
 : FW version 201604071044</description>
</bundleInfo>
<vcc:esfSettings xmlns:vcc="vcc">
    <esfSetting src="esf_settings.xml" />
</vcc:esfSettings>
...
<deviceSettings>
	<setting name="nvVNCEnabled">Off</setting>
	<setting name="mfp.general.settingsTimeout">${variable_1}</setting>
	<setting name="pcl.A4Width">198 mm</setting>
	<setting name="network.IPV6DHCPENABLE">${variable_2}</setting>
	<setting name="rgbColorReplace2.outputR">${variable_3}</setting>
</deviceSettings>
</bundle>
Creating a lookup .csv file
A .csv file contains different values for the variable setting names based on the template.
Note:
We recommend creating the .csv file using a spreadsheet that supports CSV file format.
-
Using a spreadsheet, in the first row, type the headers.
Note:
Headers contain the identifier for the printers where you want to deploy the configuration file and the variable names in the configuration file.
-
Depending on the identifier used when adding a printer, use either HOSTNAME or IP_ADDRESS as the printer identifier.
Notes:
-
For example, if you want to use the printer IP address, and you have specified Var1, Var2, and Var3, then type
IP_ADDRESS,Var1,Var2,Var3
as the header.
-
Use the same identifier when adding a printer. For example, if you used the printer IP address when adding a printer, then use the same when creating a lookup .csv file.
-
In the succeeding rows, type the printer host names or IP addresses, and the values of each variable for each printer.
Sample lookup file
IP_ADDRESS,variable_1,variable_2,variable_3,variable_4
192.168.1.1,"abc International",TRUE,60,"80"
192.168.1.2,"xyz International",FALSE,70,"60"
192.168.1.5,"mno International",FALSE,50,CUR_VAL
Notes:
-
When using a spreadsheet that supports CSV file format, the values for each variable line does not show a comma. The values are separated by column and cell.
-
Make sure that the values of the variable names have the same format as the variable names in the original .ucf or .xml configuration files. For example, if the value in the original .ucf or .xml configuration file has double quotes, then add double quotes. If the value in the original .ucf or .xml configuration file is in capital letters, then use capital letters.
-
If the value of a setting contains a back slash, then type another back slash before the first. For example, if the value is
\\192.168.1.2\share
, then enter
\\\192.168.1.2\\share
.
-
If you do not want to update the current value of a variable setting, then set the value to
CUR_VAL
.
-
Save the file.
-
Make sure that the values of the variable names are the same as the values in the original .ucf or .xml configuration files.
-
If the value of a setting contains a back slash, then type another back slash before the first. For example, if the value is
\\192.168.1.2\share
, then enter
\\\192.168.1.2\\share
.
-
Updating the new CSV file using a UTF text editor may result in an error.
Browsing preconfigured workflows
Notes:
-
After creating a workflow, you can save it as a .zip file.
-
To locate and deploy a created workflow file, from DDU, click
Browse
.
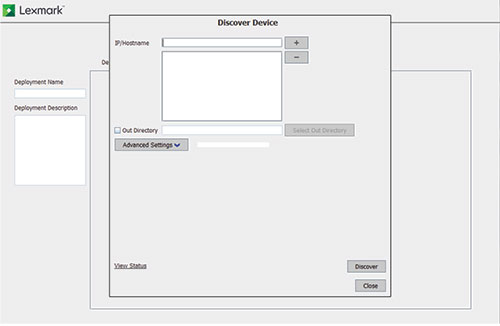
Creating CSV files
Creating CSV files
A CSV file is used for deploying and creating packages. It contains the details of the supported printers on the network.
-
From DDU, click
Create CSV File
.
-
In the IP/Hostname field, type the IP address or host name of the devices, and then click
.
Use the following formats to add IP addresses:
-
10.195.*.*
(wildcards for only the last two octets)
-
10.195.y.yy
(single IP address)
-
10.195.1.3-10.195.1.255
(IP address range)
-
printerHostname.company.com
(host name)
-
2001:db8:0:0:0:0:2:1
(single full IPv6 address; wildcards are not supported)
Note:
To remove an IP address or host name, select it from the list, and then click
.
-
If necessary, do the following:
-
To change the destination of the created CSV files, click
Out Directory
.
-
To configure device discovery settings, click
Advanced Settings
.
Note:
To change the default file names of the generated CSV files, update the Ddu’s Input File Name and Package Builder’s Input File Name settings. For more information, see
Understanding advanced settings
.
-
Click
Discover
.
The following files are created in Out Directory:
Notes:
-
Only supported devices are added on the device lists.
-
If the device lists are already created, and you want to create another device list, then make sure to update the file names. If you use the same file name as the existing device list, then DDU appends only the discovered supported devices.
Exporting device data
This feature lets you discover printers, and then export their certificate signing requests (CSR), all device settings, shortcuts, logs, and reports information.
-
From DDU, click
Export Device Data
.
-
Do any of the following:
Export a device CSR
-
Click
Export Device CSR
.
-
Add printers. For more information, see
Adding printers
.
-
From the Export Device CSR dialog, review the default path where the exported certificate files are stored.
Note:
To change the default path, click
Out Directory
, and then browse to the correct directory.
-
Click
Export
.
Note:
To check the deployment status, click
View Status
.
Export all device settings
-
Click
Export All Device Settings
.
-
Add printers. For more information, see
Adding printers
.
-
From the Export All Device Settings dialog, review the default path where the exported files are stored in .zip format.
Note:
To change the default path, click
Out Directory
, and then browse to the correct directory.
-
Click
Export
.
Note:
To check the deployment status, click
View Status
.
Export device shortcuts
-
Click
Export Device Shortcuts
.
-
Add printers. For more information, see
Adding printers
.
-
From the Export Device Shortcuts dialog, review the default path where the exported files are stored in .zip format.
Note:
To change the default path, click
Out Directory
, and then browse to the correct directory.
-
Click
Export
.
Note:
To check the deployment status, click
View Status
.
Export all device reports
-
Click
Export All Device Reports
.
-
Add printers. For more information, see
Adding printers
.
-
From the Export All Device Reports dialog, review the default path where the exported files are stored in .zip format.
Note:
To change the default path, click
Out Directory
, and then browse to the correct directory.
-
Click
Export
.
Note:
To check the deployment status, click
View Status
.
Export logs
-
Click
Export Logs
.
-
Add printers. For more information, see
Adding printers
.
-
From the Export Logs dialog, review the default path where the exported files are stored in .zip format.
Note:
To change the default path, click
Out Directory
, and then browse to the correct directory.
-
Click
Export
.
Note:
To check the deployment status, click
View Status
.
Managing deployment workflows
Editing deployment workflows
Editing deployment workflows
-
From DDU, select a deployment workflow.
-
Click
Edit
.
-
Configure the items.
-
If necessary, click
to configure the deployment workflow settings.
-
Click
Save
.
-
Do either of the following:
-
To update the package, click
Overwrite workflow
.
-
To create another package, click
Save as new workflow
.
Note:
You can also edit tasks. For more information, see
Adding tasks
.
Deleting deployment workflows
Deleting deployment workflows
-
From DDU, select a deployment workflow.
-
Click
 .
.
Note:
Deleting a workflow that is shared from another computer does not delete the saved .zip file. If the user has write access on the workflow, then the .zip file is deleted only in the shared folder.
Adding printers after creating a deployment workflow
Adding printers after creating a deployment workflow
You can add printers without editing the deployment workflow. Printers added using this process do not overwrite the printers added when creating a workflow.
-
From the home screen, click
 beside the deployment workflow.
-
Add printers. For more information, see
Adding printers
.
Notes:
-
When adding or editing a printer list after creating a workflow,
 appears beside the workflow. If this icon does not appear, then the printer list saved with the workflow is used during deployment.
-
To remove the updated printer list, click
, remove all the printers or .csv files, and then click
OK
.
Deploying workflows
Deploying workflows
Deploying workflows
-
From DDU, select a deployment workflow.
-
Click
 .
.
-
If you are deploying a workflow on secured devices, then do the following:
-
Select the authentication method used to access the secured printer.
Note:
For multiple secured devices, use the same authentication method and password.
-
Type your authentication credentials.
-
Click
OK
.
Notes:
-
To check the deployment status, click
Status
.
-
If you start another workflow while a workflow is still running, then the newly started workflow is queued and starts after the running workflow finishes.
-
To stop deploying a workflow, click
 .
.
Enabling firmware updates access control
Enabling firmware updates access control
Before you deploy to secured printers, make sure that the Firmware Updates access control is enabled. Do the following:
-
Access the Embedded Web Server.
-
Obtain the printer IP address. Do either of the following:
-
Open a web browser, and then type the printer IP address.
-
From the Embedded Web Server, depending on your printer model, do either of the following:
Understanding the status panel and workflow logs
The status panel contains the following messaging structures:
-
ALL
—Shows the following:
-
IP addresses and their executed tasks
-
Summary overview of the executed tasks
-
Failed tasks and error messages
-
Communication Errors
—Shows the IP addresses with failed discovery tasks and their error messages.
-
Deployment Errors
—Shows the IP addresses with failed deployment tasks and their error messages.
-
Successful Deployments
—Shows the IP addresses with all successful tasks.
To change the default workflow logging settings, in the Advanced dialog, from the Logs section, configure either of the following:
-
Clear Logs Interval (Days)
—Specify the number of days before logs that are older than the specified value are removed.
Notes:
-
The default value is
15
days.
-
This task occurs during the deployment of a workflow.
-
Automatically Export Deployment Log
—If set to
true
, then logs are automatically exported after the deployment of a workflow. If set to
false
, then the status panel shows an option to export the deployment log.
Note:
The default value is
true
.
Accessing logs
Accessing logs
The workflow deployment logs are located in the
%
DDUAppFolder
%\bin\logs
folder, where
DDUAppFolder
is the location of the DDU folder.
Note:
The naming convention used for workflow deployment logs is
DeploymentLog
_%WORK-FLOW-NAME%_%
TIMESTAMP
%.csv
,
where:
DeploymentLog
is the name of the deployment log.
TIMESTAMP
is the log time.
The workflow deployment logs (.csv) contain any of the following:
-
Successful deployments
-
Communication errors
-
Deployment errors
DDU uses the Apache Log4j
TM
software API to create the application and deployment logs. The configuration file for the logs can be found in
DDUAppFolder
\config\log4j-config.xml
, where
DDUAppFolder
is the location of the DDU folder. For more information, see
Configuring log settings
.
By default, the log files are saved in the folder for the DDU executable files.
DDU creates the following logs:
-
Application log (ddu.log)
—If set to
DEBUG
, then this log file helps
developers
track each request and response between the device and the computer. Threads of requests and responses are classified according to device IP addresses.
-
Deployment log
—This log file helps
users
view device details and status of solutions and licenses being installed. The file also provides a message to confirm that deployment is successful. For easier sorting of device status, the log file is created in CSV format, with the IP address of the device as the first column.
Checking for deployment errors
-
Open the
deployment.csv
file. The log file can be found in
DDUAppFolder
\bin\log
, where
DDUAppFolder
is the location of the DDU folder.
-
Filter the log file for errors.
Note:
If the log file is set to
INFO
, then the file contains the same messages as the status window does.