Click the Device Groups tab.
From the Device Groups list, select a device group.
From the Tasks list, select Home Screen.
Click the tab for the class of printers that you want to configure.
Select Use this home screen as part of the device groups policy.
Configure a button on the home screen:
For touch-screen printers, do the following:
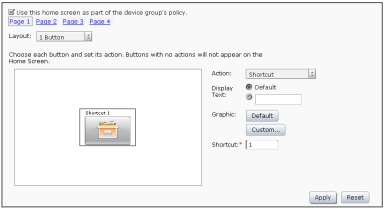
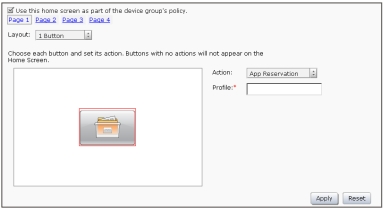
From the Layout menu, select the number of buttons to include.
If necessary, click a page, and then click the button to configure.
Select an action for the button.
Notes:
- Make sure to select an action for all the buttons that you want to appear on the home screen.
- If you have customized the home screen in your previous sessions, then reset the actions of the buttons on all pages before applying the new settings. Standard functions such as copy, fax, and e-mail do not automatically appear on the home screen. For these functions to appear on the home screen, assign an action.
Function
Available selections1
1 Not all selections are available for all models.
2 A standard function overrides itself when configured with a profile. For example, Copy + Profile executes the same function as Copy.
3 LMC cannot access eSF application icons directly. To provide locations for eSF application icons in the default order, use placeholders. To designate a location for the icon of an eSF application identified by name, and set the profile name of the application, use App Reservation. For example, the profile name for the Scan to Network application is . If placeholders or App Reservations are not provided, then installed eSF applications appear on the first page after the pages defined in the custom home screen.
Execute a standard MFP function.
Address Book
Bookmarks
Change Language
Copy
Copy Shortcuts
Email
Email Shortcuts
Fax
Fax Shortcuts
FTP
FTP Shortcuts
Held Faxes
Held Jobs
Jobs by User
Job Queue
Lock Device
Printer Panel
Release Held Faxes
Scan Profiles
Search Held Jobs
Settings
Shortcuts
Status/Supplies
USB Drive
Show a list of profiles.
App Profiles
Profiles
Execute a specific profile.
Single Profile
Override a standard function with a profile.2
Copy + Profile
Email + Profile
Fax + Profile
FTP + Profile
Execute a printer shortcut.
Shortcut
Provide a placeholder for an eSF application icon.3
App Reservation
Placeholder
Leave a blank space.
None
If necessary, specify the details of the action:
If you selected Shortcut, then enter the number of the shortcut.
Notes:
- Shortcuts added in LMC are device-class shortcuts, and not eSF-application-specific shortcuts.
- When updating the shortcut number of a profile, make sure to match it with the shortcut number in the Home Screen settings.
If you selected Single Profile or if you are overriding a standard function with a profile, then select a profile.
If you selected App Reservation, then type the profile name of the eSF application that uses the button.
The graphic that appears on the button is the default graphic of the action. If you want to select a custom graphic for any action except Placeholder or App Reservation, then do the following:
Click Custom.
Click Change, and then select a JPEG, GIF, or PNG file for the Up and Down icons.
Click Apply.
Note: If you want to revert to the default graphic, then click Default.
Selected images are resized to the following dimensions for each device class. For best results, resize or crop source images to the correct size before use.
e-Task 5—140 x 140 pixels
e-Task 4—172 x 254 pixels
e-Task 3—172 x 254 pixels
e-Task 2+, e-Task 2, and SFP e-Task 2+—120 x 75 pixels
e-Task—120 x 80 pixels
X642—120 x 55 pixels
Note: For a list of supported printers in each device class, see Supported printers. To apply custom text to any button except Placeholder or App Reservation, select Text, and then type your custom text. You can also select the Text option and leave it blank to show only the icon.
For non-touch-screen printers:
From the Layout menu, select Custom.
Following the list of buttons, click Add.
Notes:
- The only action available is Single Profile. You cannot modify other menu items on a printer without a touch screen.
- To remove a button, select it in the list, and then click Remove.
To apply custom text to the button, select the option for the custom text field beside Display Text, and then type your custom text.
Select a profile to associate with the button.
Configure the rest of the buttons on the home screen.
Apply the changes.
| Note: Before changing tabs during configuration, make sure to click Apply on each tab to apply the settings. |