Setting Top-of-Form

Top-of-Form sets the first line of print. Use the control panel to save your Top-of-Form settings for continuous forms, cut forms, and for each macro enabled.

Setting Top-Of-Form for continuous forms in push mode

  1. Clear the paper path.

    The Paper Out light blinks if no paper is loaded. If the Paper Out light is off, tear off excess forms, and then press Load/Unload. If a cut form is loaded, press FormFeed to clear the paper path.

  2. Make sure the paper select lever is in the inline picture of the continuous forms icon position.

  3. Load continuous form paper on the push tractor feed pins (or the Tractor 2 feed pins if you are using the optional Tractor 2 Feeder).

  4. Press FormFeed.

    The paper moves to the current Top-Of-Form, and the Paper Out light goes off.

  5. Open the control panel cover to access layer 2.

    art of the control panel with the top layer down
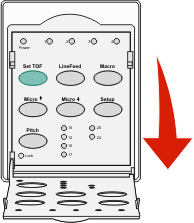
  6. Press any paper movement button (LineFeed, Micro art of an up arrow, Micro art of down arrow) to align the horizontal lines located on the platen with the Top-Of-Form you want.

    Note: If you press and hold a paper movement button, the paper advances in micro movements and then goes into continuous feed.
  7. Press Set TOF to set and save your Top-Of-Form.

  8. Close the control panel cover.

  9. To verify the new Top-Of-Form, press Load/Unload to unload the continuous forms paper, and then press FormFeed to reload the continuous forms paper.

    The continuous forms paper loads to the current Top-Of-Form setting.

  10. Press Start/Stop to set the printer online.

    Note: If Auto Tear Off is set to On, the paper will advance to the Tear Off position. Sending a print job or pressing Tear Off returns the paper to the current Top-Of-Form.

Setting Top-Of-Form for continuous forms in pull mode

  1. Turn the printer on.

    The Paper Out light blinks if no paper is loaded.

  2. Move the paper select lever down to the inline picture of the continuous forms icon position.

  3. Load continuous form paper on the pull tractor feed pins.

  4. Open the control panel cover to access layer 2.

    art of the control panel with the top layer down
  5. Press any paper movement button (Micro art of an up arrow, Micro art of a down arrow, or LineFeed) to move the paper to the Top-Of-Form position.

    Note: Use the second sheet of continuous forms paper to set Top-Of-Form.
  6. Press Set TOF to set and save Top-Of-Form.

  7. Close the control panel cover.

    Note: Top-Of-Form is not saved if the printer is turned off or runs out of paper when the printer is in pull tractor mode.
  8. Press Start/Stop to set the printer online.

Setting Top-Of-Form for a cut form or an envelope

Top-Of-Form can range from minus one inch to plus 22 inches from the top of a cut form.

  1. Clear the paper path.

    The Paper Out light blinks if no paper is loaded. If the Paper Out light is off, tear off excess forms, and then press Load/Unload. If a single form is loaded, press FormFeed to clear the paper path.

  2. Move the paper select lever up to the inline picture of the cut forms icon position.

  3. Load a cut sheet of paper or an envelope through the manual feeder.

    • If Auto Cut Sheet is set to On, the printer will move the paper or envelope to the current Top-Of-Form.

    • If Auto Cut Sheet is set to Off, press FormFeed when the Paper Out light goes off.

  4. Open the control panel cover to access layer 2.

    art of the control panel with the top layer down
  5. Press any paper movement button (Micro art of an up arrow, Micro art of a down arrow, LineFeed) to align the horizontal lines located on the platen with the Top-Of-Form you want.

    Note: If you press and hold a paper movement button, the paper will advance in micro movements and then go into continuous feed mode.
  6. Press Set TOF to set and save your Top-Of-Form.

  7. Close the control panel cover.

  8. Press Start/Stop to put the printer online.

Setting Top-Of-Form in a macro

Each macro has a separate Top-Of-Form setting. To set Top-Of-Form in a macro, you must first select that macro.

  1. Open the control panel cover to access layer 2.

  2. Press Macro to select the macro you want to use.

    Note: The procedure for setting Top-Of-Form depends on the paper and print mode you are using. For help, see one of the following sections in this chapter: