The control panel has two layers of functionality:
Layer 1, with the control panel cover closed, contains basic functions like FormFeed, Tear Off, and taking the printer online/offline.
Layer 2, with the control panel cover open, contains more advanced functionality. Use layer 2 to select a macro and change printer menu settings.
Button | Function | ||
|---|---|---|---|
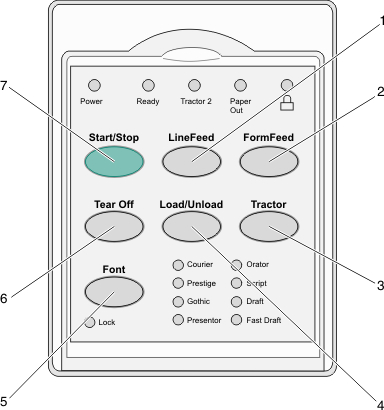
1 | LineFeed | Advances the paper one line | |
2 | FormFeed | Advances the paper to the next Top-Of-Form | |
3 | Tractor | Alternates between Tractor 1 and Tractor 2 if the optional Tractor 2 is installed | |
4 | Load/Unload | Loads paper to the current Top-Of-Form or unloads paper to a parked position | |
5 | Font | Selects one of the resident font styles Note: Repeatedly pressing the Font button cycles through the printer font selections. If you continue pressing Font through a second pass, the font selections will be locked. | |
6 | Tear Off | Alternates the paper between Tear Off and Top-Of-Form | |
7 | Start/Stop | Communicates the on/off status of the printer | |

Button | Function | |
|---|---|---|
1 | LineFeed | Advances the paper one line. Press and hold LineFeed to advance the paper 5 micro movements, and then go into continuous feed. |
2 | Macro | To support different styles of pre-printed forms, selects between four document formats |
3 | Setup | Press to enter Setup mode. Lets you change the default values and modes of printer operation. |
4 | Micro | Feeds the paper downward in small incremental movements. Press and hold to select continuous feed. |
5 | Pitch | Sets the character pitch to: 10 cpi, 12 cpi, 15 cpi, 17 cpi, 20 cpi, or proportional spacing Notes:
|
6 | Micro | Feeds the paper upward in small incremental movements. Press and hold to select continuous feed. |
7 | Set TOF | Sets the Top-Of-Form, which is the position of the first print line on the page |