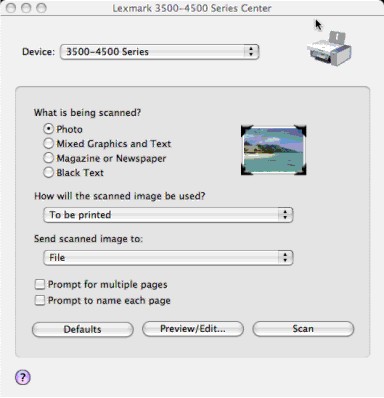
The All-In-One Center provides the basic functions for most scan jobs. You can customize the settings on the All-In-One Center dialog according to the type of project you want to create. The dialog is set to these default settings:
What is being scanned? | Photo |
How will the scanned image be used? | To be printed |
Send scanned image to: | File |
Prompt for multiple pages | Not selected |
Prompt to name each page | Not selected |
From here | You can |
What is being scanned? | Select the option closest to the type of image you are scanning. Settings are optimized based on your selection:
|
How will the scanned image be used? | Choose the way the scan will be used. Resolution and other settings are optimized based on your selection:
|
Send scanned image to | Choose where to send scanned images, such as to File, to the Clipboard, or to an application. To add, remove, or modify an application in the list, see Editing the Customize list. For more information, see Choosing where to send scanned images |
Prompt for multiple pages | Scan multiple pages using the current scan settings. You are prompted to place the next item on the scanner glass after a page is scanned. If you still have more pages to scan, click Scan. When the multiple-page scan is complete, click Done. Do not select Prompt for multiple pages if you are scanning only a single item. |
Prompt to name each page | Enter a filename for every page or item scanned. |
Defaults | Revert to factory default settings. |
Preview/Edit | Open the Scan dialog to view the image, and adjust the scan settings. |
Scan | Start scanning. |
Click ![]() to go to the Help Center for more information.
to go to the Help Center for more information.