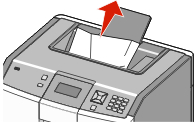
If the paper is visible in the standard exit bin, then grasp the paper and pull it away from the bin.
| Warning—Potential Damage: To avoid overexposing the photoconductors, do not leave the front door open longer than 10 minutes. |
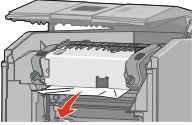
Open the front door, and then open the top cover.
 | CAUTION—HOT SURFACE: The inside of the printer might be hot. To reduce the risk of injury from a hot component, allow the surface to cool before touching. |
Grasp the jammed paper on each side and pull it towards you.
Close the top cover, and then close the front door.
Press  .
.
| Warning—Potential Damage: To avoid overexposing the photoconductors, do not leave the front door open longer than 10 minutes. |
Open the front door, and then open the top cover.
| | CAUTION—HOT SURFACE: The inside of the printer might be hot. To reduce the risk of injury from a hot component, allow the surface to cool before touching. |
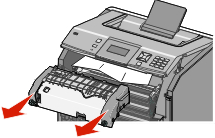
If the paper is jammed behind the fuser, then you will need to remove the fuser unit.
| Warning—Potential Damage: Do not touch the center of the fuser unit. Doing so may cause your fingers to touch the roller underneath the fuser unit. Touching the fuser roller will damage the fuser. |
Turn the screws on the fuser unit to the left to loosen them.

Lift the handholds on each side of the fuser unit, and then pull forward to remove it.
Place the fuser unit on a flat surface.
Pull the paper gently out of the printer or up toward the standard exit bin to remove it.
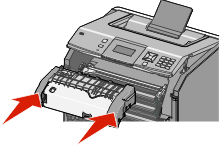
Reinstall the fuser unit.
Align the fuser unit using the handholds on each side, and place it back into the printer.
Turn the screws to the right to fasten the fuser unit securely.

Close the top cover, and then close the front door.
Press .