Printing in black and white
From the home screen, navigate to:
 > Settings > Print Settings > Quality Menu > Print Mode > Black Only >
Use Forms and Favorites to quickly and easily access frequently used forms or other information that is regularly printed. Before you can use this application, first set it up on the printer. For more information, see Setting up Forms and Favorites.
From the home screen, navigate to:
Forms and Favorites > select the form from the list > enter the number of copies > adjust other settings
Apply the changes.
From the Paper menu on the printer control panel, set the paper type and size to match the paper loaded.
Send the print job:
With a document open, click File > Print.
Click Properties, Preferences, Options, or Setup.
Adjust the settings, if necessary.
Click OK > Print.
Customize the settings in the Page Setup dialog:
With a document open, choose File > Page Setup.
Choose a paper size or create a custom size to match the paper loaded.
Click OK.
Customize the settings in the Print dialog:
With a document open, choose File > Print.
If necessary, click the disclosure triangle to see more options.
From the Print dialog and pop-up menus, adjust the settings if necessary.
| Note: To print on a specific paper type, adjust the paper type setting to match the paper loaded, or select the appropriate tray or feeder. |
Click Print.
From the home screen, navigate to:
> Settings > Print Settings > Quality Menu > Print Mode > Black Only >
Open a Web browser, and then type the printer IP address in the address field.
Notes:
Click Settings > Print Settings > Quality Menu > Toner Darkness.
Adjust the toner darkness setting.
Click Submit.
The Max Speed and Max Yield settings let you choose between a faster print speed or a higher toner yield. Max Yield is the factory default setting.
Max Speed—This lets you print in either black or color depending on what is set in the printer driver. The printer prints in color unless Black Only is selected in the printer driver.
Max Yield—This lets you switch from black to color based on the color content found on each page. Frequent color mode switching can result in slower printing if the content of pages is mixed.
Open a Web browser, and then type the printer IP address in the address field.
Notes:
Click Settings > Print Settings > Setup Menu.
From the Printer Usage list, select Max Speed or Max Yield.
Click Submit.
From the home screen, navigate to:
![]() > Settings > Print Settings > Setup Menu
> Settings > Print Settings > Setup Menu
From the Printer Usage list, select Max Speed or Max Yield.
Touch .
Notes:
Insert a flash drive into the USB port.
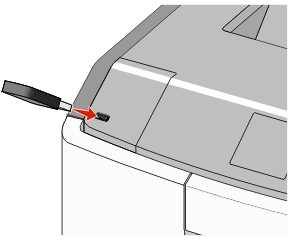
Notes:
| Warning—Potential Damage: Do not touch the USB cable, any network adapter, any connector, the memory device, or the printer in the areas shown while actively printing, reading, or writing from the memory device. A loss of data can occur. |

From the printer control panel, touch the document you want to print.
Touch the arrows to specify the number of copies for printing, and then touch Print.
Notes:
Flash drive | File type |
|---|---|
Notes:
| Documents:
Images:
|
To download a compatible mobile printing application, visit www.lexmark.com/mobile.
| Note: Mobile printing applications may also be available from your mobile device manufacturer. |
From the printer control panel, navigate to:
> Settings > Security > Confidential Print > select the print job type
Print job type | Description |
|---|---|
Notes:
| |
Max Invalid PIN | Limits the number of times an invalid PIN can be entered. Note: When the limit is reached, the print jobs for that user name and PIN are deleted. |
Confidential Job Expiration | Lets you hold print jobs in the computer until you enter the PIN from the printer control panel. Note: The PIN is set from the computer. It must be four digits, using the numbers 0–9. |
Repeat Job Expiration | Lets you print and store print jobs in the printer memory for reprinting. |
Verify Job Expiration | Lets you print one copy of a print job while the printer holds the remaining copies. It allows you to examine if the first copy is satisfactory. The print job is automatically deleted from the printer memory once all copies are printed. |
Reserve Job Expiration | Lets you store print jobs for printing at a later time. The print jobs are held until deleted from the Held Jobs menu. |
Touch .
| Note: Confidential and Verify print jobs are automatically deleted from memory after printing. Repeat and Reserve jobs are held in the printer until you delete them. |
With a document open, click File > Print.
Click Properties, Preferences, Options, or Setup.
Click Print and Hold.
Select the print job type (Confidential, Repeat, Reserve, or Verify), and then assign a user name. For a confidential print job, also enter a four-digit PIN.
Click OK or Print.
From the printer home screen, release the print job.
For confidential print jobs, navigate to:
Held jobs > select your user name > Confidential Jobs > enter the PIN > Print
For other print jobs, navigate to:
Held jobs > select your user name > select the print job > specify the number of copies > Print
With a document open, choose File > Print.
If necessary, click the disclosure triangle to see more options.
From the print options or Copies & Pages pop-up menu, choose Job Routing.
Select the print job type (Confidential, Repeat, Reserve, or Verify), and then assign a user name. For a confidential print job, also enter a four-digit PIN.
Click OK or Print.
From the printer home screen, release the print job.
For confidential print jobs, navigate to:
Held jobs > select your user name > Confidential Jobs > enter the PIN > Print
For other print jobs, navigate to:
Held jobs > select your user name > select the print job > specify the number of copies > Print
From the home screen, navigate to:
> Reports > Print Fonts
Touch PCL Fonts or PostScript Fonts.
A directory list shows the resources stored in a flash memory or on the printer hard disk.
From the home screen, navigate to:
> Reports > Print Directory
From the printer control panel, touch Cancel Job or press  on the keypad.
Touch the print job you want to cancel, and then touch Delete Selected Jobs.
| Note: If you press on the keypad, then touch Resume to return to the home screen. |
Open the printers folder, and then select your printer.
From the print queue, select the print job you want to cancel, and then delete it.
From System Preferences in the Apple menu, navigate to your printer.
From the print queue, select the print job you want to cancel, and then delete it.