Printing specialty documents
Tips on using letterhead
Page orientation is important when printing on letterhead. Use the following table to determine which direction to load the letterhead:
Standard 250-sheet tray Optional 250-sheet tray Optional 550-sheet tray
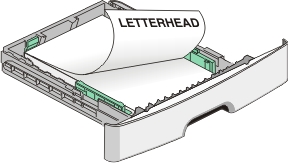
| Printed letterhead design is placed facedown. The top edge of the sheet with the logo is placed at the front of the tray. |
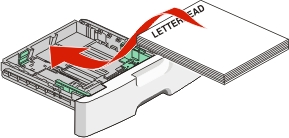
Duplex (two-sided) printing from trays | Printed letterhead design is placed faceup. The top edge of the sheet with the logo is placed at the rear of the tray. |
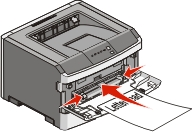
Manual feeder (simplex printing) | Preprinted letterhead design is placed faceup. The top edge of the sheet with the logo should enter the manual feeder first. |
Manual feeder (duplex printing) | Preprinted letterhead design is placed facedown. The top edge of the sheet with the logo should enter the manual feeder last. |
Tips on using transparencies
Print samples on the transparencies being considered for use before buying large quantities.
When printing on transparencies:
Feed transparencies from the standard 250-sheet tray or the manual feeder.
Use transparencies designed specifically for laser printers. Check with the manufacturer or vendor to ensure that the transparencies are able to withstand temperatures up to 175° C (350° F) without melting, discoloring, offsetting, or releasing hazardous emissions.
| Note: Transparencies can be printed at a temperature up to 180° C (356° F) if Transparency Weight is set to Heavy and Transparency Texture is set to Rough. Select these settings in the Paper menu using a local utility. |
To prevent print quality problems, avoid getting fingerprints on the transparencies.
Before loading transparencies, fan the stack to prevent sheets from sticking together.
We recommend Lexmark part number 70X7240 for letter-size transparencies and Lexmark part number 12A5010 for A4-size transparencies.
Tips on using envelopes
Print samples on the envelopes being considered for use before buying large quantities.
When printing on envelopes:
Use envelopes designed specifically for laser printers. Check with the manufacturer or vendor to ensure the envelopes can withstand temperatures up to 210°C (410°F) without sealing, wrinkling, curling excessively, or releasing hazardous emissions.
For the best performance, use envelopes made from 90 g/m2 (24 lb bond) paper. Use up to 105 g/m2 (28 lb bond) weight for envelopes as long as the cotton content is 25% or less. All-cotton envelopes must not exceed 90 g/m2 (24 lb bond) weight.
Use only new envelopes.
To optimize performance and minimize jams, do not use envelopes that:
Have excessive curl or twist
Are stuck together or damaged in any way
Have windows, holes, perforations, cutouts, or embossing
Have metal clasps, string ties, or folding bars
Have an interlocking design
Have postage stamps attached
Have any exposed adhesive when the flap is in the sealed or closed position
Have bent corners
Have rough, cockle, or laid finishes
Adjust the width guides to fit the width of the envelopes.
| Note: A combination of high humidity (over 60%) and the high printing temperature may wrinkle or seal envelopes. |
Tips on using labels
Print samples on the labels being considered for use before buying large quantities.
| Note: Use only paper label sheets. Vinyl, pharmacy, and dual-sided labels are not supported. |
For detailed information on label printing, characteristics, and design, see the Card Stock & Label Guide available on the Lexmark Web site at http://support.lexmark.com.
When printing on labels:
Use labels designed specifically for laser printers. Check with the manufacturer or vendor to verify that:
The labels can withstand temperatures up to 210°C (410°F) without sealing, excessive curling, wrinkling, or releasing hazardous emissions.
| Note: Labels can be printed at a higher fusing temperature up to 220°C (428°F) if Label Weight is set to Heavy. Select this setting using the Embedded Web Server, or from the printer control panel Paper menu. |
Label adhesives, face sheet (printable stock), and topcoats can withstand up to 25-psi (172-kPa) pressure without delaminating, oozing around the edges, or releasing hazardous fumes.
Do not use labels with slick backing material.
Use full label sheets. Partial sheets may cause labels to peel off during printing, resulting in a jam. Partial sheets also contaminate the printer and the cartridge with adhesive, and could void the printer and cartridge warranties.
Do not use labels with exposed adhesive.
Do not print within 1 mm (0.04 in.) of the edge of the label, of the perforations, or between die-cuts of the label.
Be sure adhesive backing does not reach to the sheet edge. Zone coating of the adhesive at least 1 mm (0.04 in.) away from edges is recommended. Adhesive material contaminates the printer and could void the warranty.
If zone coating of the adhesive is not possible, remove a 2-mm (0.06-in.) strip on the leading and driver edge, and use a non-oozing adhesive.
Portrait orientation works best, especially when printing bar codes.
Tips on using card stock
Card stock is heavy, single-ply specialty media. Many of its variable characteristics, such as moisture content, thickness, and texture, can significantly impact print quality. Print samples on the card stock being considered for use before buying large quantities.
When printing on card stock:
Make sure the Paper Type is Card Stock.
Select the appropriate Paper Texture setting.
Be aware that preprinting, perforation, and creasing may significantly affect the print quality and cause jams or other paper handling problems.
Check with the manufacturer or vendor to ensure the card stock can withstand temperatures up to 210°C (410°F) without releasing hazardous emissions.
Do not use preprinted card stock manufactured with chemicals that may contaminate the printer. Preprinting introduces semi-liquid and volatile components into the printer.
Use grain short card stock when possible.
Printing a booklet (Windows)
The booklet feature automatically enables 2-sided printing with short-edge control, so any 2-sided printing options must be set before selecting the booklet function. After Booklet is selected, the 2-sided printing options remain at the last setting used.
Some programs include their own booklet features. We recommend that when producing a booklet, you use either the booklet layout feature provided here or the booklet feature provided by the program the document was created in. Do not use both features at the same time.
With a document open, click File  Print.
Click Properties, Preferences, Options, or Setup.
Click the Page Layout tab.
Click More Page Layout Options.
Click Booklet.
Click OK.
Notes:
- Booklet options are unavailable if the duplex unit is installed on the printer but not added to the Installed Options list.
- The PostScript Passthrough printer driver feature may need to be turned off in order for the booklet layout to work with some programs.