Understanding the printer messages
Toner cartridge messages
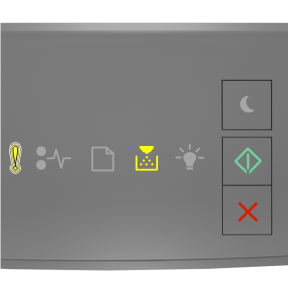
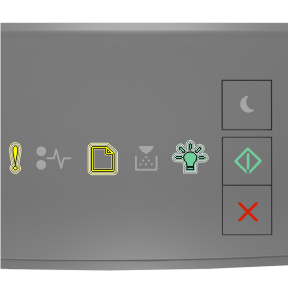
Cartridge, imaging unit mismatch [41.xy]
 - On
- On
 - On
- On
If the printer control panel light sequence matches the light sequence in the preceding illustration, then do the following:
Check if both the toner cartridge and imaging unit are Lexmark-authorized MICR (magnetic ink character recognition) or non-MICR supplies.
Change the toner cartridge or imaging unit so that both are Lexmark-authorized MICR or non-MICR supplies.
Notes:
- For a list of supported supplies, see the “Ordering supplies” section of the User's Guide or go to www.lexmark.com.
- For more information on MICR, go to www.lexmark.com.
Cartridge low [88.xx]
- On
 - On
- On
If the printer control panel light sequence matches the light sequence in the preceding illustration, then you may need to order a toner cartridge. If necessary, press on the printer control panel to continue printing.
Cartridge nearly low [88.xy]
- Slowly blinking
- On
- On
If the printer control panel light sequence matches the light sequence in the preceding illustration, then press on the printer control panel, if necessary, to continue printing.
Cartridge very low [88.xy]
- Blinking
- On
- On
If the printer control panel light sequence matches the light sequence in the preceding illustration, then you may need to replace the toner cartridge very soon. For more information, see the “Replacing supplies” section of the User’s Guide.
If necessary, press on the printer control panel to continue printing.
Non-Lexmark cartridge, see User’s Guide [33.xy]
If the printer control panel lights blink from left to right repeatedly, then the printer has detected a non-Lexmark cartridge installed in the printer.
Your Lexmark printer is designed to function best with genuine Lexmark supplies and parts. Use of third-party supplies or parts may affect the performance, reliability, or life of the printer and its imaging components.
| Warning—Potential Damage: Use of third-party supplies or parts may affect warranty coverage. Damage caused by the use of third-party supplies or parts are not covered by the warranty. |
All life indicators are designed to function with Lexmark supplies and parts, and may deliver unpredictable results if third-party supplies or parts are used. Imaging component usage beyond the intended life may damage your Lexmark printer or associated components.
To accept any and all of these risks and to proceed with the use of non-genuine supplies or parts in your printer, press and  simultaneously for at least three seconds to clear the light sequence.
| Note: For the list of supported supplies, see the “Ordering supplies” section of the User's Guide or visit http://support.lexmark.com. |
Replace cartridge, 0 estimated pages remain [88.xy]
- On
- On
If the printer control panel light sequence matches the light sequence in the preceding illustration, then press twice quickly to see the supplemental light sequence.
- On
 - Blinking
 - On
- On
If the supplemental light sequence matches the light sequence in the preceding illustration, then replace the toner cartridge. For more information, see the instruction sheet that came with the supply or see the “Replacing supplies” section of the User’s Guide.
| Note: If you do not have a replacement toner cartridge, then see the “Ordering supplies” section of the User’s Guide or visit www.lexmark.com. |
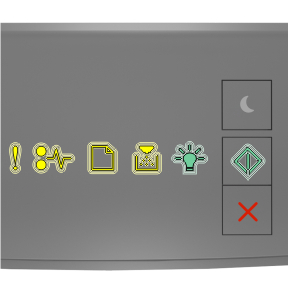
Replace cartridge, printer region mismatch [42.xy]
- On
- On
If the printer control panel light sequence matches the light sequence in the preceding illustration, then press twice quickly to see the supplemental light sequence.
- On
 - Blinking
- On
If the supplemental light sequence matches the light sequence in the preceding illustration, then install a toner cartridge that matches the region number of the printer. x indicates the value of the printer region. y indicates the value of the cartridge region. x and y can have the following values.
Printer and toner cartridge regions0 | Global |
1 | United States, Canada |
2 | European Economic Area (EEA), Switzerland |
3 | Asia Pacific, Australia, New Zealand |
4 | Latin America |
5 | Africa, Middle East, rest of Europe |
9 | Invalid |
Notes:
- The x and y values represent .xy in the code that appears on the Embedded Web Server.
- The x and y values must match for printing to continue.
Reinstall missing or unresponsive cartridge [31.xy]
- On
- On
If the printer control panel light sequence matches the light sequence in the preceding illustration, then press twice quickly to see the supplemental light sequence.
- On
- On
- On
If the supplemental light sequence matches the light sequence in the preceding illustration, then try one or more of the following:
Remove the toner cartridge, and then reinstall it.
Remove the toner cartridge, and then install a new one. For more information, see the instruction sheet that came with the supply.
Replace unsupported cartridge [32.xy]
- On
- On
- On
- On
If the printer control panel light sequence matches the preceding light sequence, then remove the toner cartridge, and then install a supported one. For more information, see the instruction sheet that came with the supply.
| Note: If you do not have a replacement toner cartridge, then see the “Ordering supplies” section of the User’s Guide or visit www.lexmark.com. |
Imaging unit messages
Imaging unit low [84.xy]
- Blinking
- On
If the printer control panel light sequence matches the light sequence in the preceding illustration, then you may need to order an imaging unit. If necessary, press on the printer control panel to continue printing.
Imaging unit nearly low [84.xy]
- Slowly blinking
- Blinking
- On
If the printer control panel light sequence matches the light sequence in the preceding illustration, then press on the printer control panel, if necessary, to continue printing.
Imaging unit very low [84.xy]
- Blinking
- Blinking
- On
If the printer control panel light sequence matches the light sequence in the preceding illustration, then you may need to replace the imaging unit very soon. For more information, see the “Replacing supplies” section of the User’s Guide.
If necessary, press on the printer control panel to continue printing.
Non-Lexmark imaging unit, see User’s Guide [33.xy]
If the printer control panel lights blink from left to right repeatedly, then the printer has detected a non-Lexmark imaging unit installed in the printer.
Your Lexmark printer is designed to function best with genuine Lexmark supplies and parts. Use of third-party supplies or parts may affect the performance, reliability, or life of the printer and its imaging components.
| Warning—Potential Damage: Use of third-party supplies or parts can affect warranty coverage. Damage caused by the use of third-party supplies or parts is not covered by the warranty. |
All life indicators are designed to function with Lexmark supplies and parts, and may deliver unpredictable results if third-party supplies or parts are used. Imaging component usage beyond the intended life may damage your Lexmark printer or associated components.
To accept any and all of these risks and to proceed with the use of non-genuine supplies or parts in your printer, press and simultaneously for at least four seconds to clear the light sequence.
| Note: For the list of supported supplies, see the “Ordering supplies” section of the User's Guide or visit http://support.lexmark.com. |
Replace imaging unit, 0 estimated pages remain [84.xy]
- On
- Blinking
- On
If the printer control panel light sequence matches the light sequence in the preceding illustration, then replace the imaging unit. For more information, see the instruction sheet that came with the supply.
| Note: If you do not have a replacement imaging unit, then see the “Ordering supplies” section of the User’s Guide or visit www.lexmark.com. |
Reinstall missing or unresponsive imaging unit [31.xy]
- On
- Blinking
If the printer control panel light sequence matches the light sequence in the preceding illustration, then press twice quickly to see the supplemental light sequence.
- On
- On
- Blinking
If the supplemental light sequence matches the light sequence in the preceding illustration, then try one or more of the following:
Remove the imaging unit, and then reinstall it.
Remove the imaging unit, and then install a new one. For more information, see the instruction sheet that came with the supply.
Replace unsupported imaging unit [32.xy]
- On
- On
- On
- Blinking
If the printer control panel light sequence matches the light sequence in the preceding illustration, then remove the imaging unit, and then install a supported one. For more information, see the instruction sheet that came with the supply.
| Note: If you do not have a replacement imaging unit, then see the “Ordering supplies” section of the User’s Guide or visit www.lexmark.com. |
Paper loading messages
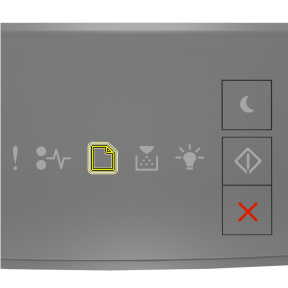
Incorrect paper size, open [paper source] [34]
- On
- On
If the printer control panel light sequence matches the light sequence in the preceding illustration, then press twice quickly to see the supplemental light sequence.
- On
- On
- On
- On
If the supplemental light sequence matches the light sequence in the preceding illustration, then try one or more of the following:
Load the correct size of paper.
From the printer control panel, press to clear the light sequence and print using a different tray.
Check the length and width guides and make sure the paper is loaded properly in the tray.
Make sure the correct paper size and type are specified in Print Properties or the Print dialog settings.
Make sure the correct paper size and type are specified in the Paper menu on the printer control panel:
If the printer is on a network, then access the Embedded Web Server.
Open a Web browser, and then type the printer IP address in the address field.
Notes:
- Print a network setup page or menu settings page, and then locate IP address in TCP/IP section.
- If you are using a proxy server, then temporarily disable it to load the Web page correctly.
Click Settings > Paper Menu.
If the printer is connected to a computer by a USB or parallel cable, then access the Paper menu through the Local Printer Settings Utility for Windows or through Printer Settings for Macintosh.
| Note: Make sure the paper size is correctly set. For example, if the MP Feeder Size is set to Universal, then make sure the paper is large enough for the data being printed. |
Load [paper source] with [custom type name] [orientation]
- On
- On
If the printer control panel light sequence matches the light sequence in the preceding illustration, then try one or more of the following:
Load the tray or feeder with the correct size and type of paper.
From the printer control panel, press to continue printing.
| Note: If the printer finds a tray that has the correct size and type of paper, then it feeds from that tray. If the printer cannot find a tray that has the correct size and type of paper, then it prints from the default paper source. |
Press to cancel the print job.
Load [paper source] with [custom type string] [orientation]
- On
- On
If the printer control panel light sequence matches the light sequence in the preceding illustration, then try one or more of the following:
Load the tray or feeder with the correct size and type of paper.
From the printer control panel, press to continue printing.
| Note: If the printer finds a tray that has the correct size and type of paper, then it feeds from that tray. If the printer cannot find a tray that has the correct size and type of paper, then it prints from the default paper source. |
From the printer control panel, press to cancel the print job.
Load [paper source] with [paper size] [orientation]
- On
- On
If the printer control panel light sequence matches the light sequence in the preceding illustration, then try one or more of the following:
Load the tray or feeder with the correct size of paper.
From the printer control panel, press to continue printing.
| Note: If the printer finds a tray that has the correct size of paper, then it feeds from that tray. If the printer cannot find a tray that has the correct size of paper, then it prints from the default paper source. |
From the printer control panel, press to cancel the print job.
Load [paper source] with [paper type] [paper size] [orientation]
- On
- On
If the printer control panel light sequence matches the light sequence in the preceding illustration, then try one or more of the following:
Load the tray or feeder with the correct size and type of paper.
From the printer control panel, press to continue printing.
| Note: If the printer finds a tray that has the correct size and type of paper, then it feeds from that tray. If the printer cannot find a tray that has the correct size and type of paper, then it prints from the default paper source. |
From the printer control panel, press to cancel the print job.
Load Manual Feeder with [custom type name] [orientation]
- On
- On
If the printer control panel light sequence matches the light sequence in the preceding illustration, then try one or more of the following:
Load the multipurpose feeder with the correct size and type of paper.
From the printer control panel, press to continue printing.
| Note: If no paper is loaded in the feeder, then the printer manually overrides the request, and then prints from an automatically selected tray. |
Press to cancel the print job.
Load Manual Feeder with [custom type string] [orientation]
- On
- On
If the printer control panel light sequence matches the light sequence in the preceding illustration, then try one or more of the following:
Load the multipurpose feeder with the correct size and type of paper.
From the printer control panel, press to continue printing.
| Note: If no paper is loaded in the feeder, then the printer manually overrides the request, and then prints from an automatically selected tray. |
Press to cancel the print job.
Load Manual Feeder with [paper size] [orientation]
- On
- On
If the printer control panel light sequence matches the light sequence in the preceding illustration, then try one or more of the following:
Load the feeder with the correct size and type of paper.
From the printer control panel, press to continue printing.
| Note: If no paper is loaded in the feeder, then the printer manually overrides the request, and then prints from an automatically selected tray. |
Press to cancel the print job.
Load Manual Feeder with [paper type] [paper size] [orientation]
- On
- On
If the printer control panel light sequence matches the light sequence in the preceding illustration, then try one or more of the following:
Load the multipurpose feeder with the correct size and type of paper.
From the printer control panel, press to continue printing.
| Note: If no paper is loaded in the feeder, then the printer manually overrides the request, and then prints from an automatically selected tray. |
Press to cancel the print job.
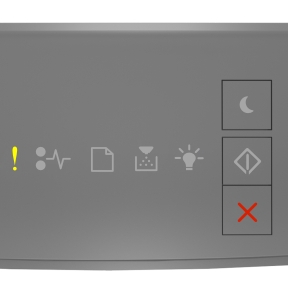
Remove paper from standard output bin
- Blinking
If the printer control panel light sequence matches the light sequence in the preceding illustration, then do the following:
Remove the paper stack from the standard output bin.
From the printer control panel, press to continue printing.
Printer communication error messages
Network [x] software error [54]
- On
- On
If the printer control panel light sequence matches the light sequence in the preceding illustration, then press twice quickly to see the supplemental light sequence.
- On
- Blinking
- On
If the supplemental light sequence matches the light sequence in the preceding illustration, then try one or more of the following:
From the printer control panel, press to continue printing.
Unplug the router, then wait for 30 seconds, and then plug the router back again.
Turn off the printer, wait for about 10 seconds, and then turn the printer back on.
Update the network firmware in the printer or print server. For more information, visit the Lexmark Web site at http://support.lexmark.com.
Standard parallel port disabled [56]
- On
- On
If the printer control panel light sequence matches the light sequence in the preceding illustration, then press twice quickly to see the supplemental light sequence.
- On
- Slowly blinking
- Slowly blinking
- On
If the supplemental light sequence matches the light sequence in the preceding illustration, then try one or more of the following:
Standard network software error [54]
- On
- On
If the printer control panel light sequence matches the light sequence in the preceding illustration, then press twice quickly to see the supplemental light sequence.
- On
- On
- On
If the supplemental light sequence matches the light sequence in the preceding illustration, then try one or more of the following:
From the printer control panel, press to continue printing.
Turn off the printer, and then turn it back on.
Update the network firmware in the printer or on the print server. For more information, visit the Lexmark Web site at http://support.lexmark.com.
Rear USB port disabled [56]
- On
- On
If the printer control panel light sequence matches the light sequence in the preceding illustration, then press twice quickly to see the supplemental light sequence.
- On
- Blinking
- Blinking
- On
If the supplemental light sequence matches the light sequence in the preceding illustration, then try one or more of the following:
Insufficient memory error messages
Insufficient memory to collate job [37]
- On
- On
If the printer control panel light sequence matches the light sequence in the preceding illustration, then press twice quickly to see the supplemental light sequence.
- On
- On
- On
If the supplemental light sequence matches the light sequence in the preceding illustration, then try one or more of the following:
Insufficient memory to support Resource Save feature [35]
- On
- On
If the printer control panel light sequence matches the light sequence in the preceding illustration, then press twice quickly to see the supplemental light sequence.
- On
- Blinking
- On
If the supplemental light sequence matches the light sequence in the preceding illustration, then press on the printer control panel to clear the light sequence.
The job will be printed without using Resource Save.
Memory full [38]
- On
- On
If the printer control panel light sequence matches the light sequence in the preceding illustration, then press twice quickly to see the supplemental light sequence.
- On
- On
- On
- On
If the supplemental light sequence matches the light sequence in the preceding illustration, then try one or more of the following:
From the printer control panel, press to continue printing. A data loss will occur.
From the printer control panel, press to cancel the print job.
Install additional printer memory.
Decrease the resolution setting.
Miscellaneous messages
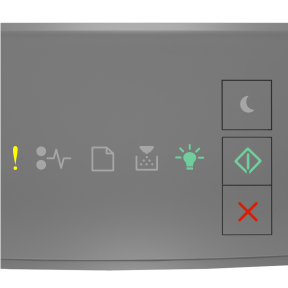
Close front door
- On
If the printer control light sequence matches the light sequence in the preceding illustration, then close the front door of the printer.
Complex page, some data may not have printed [39]
- On
- On
If the printer control panel light sequence matches the light sequence in the preceding illustration, then press twice quickly to see the supplemental light sequence.
- On
- On
- On
If the supplemental light sequence matches the light sequence in the preceding illustration, then try one or more of the following:
From the printer control panel, press to continue printing. A data loss may occur.
From the printer control panel, press to cancel the print job.
Install additional printer memory.
Reduce the number and size of fonts, the number and complexity of images, and the number of pages in the print job.
PPDS font error [50]
- On
- On
If the printer control light sequence matches the light sequence in the preceding illustration, then press twice quickly to see the supplemental light sequence.
- On
- Blinking
- On
If the supplemental light sequence matches the light sequence in the preceding illustration, then try one or more of the following:
From the printer control panel, press to continue printing.
From the printer control panel, press to cancel the print job.
Printer had to restart. Last job may be incomplete.
- Blinking
- Blinking
- Blinking
- On
If the printer control panel light sequence matches the light sequence in the preceding illustration, then press on the printer control panel to continue printing.
For more information, visit http://support.lexmark.com or contact customer support.
Service error
- Blinking
- Blinking
- Blinking
- Blinking
- Blinking
- Blinking
If the printer control panel light sequence matches the light sequence in the preceding illustration, then turn off the printer, and then turn it back on.
If the lights are still blinking after 10 seconds, then the printer may need to be serviced. Visit http://support.lexmark.com or contact your system support person.
Too many trays attached [58]
- On
- On
If the printer control panel light sequence matches the light sequence in the preceding illustration, then press twice quickly to see the supplemental light sequence.
- On
- On
- On
- On
If the supplemental light sequence matches the light sequence in the preceding illustration, then do the following:
Turn off the printer.
Unplug the power cord from the electrical outlet.
| Note: Optional trays lock together when stacked. Remove stacked trays one at a time from the top to the bottom. |
Remove the extra tray or trays.
Connect the power cord to a properly grounded electrical outlet.
Turn the printer back on.
![Printer control panel light sequence for Cartridge, imaging unit mismatch [41.xy]](../resource/panel_lights_error_toner_on_3.jpg)
![Printer control panel light sequence for Cartridge logw [88.xx]](../resource/panel_lights_toner_start_on_3.jpg)
![Printer control panel light sequence for Cartridge nearly low [88.xy]](../resource/panel_lights_error_slow_blink_toner_start_on_3.jpg)
![Supplemental light sequence for Replace cartridge, 0 estimated pages remain [88.xy]](../resource/panel_lights_error_ready_on_jam_blinking_3.jpg)
![Supplemental light sequence for Replace cartridge, printer region mismatch [42.xy]](../resource/panel_lights_error_toner_on_load_blinking_3.jpg)
![Supplemental light sequence for Reinstall missing or unresponsive cartrdige [31.xy]](../resource/panel_lights_error_jam_toner_on_3.jpg)
![Printer control panel light sequence for Replace unsupported cartridge [32.xy]](../resource/panel_lights_error_jam_load_toner_on_3.jpg)
![Printer control panel light sequence for Imaging unit low [84.xy]](../resource/panel_lights_start_on_toner_blinking_3.jpg)
![Printer control panel light sequence for Imaging unit nearly low [84.xy]](../resource/panel_lights_error_slow_blink_toner_blinking_start_on_3.jpg)
![Printer control panel light sequence for Imaging unit very low [84.xy]](../resource/panel_lights_start_on_error_toner_blinking_3.jpg)
![Printer control panel light sequence for Replace imaging unit, 0 estimated pages remain [84.xy]](../resource/panel_lights_error_start_on_toner_blinking_3.jpg)
![Printer control panel light sequence for Reinstall missing or unresponsive imaging unit [31.xy]](../resource/panel_lights_error_on_toner_blinking_3.jpg)
![Supplemental light sequence for Reinstall missing or unresponsive imaging unit [31.xy]](../resource/panel_lights_error_jam_on_toner_blinking_3.jpg)
![Printer control panel light sequence for Replace unsupported imaging unit [32.xy]](../resource/panel_lights_error_jam_load_on_toner_blinking_3.jpg)
![Printer control panel light sequence for Incorrect paper size, open<nbspace/>[paper source]<nbspace/>[34]](../resource/panel_lights_error_start_on_3.jpg)
![Supplemental light sequence for Incorrect paper size, open [paper source] [34]](../resource/panel_lights_error_load_ready_start_on_3.jpg)
![Printer control panel light sequence for Load [paper source] with [custom type name]](../resource/panel_lights_load_start_on_3.jpg)
![Supplemental light sequence for Network [x] software error [54]](../resource/panel_lights_error_start_on_jam_blinking_3.jpg)
![Supplemental light sequence for Standard parallel port disabled [56]](../resource/panel_lights_error_start_on_jam_load_slow_blink_3.jpg)
![Supplemental light sequence for Standard network software error [54]](../resource/panel_lights_error_jam_start_on_3.jpg)
![Supplemental light sequence for Standard USB port disabled [56]](../resource/panel_lights_error_start_on_jam_load_blinking_3.jpg)
![Supplemental light sequence for Insufficient memory to collate job [37]](../resource/panel_lights_error_toner_start_on_3.jpg)
![Supplemental light sequence for Insufficient memory to support Resource Save feature [35]](../resource/panel_lights_error_start_on_ready_blinking_3.jpg)
![Supplemental light sequence for Memory full [38]](../resource/panel_lights_error_toner_ready_start_on_3.jpg)
![Supplemental light sequence for Too many trays attached [58]](../resource/panel_lights_error_load_toner_start_on_3.jpg)