Learning about the printer

Printer configurations
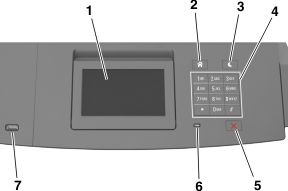
Basic model

The basic printer model

1

Standard bin

2

Printer control panel

3

Multipurpose feeder

4

Standard 550-sheet tray (Tray 1)


Fully configured model

tipping_hazard caution icon CAUTION—TIPPING HAZARD: Floor-mounted configurations require additional furniture for stability. You must use either a printer stand or printer base if you are using a high-capacity input tray or more than one input option. If you purchased a printer with a similar configuration, you may need additional furniture. For more information, see www.lexmark.com/multifunctionprinters.

The following illustration shows the maximum number of optional finishers and trays that are supported by the printer. For more information on other configurations, visit http://support.lexmark.com.
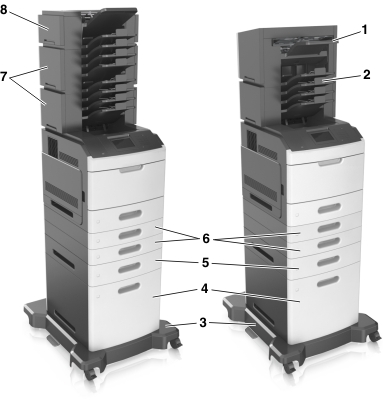
A fully configured printer
 

Hardware option

Alternative hardware option

1

Staple finisher

  • Output expander

  • 4-bin mailbox

2

4-bin mailbox

  • Output expander

  • High-capacity output expander

  • Staple finisher

3

Caster base

None

4

2100-sheet tray

None

5

550-sheet tray

250-sheet tray

6

250-sheet tray

550-sheet tray

7

4-bin mailbox

Output expander

8

Output expander

4-bin mailbox


In a configuration with two or more optional finishers:

When using optional trays:

Using the printer control panel

The printer control panel and its parts
 

Use the

To

1

Display

  • View the printer status.

  • Set up and operate the printer.

2

Home button

Go to the home screen.

3

Sleep button

Enable Sleep mode or Hibernate mode.

Do the following to wake the printer from Sleep Mode:

  • Press any hard button.

  • Pull out Tray 1 or load paper in the multipurpose feeder.

  • Open a door or cover.

  • Send a print job from the computer.

  • Perform a power-on reset with the main power switch.

  • Attach a device to the USB port on the printer.

4

Keypad

Enter numbers, letters, or symbols.

5

Stop or Cancel button

Stop all printer activity.

6

Indicator light

Check the status of the printer.

7

USB port

Connect a flash drive to the printer.

Note: Only the front USB port supports flash drives.


Understanding the colors of the indicator and Sleep button lights

The colors of the indicator and Sleep button lights on the printer control panel signify a certain printer status or condition.

Indicator light color and its corresponding printer status

Indicator light

Printer status

Off

The printer is off or in Hibernate mode.

Blinking green

The printer is warming up, processing data, or printing.

Solid green

The printer is on, but idle.

Blinking red

The printer requires user intervention.


Sleep button light color and its corresponding printer status

Sleep button light

Printer status

Off

The printer is idle or in Ready state.

Solid amber

The printer is in Sleep mode.

Blinking amber

The printer is waking from or entering Hibernate mode.

Blinking amber for 0.1 second, then goes completely off for 1.9 seconds in pulsing pattern

The printer is in Hibernate mode.


Understanding the home screen

When the printer is turned on, the display shows a basic screen, referred to as the home screen. Use the home screen buttons and icons to initiate an action.

Note: Your home screen may vary depending on your home screen customization settings, administrative setup, and active embedded solutions.
The illustration shows an example of a home screen.

Touch

To

1

Change Language

Change the primary language of the printer.

2

Bookmarks

Create, organize, and save a set of bookmarks (URLs) into a tree view of folders and file links.

Note: The tree view does not include bookmarks created within Forms and Favorites, and the ones in the tree are not usable in Forms and Favorites.

3

Held Jobs

Display all current held jobs.

4

USB

View, select, or print photos and documents from a flash drive.

Note: This icon appears only when you return to the home screen while a memory card or flash drive is connected to the printer.

5

Menus

Access printer menus.

Note: These menus are available only when the printer is in ready state.

6

Status message bar

  • Show the current printer status such as Ready or Busy.

  • Show printer conditions such as Imaging unit low or Cartridge Low.

  • Show intervention messages and the instructions on how to clear them.

7

Status/Supplies

  • Show a printer warning or error message whenever the printer requires intervention to continue processing.

  • View more information on the printer warning or message, and on how to clear it.

8

Tips

View a context-sensitive help information.


This may also appear on the home screen:

Touch

To

Search Held Jobs

Search current held jobs.

Jobs by user

Access print jobs saved by user.

Profiles and Solutions

Access profiles and solutions.


Features

Feature

Description

Attendance message alert

Message alert icon

If an attendance message affects a function, then this icon appears and the red indicator light blinks.

Warning

Warning button

If an error condition occurs, then this icon appears.

Printer IP address

Example: 123.123.123.123

The IP address of your printer is located at the top left corner of the home screen and appears as four sets of numbers separated by periods. You can use the IP address when accessing the Embedded Web Server to view and remotely configure printer settings even when you are not physically near the printer.


Using the touch-screen buttons

Note: Your home screen may vary, depending on your home screen customization settings, administrative setup, and active embedded solutions.
The illustration shows a sample touch screen on the printer control panel.
 

Touch the

To

1

Radio button

Select or clear an item.

2

Up arrow

Scroll up.

3

Down arrow

Scroll down.

4

Accept button

Save a setting.

5

Cancel button

  • Cancel an action or a selection.

  • Return to the previous screen.


Other touch-screen buttons

Touch

To

Home icon

Return to the home screen.

Tips icon

Open a context-sensitive Help dialog on the printer control panel.

Left arrow

Scroll to the left.

Right arrow

Scroll to the right.