When a jam occurs, a message indicating the jam location and information to clear the jam appears on the printer display. Open the doors, covers, and trays indicated on the display to remove the jam.
Notes:
|
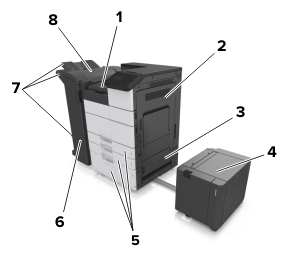
1 |
Area G |
|
2 |
Door C |
|
3 |
Door D |
|
4 |
Door F |
|
5 |
Trays |
|
6 |
Door H |
|
7 |
Finisher bins |
|
8 |
Door J |
|
Area name |
Control panel message |
What to do |
|---|---|---|
|
Multipurpose feeder |
[x]-page jam, clear jammed paper from multipurpose feeder. [200.xx] |
Remove the jammed paper from the feeder. |
|
Door C, trays |
[x]-page jam, open door C and clear all jammed paper. [2yy.xx] |
Open door C, and then remove the jammed paper. Pull out the tray, and then remove the jammed paper. |
|
[x]-page jam, slide the 3000-sheet tray and open door C. [2yy.xx] |
||
|
Door D, trays |
[x]-page jam, open door D and clear all jammed paper. [24y.xx] |
Open door D, and then remove the jammed paper. Pull out the tray, and then remove the jammed paper. |
|
[x]-page jam, slide the 3000-sheet tray and open door D. [24y.xx] |
||
|
Doors C and F |
[x]-page jam, slide the 3000-sheet tray and open door F. [24y.xx] |
Pull the 3000-sheet tray, and then remove the jammed paper from the side of the tray. Open door F, and then remove the jammed paper. |
|
Area G, doors C, J, and H, finisher bin |
[x]-page jam, open doors G, H, and J and clear jammed paper. [4yy.xx] |
Open door G, and then remove the jammed paper. Open door H, and then remove the jammed paper. |
|
Doors C and G, finisher bin |
[x]-page jam, press latch to access area G. Leave paper in bin. [40y.xx] |
Slide the staple finisher to the left, and then remove the jammed paper. |
|
Area G, doors C, J, and H, finisher bin |
[x]-page jam, open door H and rotate knob H6 clockwise. Leave paper in bin. [426.xx–428.xx] |
Open door H, and then remove the jammed paper. |