Setting up the printer to fax
Scenario 1: Standard telephone line
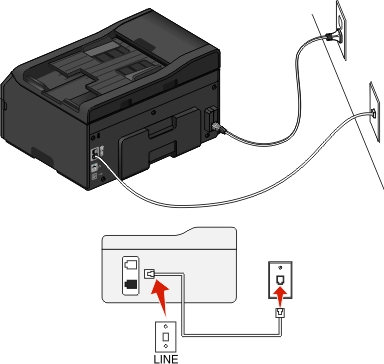
Setup 1: Printer is connected to a dedicated fax line
To connect:
Connect the cable from the wall jack to the  port of the printer.
Tips for this setup:
You can set the printer to receive faxes automatically (Auto Answer On) or manually (Auto Answer Off).
If you want to receive faxes automatically (Auto Answer On), then set the printer to pick up on any number of rings that you want.
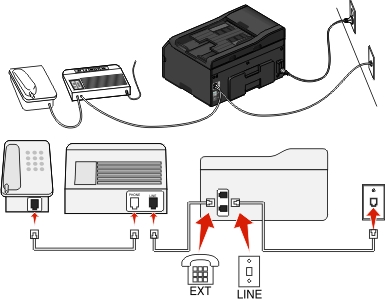
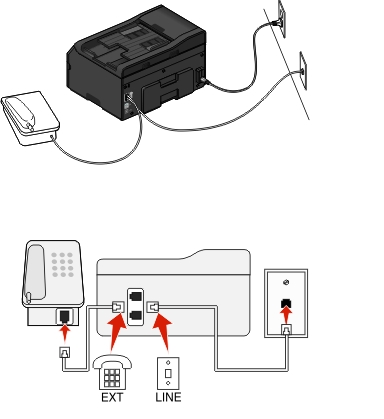
Setup 2: Printer is sharing the line with an answering machine
Connected to the same telephone wall jack
To connect:
Connect the cable from the wall jack to the port of the printer.
Remove the protective plug from the  port of the printer, and then connect the answering machine to the port.
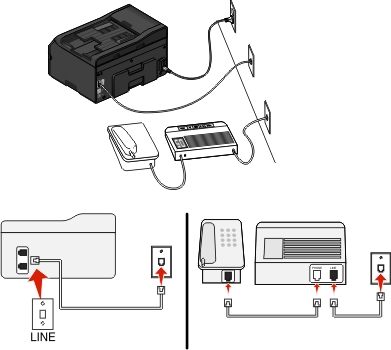
Connected to different wall jacks
To connect:
Connect the cable from the wall jack to the port of the printer.
Tips for this setup:
If you have only one telephone number on your line, then you need to set the printer to receive faxes automatically (Auto Answer On).
Set the printer to pick up calls two rings after the answering machine. For example, if the answering machine picks up calls after four rings, then set the printer to pick up after six rings. This way, the answering machine picks up calls first and your voice calls are received. If the call is a fax, then the printer detects the fax signal on the line and takes over the call.
If you subscribe to a distinctive ring service provided by your telephone company, then make sure that you set the correct ring pattern for the printer. Otherwise, the printer will not receive faxes even if you have set it to receive faxes automatically.
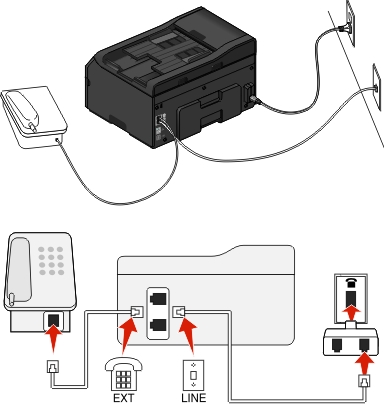
Setup 3: Printer is sharing the line with a telephone subscribed to voice mail service
To connect:
Connect the cable from the wall jack to the port of the printer.
Remove the protective plug from the port of the printer, and then connect the telephone to the port.
Tips for this setup:
This setup works best if you subscribe to a distinctive ring service. If you have distinctive ring service, then make sure that you set the correct ring pattern for the printer. Otherwise, the printer will not receive faxes even if you have set it to receive faxes automatically.
If you have only one telephone number on your line, then you need to set the printer to receive faxes manually (Auto Answer Off).
When you answer the telephone and you hear fax tones, press *9* or the manual answer code on the telephone to receive the fax.
You can also set the printer to receive faxes automatically (Auto Answer On), but you need to turn off the voice mail service when you are expecting a fax. This setting works best if you are using voice mail more often than fax.
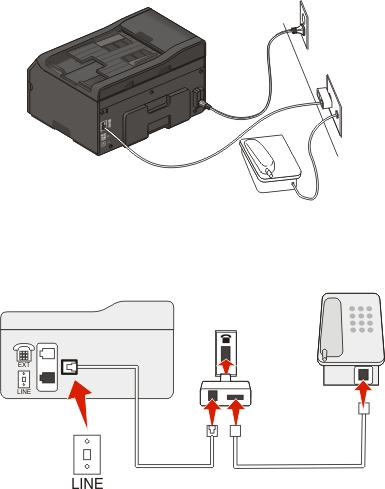
Scenario 2: Digital Subscriber Line (DSL)
A Digital Subscriber Line splits your regular telephone line into two channels: voice and Internet. Telephone and fax signals travel through the voice channel, and Internet signals pass through the other channel. This way, you can use the same line for analog voice calls (including faxes) and digital Internet access.
To minimize interference between the two channels and ensure a quality connection, you need to install a DSL filter for the analog devices (fax machine, telephone, answering machine) in your network. Interference causes noise and static on the telephone, failed and poor quality faxes for the printer, and slow Internet connection on your computer.
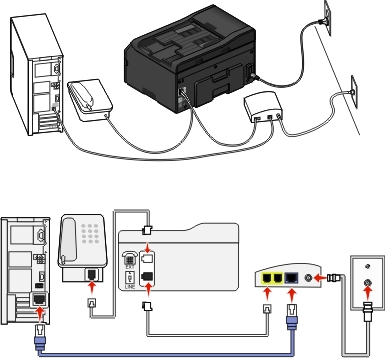
To install a filter for the printer:
Connect the line port of the DSL filter to the wall jack.
Connect a telephone cable from the port on the back of the printer to the phone port on the DSL filter.
To continue using a computer for Internet access, connect the computer to the DSL HPN port on the DSL filter.
To connect a telephone to the printer, remove the protective plug from the port of the printer and then connect the telephone to the port.
Scenario 3: VoIP telephone service
To connect:
Connect one end of a telephone cable to the port of the printer.
Connect the other end of the cable to the port labeled Phone Line 1 or Phone Port on the VoIP adapter.
The port labeled Phone Line 2 or Fax Port is not always active. You may need to pay extra to your VoIP provider if you want to activate the second phone port.
Remove the protective plug from the port of the printer, and then connect the telephone to the port.
Tips for this setup:
To make sure that the phone port on the VoIP adapter is active, plug an analog telephone into the phone port, and then listen for a dial tone. If you hear a dial tone, then the port is active.
If you need two phone ports for your devices but do not want to pay extra, then do not plug the printer into the second phone port. You can use a phone splitter. Plug the phone splitter into the Phone Line 1 or Phone Port, and then plug the printer and telephone into the splitter.
Make sure you use a phone splitter, not a line splitter. To make sure that you are using the correct splitter, plug an analog telephone into the splitter and then listen for a dial tone.
Scenario 4: Digital telephone service through a cable provider
Setup 1: Printer is connected directly to a cable modem
Follow this setup if you normally connect your telephone to a cable modem.
To connect:
Connect one end of a telephone cable to the port of the printer.
Connect the other end of the cable to the port labeled Phone Line 1 or Phone Port on the cable modem.
The port labeled Phone Line 2 or Fax Port is not always active. You may need to pay extra to your cable provider if you want to activate the second phone port.
Remove the protective plug from the port of the printer, and then connect the telephone to the port.
Tips for this setup:
To make sure that the phone port on the cable modem is active, plug an analog telephone into the phone port, and then listen for a dial tone. If you hear a dial tone, then the port is active.
If you need two phone ports for your devices but do not want to pay extra, then do not plug the printer into the second phone port. You can use a phone splitter. Plug the phone splitter into the Phone Line 1 or Phone Port , and then plug the printer and telephone into the splitter.
Make sure you use a phone splitter, not a line splitter. To make sure that you are using the correct splitter, plug an analog telephone into the splitter and then listen for a dial tone.
Setup 2: Printer is connected to a wall jack; cable modem is installed elsewhere in the house
Follow this setup if your cable provider activated the wall jacks in your house so that you do not have to plug your devices into the cable modem. Your cable telephone service comes from the wall jacks.
To connect:
Connect the cable from the wall jack to the port of the printer.
Remove the protective plug from the port of the printer, and then connect the telephone to the port.
Scenario 5: Country- or region-specific setup
Different countries or regions have different types of telephone wall jacks. The standard wall jack adopted by most countries or regions is the Registered Jack-11 (RJ-11). You need to have an RJ-11 plug, or a telephone cable that has an RJ-11 connector, so you can connect a device to an RJ-11 wall jack.
The fax ports on the back of the printer and the telephone cable that comes with the printer have RJ-11 connectors. If you have a different type of connector in your country or region, then you may need to use an RJ-11 adapter.
Connecting the printer to a non-RJ-11 wall jack
To connect:
Connect one end of a telephone cable to the port of the printer.
Connect the other end of the cable to the RJ-11 adapter, and then connect the adapter to the wall jack.
If you want to connect another device (telephone or answering machine) to the same wall jack, and if the device has a non-RJ 11 connector, then connect it directly to the wall jack.
Notes:
- Do not remove the wrap plug from the port of the printer.
- The printer may not come with an RJ-11 adapter in your country or region.
If the additional device (telephone or answering machine) has an RJ-11 connector, then you can remove the wrap plug and connect the device to the port of the printer.
Connecting the printer in countries or regions that use serial connection
In some countries or regions, you need to plug all devices into the wall jack. You cannot plug a telephone or answering machine into the port of the printer. This is called serial connection.
Austria | Germany | Portugal |
Belgium | Ireland | Spain |
Denmark | Italy | Sweden |
France | Netherlands | Switzerland |
Finland | Norway | United Kingdom |
| Warning—Potential Damage: If your country or region is on the list, then do not remove the wrap plug from the port of the printer. It is necessary for the proper functioning of the devices on the telephone line. |
To connect:
Connect the cable from the wall jack to the port of the printer.
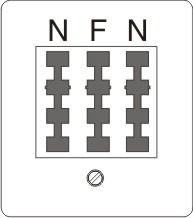
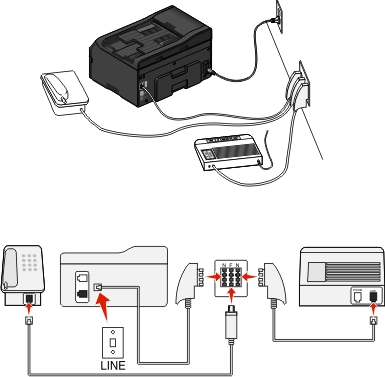
Connecting the printer to a wall jack in Germany
The German wall jack has two kinds of ports. The N ports are for fax machines, modems, and answering machines. The F port is for telephones.
Connect the printer to any of the N ports.
To connect:
Connect one end of a telephone cable to the port of the printer.
Connect the other end of the cable to the RJ-11 adapter, and then connect the adapter to an N port.
If you want to connect a telephone and answering machine to the same wall jack, then connect the devices as shown.
Entering your user information
Your user information includes your name or your company name, your fax number (which is your telephone number, unless you have a dedicated fax telephone line), and the time and date on your fax machine when a transmission is made. This information appears in the header and footer of the faxes that you send.
In some countries, you cannot send a fax without this information. Some fax machines block faxes without sender information, so make sure that you enter this information in your printer.
Setting the fax header
From the printer control panel, navigate to:
 > Setup >
  > Fax Setup > > Dialing and Sending > > Fax Name >
Enter your name or your company name, and then press .
To change a character, press the left arrow button.
To add a space, press the number 0.
Press the arrow buttons to scroll to Fax Number, and then press .
Enter your fax number or your telephone number, and then press .
Setting the fax footer
From the printer control panel, navigate to:
> Setup > > Fax Setup > > Ringing and Answering > > Fax Footer > > On >
Setting the date and time
From the printer control panel, navigate to:
> Setup > > Device Setup > > Date/Time >
Enter the date, and then press .
Enter the time, and then press .