Networking FAQ
What is Wi-Fi Protected Setup?
Wi-Fi Protected Setup (WPS) is a simple and secure configuration that allows you to establish a wireless home network and enable network security without requiring prior knowledge of Wi-Fi technology. It is no longer necessary to configure the network name (SSID) and WEP key or WPA passphrase for network devices.
| Note: WPS supports only networks that communicate through access points (wireless routers). |
The printer supports the following methods in connecting to a wireless network:
Personal Identification Number (PIN)—A PIN on the printer is entered into the wireless settings of the access point.
Push Button Configuration (PBC)—Buttons on both the printer and the access point are pushed within a given period of time.
Look for any of these identifier marks to check if your access point is WPS certified:
You can find these WPS logos on the side, back, or top of your access point.
For more information on accessing the wireless settings and determining the WPS capability of your access point, see the documentation that came with the access point or contact your system support person.
Where do I find my WEP key or WPA/WPA2 preshared key/passphrase?
Contact your system support person.
The person who set up your network usually keeps the WEP key or WPA/WPA2 preshared key/passphrase.
If your wireless network was set up by your Internet Service Provider (ISP), then you might find the information in the documentation they provided.
See the documentation that came with your access point (wireless router).
If your access point is using the default settings, then you can find the information in the documentation.
View the security settings on the access point.
Open a Web browser, and then type the IP address of the access point in the address field. Press Enter.
Notes:
- To obtain the IP address of the access point, see the documentation that came with it or contact your system support person.
- If you are using a proxy server, then temporarily disable it to load the Web page correctly.
Enter the user name and password for the access point when prompted.
| Note: The WEP key or WPA/WPA2 preshared key/passphrase is not the same as the password for the access point. The password lets you access the access point settings. The WEP key or WPA/WPA2 preshared key/passphrase allows printers and computers to join your wireless network. |
Look for the WEP key or WPA/WPA2 preshared key/passphrase.
What is an SSID?
A Service Set Identifier (SSID) is the name that identifies a wireless network. All devices on the network must know the SSID of the wireless network, or they will not be able to communicate with each other. Usually, the wireless network broadcasts the SSID to allow wireless devices in the area to connect to it. Sometimes, the SSID is not broadcast for security reasons.
If the SSID of your wireless network is not broadcast, then it cannot be detected automatically and will not show up in the list of available wireless networks. You must enter the network information manually in this situation.
An SSID can contain up to 32 alphanumeric characters. Alphanumeric characters are a combination of alphabetic (letters A to Z) and numeric (numbers 0 to 9) characters.
Where do I find my SSID?
View the settings on the access point (wireless router).
Most access points have a built-in Web server that can be accessed using a Web browser.
Check your computer to see if a program was installed with your wireless network adapter.
Many network adapters provide a software application that allows you to view the wireless settings of your computer, including your SSID.
If you are unable to locate your SSID using either of these methods, then contact your system support person.
What is a network?
A network is a collection of devices such as computers, printers, Ethernet hubs, access points, and routers connected together for communication through cables or through a wireless connection. A network can be wired, wireless, or designed to have both wired and wireless devices.
How do I find out what type of security my network is using?
Contact your system support person.
The person who set up your network usually keeps your wireless information.
See the documentation that came with your access point (wireless router).
Check the characters of the password that you use to access your wireless network.
If you are not using a password, then choose None or No Security.
Exactly 10 or 26 hexadecimal characters or Exactly 5 or 13 ASCII characters | WEP |
Exactly 64 hexadecimal characters or From 8 to 63 ASCII characters | WPA or WPA2 |
Notes:
- Hexadecimal characters are A–F, a–f, and 0–9.
- ASCII characters are letters, numbers, and symbols found on a keyboard. ASCII characters in a WPA/WPA2 preshared key/passphrase are case-sensitive.
View the security settings on the access point.
Open a Web browser. Type the IP address of the access point in the address field, and then press Enter.
Notes:
- To obtain the IP address of the access point, see the documentation that came with it, or contact your system support person.
- If you are using a proxy server, then temporarily disable it to load the Web page correctly.
Enter the user name and password for the access point when prompted.
| Note: The WEP key or WPA/WPA2 preshared key/passphrase is not the same as the password for the access point. The password lets you access the access point settings. The WEP key or WPA/WPA2 preshared key/passphrase allows printers and computers to join your wireless network. |
Look for the WEP key or WPA/WPA2 preshared key/passphrase.
How are home networks configured?
For desktop computers, laptops, and printers to communicate with each other over a network, they must be connected by cables and/or have wireless network adapters built in or installed in them.
There are many different ways a network can be set up. Four common examples appear below.
| Note: The printers in the following diagrams represent printers with internal print servers built into them so that they can communicate over a network. |
Wireless network examples
Scenario 1: Mixed wired and wireless connections on a network with Internet access
All computers and printers connect to the network through a router with Ethernet and wireless capabilities.
Some computers and printers connect wirelessly to the router; others connect over a wired connection.
The network is connected to the Internet through a DSL or cable modem.
Scenario 2: Wireless network with Internet access
Scenario 3: Wireless network with no Internet access
Scenario 4: Computer connected wirelessly to a printer without Internet access
A computer is directly connected to a printer without going through a wireless router.
This configuration is referred to as an ad hoc network.
The network has no connection to the Internet.
| Note: Most computers can connect to only one wireless network at a time. If you access the Internet over a wireless connection, you will lose Internet access if you are connected to an ad hoc network. |
What is a USB cable?
A Universal Serial Bus (USB) cable is primarily used to connect a USB device to a host. Common hosts include computers and video game consoles. Through the USB port and cable, it is possible to connect computer peripherals such as mouse devices, keyboards, digital cameras, printers, personal media players, flash drives, and external hard drives. For many of those devices, USB has become the standard connection method.
Why do I need a USB cable?
When setting up the printer on your wireless network, the printer will need to temporarily connect to a computer using the USB cable. This temporary connection may be used to set up the wireless settings of the printer.
| Note: A USB cable is not necessary when connecting to a wireless network through Wi-Fi Protected Setup (WPS). |
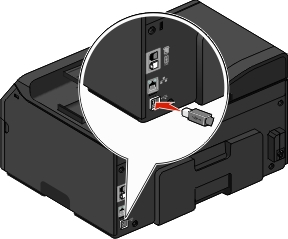
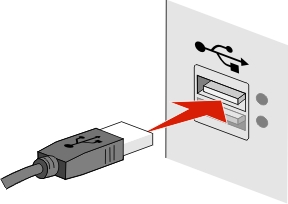
How do I attach the USB cable?
The USB cable attaches to a USB port on the computer and to the square connector on the back of the printer. This connection allows you to configure the printer for a network or local (USB) installation.
The USB port on the computer and on the printer are each marked with  .
.
| Note: Do not connect the USB cable until prompted to do. |
If the USB port at the back of the printer is covered by a sticker, then make sure to remove it.
Firmly plug the square end of the USB cable into the back of the printer.
Firmly plug the rectangular end of the USB cable into the USB port of the computer.
Follow the instructions on the computer screen.
How are infrastructure and ad hoc networks different?
Wireless networks can operate in one of two modes: infrastructure or ad hoc.
In infrastructure mode, all devices on a wireless network communicate with each other through an access point (wireless router).
In ad hoc mode, a computer with a wireless network adapter communicates directly with a printer equipped with a wireless print server.
Characteristics |
Communication | Through an access point | Directly between devices |
Security | More security options | WEP or no security |
Range | Determined by the range and number of access points | Restricted to the range of individual devices on the network |
Speed | Usually faster | Usually slower |
Requirements for all devices |
Unique IP address for each device | Yes | Yes |
Mode set to | Infrastructure mode | Ad hoc mode |
Same SSID | Yes, including the access point | Yes |
Same channel | Yes, including the access point | Yes |
We recommend setting up a network in infrastructure mode using the installation software CD. Infrastructure mode provides:
Finding the signal strength
The signal strength tells you how strongly the computer or printer is receiving the wireless signal from the wireless network. Poor signal quality could affect connectivity during configuration.
Checking computer connectivity
From your computer system tray, click the wireless icon that corresponds to the software managing your wireless network adapter.
Check the signal quality.
Checking printer connectivity
From the printer, print a network setup page.
In the Wireless section, look for Quality.
View the signal strength from the printer control panel.
Navigate to:
 > Setup >
  > Network Setup > > Wireless 802.11 b/g/n > > Network Connection Setup > > Wireless > > View Signal Quality >
To improve signal quality, remove sources of interference or move wireless devices closer to the access point (wireless router).
How can I improve wireless signal strength?
A common reason wireless printers fail to communicate over a network is poor wireless signal quality. If the signal is too weak, too distorted, or blocked by an object, it cannot carry information between the access point and the printer. To determine if the printer is receiving a strong signal from the access point, print a network setup page. The Quality field indicates the relative strength of the wireless signal the printer is receiving. Drops in signal strength can be intermittent, however, and although the signal quality appears high, it may drop during certain conditions.
If you think signal strength is a problem between your access point (wireless router) and the printer, then try one or more of the following:
Notes:
- The solutions below are for infrastructure networks. If you are using an ad hoc network, then adjust the computer when the solution suggests adjusting the access point.
- Ad hoc networks have a much shorter range than infrastructure networks. Try moving the printer closer to the computer if they seem to have trouble communicating.
Move the printer closer to the access point
If the printer is too far away from the access point, then it will not be able to communicate with other devices on the network. For most indoor wireless networks, the maximum distance between the access point and the printer is approximately 100 feet (30 meters). This distance could be longer or shorter, depending upon the layout of the network and the limitations of the access point.
Remove obstacles between the access point and the printer
The wireless signal from your access point will pass through most objects. Most walls, floors, furniture, and other objects will not block the wireless signal. However, there are materials that are too dense for the signal to pass through, such as objects containing metal and concrete. Arrange your printer and access point so that the signal is not blocked by such objects.
Remove sources of interference
Other types of radio frequencies can cause problems with the wireless signal on your network, resulting to printing issues that seem to come and go.
Turn off potential sources of interference where possible.
Avoid using microwave ovens, cordless phones (but not cellular phones), baby monitors, almost any kitchen appliance, wireless surveillance equipment, or any appliance containing a motor when printing over your wireless network.
If another wireless network is operating in the vicinity, then change the wireless channel on the access point.
Do not place your access point on a printer or other electronic device. Such devices can also interfere with the wireless signal.
Arrange the network to reduce signal absorption
Even when the wireless signal is able to pass through an object, it is slightly weakened. If it passes through too many objects, then it can be significantly weakened. All objects absorb part of the wireless signal when it passes through them, and certain types of objects absorb enough to cause communications problems. Place your access point as high in the room as possible to avoid signal absorption.
How can I make sure my computer and printer are connected to the same wireless network?
If the printer is not on the same wireless network as the computer, then you will not be able to print wirelessly. The SSID of the printer must match the SSID of the computer, if the computer is already connected to the wireless network.
For Windows users
Obtain the SSID of the network that the computer is connected to:
Type the IP address of your access point (wireless router) in the address field of your Web browser.
If you do not know the IP address of the access point, then do the following:
Click  , or click Start and then click Run.
In the Start Search or Run dialog, type cmd.
Press Enter, or click OK.
Type ipconfig, and then press Enter. Check the Wireless Network Connection section:
The “Default Gateway” entry is typically the access point.
The IP address appears as four sets of numbers separated by periods, such as 192.168.2.134.
Type the user name and password of the router when prompted.
Click OK.
In the Wireless settings section, look for the SSID.
Write down the SSID.
| Note: Make sure you copy it exactly, including any capital letters. |
Obtain the SSID of the network that the printer is connected to:
From the printer, print a network setup page.
In the Wireless section, look for SSID.
Compare the SSID of the computer and SSID of the printer.
If the SSIDs are the same, then the computer and the printer are connected to the same wireless network.
If the SSIDs are not the same, then run the utility again to set up the printer on the wireless network used by the computer.
For Macintosh users with an AirPort base station
In Mac OS X version 10.5 or later
From the Apple menu, navigate to:
System Preferences > Network > AirPort
or
System Preferences > Network > Wi-Fi
The SSID of the network that the computer is connected to is displayed in the Network Name menu.
Write down the SSID.
In Mac OS X version 10.4 or earlier
From the Finder, navigate to:
Applications > Internet Connect > AirPort
The SSID of the network that the computer is connected to is displayed in the Network menu.
Write down the SSID.
For Macintosh users with an access point
Type the IP address of the access point in the address field of your Web browser and continue to step 2.
If you do not know the IP address of the access point, then do the following:
From the Apple menu, navigate to:
System Preferences > Network > AirPort
or
System Preferences > Network > Wi-Fi
Click Advanced or Configure.
Click TCP/IP.
The Router entry is typically the access point.
Type your user name and password when prompted, and then click OK.
In the Wireless settings section, look for the SSID.
Write down the SSID, security type, and the WEP key or WPA/WPA2 preshared key/passphrase (if shown).
Notes:
- Make sure you copy the network information down exactly, including any capital letters.
- Store the SSID and the WEP key or WPA/WPA2 preshared key/passphrase in a safe place for future reference.
Can I use my printer on a USB and a network connection at the same time?
Yes; the printer supports a simultaneous USB and network connection. The printer can be configured in the following ways:
Locally attached (connected to a computer using a USB cable)
Wireless network
Ethernet network
Wireless network and locally attached simultaneously
Ethernet network and locally attached simultaneously
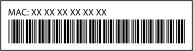
What is a MAC address?
A Media Access Control (MAC) address is a 48-bit identifier associated with the hardware of network equipment. The MAC address may also be called the physical address because it is connected to the hardware of a device instead of its software. The MAC address is displayed as a hexadecimal number in this format: 01-23-45-67-89-AB.
While it is possible to change the MAC address of a network device, it is not common practice to do so. For this reason, MAC addresses are considered permanent. IP addresses are easily changed, so MAC addresses are a more reliable method of identifying a specific device on a network.
Routers with security capabilities may allow filtering of MAC addresses on networks. This allows a managed list of devices to access the network, identified by their MAC addresses, as well as prevent access from unwanted devices. If your network uses MAC address filtering, then be sure to add the MAC address of the printer to the list of allowed devices.
How do I find the MAC address?
Network devices have a unique hardware identification number to distinguish them from other devices on the network. This is called the MAC (Media Access Control) address. Other devices sometimes use a type of MAC address called Universally Administered Address (UAA).
When installing the printer on a network, make sure you select the printer with the correct MAC address.
The MAC address of the internal print server is a series of letters and numbers.
Notes:
- A list of MAC addresses can be set on an access point (wireless router) so that only devices with matching MAC addresses are allowed to operate on the network. This is called MAC filtering. If MAC filtering is enabled in your access point and you want to add a printer to your network, then the MAC address of the printer must be included in the MAC filter list.
- If you are using an AirPort base station, then the MAC address may be referred to as AirPort ID, and MAC address filtering may be accessed through MAC Address Access Control.
What is an IP address?
An IP address is a unique number used by devices (such as a wireless printer, computer, or access point (wireless router)) on an IP network to locate and communicate with each other. Devices on an IP network can communicate with each other only if they have unique and valid IP addresses. A unique IP address means no two devices on the same network have the same IP address.
An IP address is a group of four numbers separated by periods. An example of an IP address is 123.123.123.123.
What is TCP/IP?
Networks are able to function when computers, printers, and other devices are able to send data to each other, either through cables or wireless signals. This transfer of data is made possible by sets of data transmission rules called protocols. A protocol can be thought of as a language that has rules so that participants can effectively communicate with each other.
Different types of networks use different protocols, but Transmission Control Protocol/Internet Protocol (TCP/IP) is the most popular. TCP/IP is used to send data over the Internet as well as over most corporate and home networks.
Every device on a network that uses TCP/IP must have an IP address. IP addresses are essentially unique computer names in a numeric format, used to transfer data around a network. IP addresses allow TCP/IP to confirm requests for, and receipt of, data by various devices on the network.
How do I locate IP addresses?
For Windows users
Click , or click Start and then click Run.
In the Start Search or Run dialog, type cmd.
Press Enter, or click OK.
Type ipconfig, and then press Enter.
The IP address appears as four sets of numbers separated by periods, such as 192.168.0.100.
For Macintosh users
From the Apple menu, navigate to:
About This Mac > More Info
From the Contents pane, choose Network.
If you are connected over a wireless network, then choose AirPort from the Active Services list.
Locating the printer IP address
How are IP addresses assigned?
An IP address may be assigned automatically by the network using DHCP. Once the printer is set up on a computer, the computer sends all print jobs across the network to the printer using this address.
If the IP address is not automatically assigned, you will be asked during wireless setup to manually enter an address and other network information after selecting your printer from the available list.
What is a key index?
An access point (wireless router) can be configured with as many as four WEP keys. Only one key is used on the network at a time, however. The keys are numbered, and the number of a key is referred to as its key index. All devices on the wireless network must be configured to use the same key index when multiple WEP keys are configured on the access point.
Select the same key index on your printer as you are using on your access point.
What is the difference between Guided and Advanced setup?
Use Guided setup if:
The printer and the computer communicate on the same wireless network.
You want the Wireless Setup Utility to automatically detect the network for you.
You want to connect your printer to the wireless network using Wi-Fi Protected Setup (WPS).
Use Advanced setup if:
The printer and the installing computer are not on the same wireless network, or if the computer does not have wireless access.
The wireless network requires certificates.
Enterprise-level security is employed on the wireless network.
You know the network SSID and security information and want to enter the information on a single screen.
The printer will be configured for a remote network.
You know your network information and want to enter it quickly.
You are configuring a printer for a wireless network that uses 802.1X authentication.