Working with photos

Supported memory cards and file types

Memory card

File type

  • Secure Digital (SD)

  • Secure Digital High Capacity (SDHC)

  • Micro Secure Digital (with adapter) (Micro SD)

  • Mini Secure Digital (with adapter) (Mini SD)

  • MultiMedia Card (MMC)

  • Reduced Size MultiMedia Card (with adapter) (RS-MMC)

  • MultiMedia Card mobile (with adapter) (MMCmobile)

  • Memory Stick

  • Memory Stick PRO

  • Memory Stick Duo (with adapter)

  • Memory Stick PRO Duo (with adapter)

  • xD-Picture Card

  • xD-Picture Card (Type H)

  • xD-Picture Card (Type M)

Documents:

  • .pdf (Adobe Portable Document Format)

Images:

  • .jpg, .jpeg, .jpe (Joint Photographic Experts Group)

  • .tiff, .tif (Tagged Image File Format)


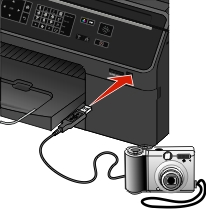
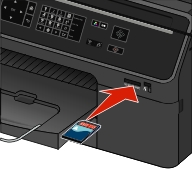
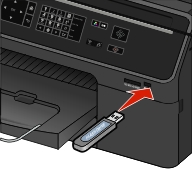
Using a memory card or flash drive with the printer

Insert a memory card into the card slot or a flash drive into the USB port.

Inserting a memory card

Inserting a flash drive

The illustration shows a memory card being inserted into the card slot.

Notes:

  • Insert the card with the brand name label facing up.
  • Make sure any arrows on the card point toward the printer.
  • If necessary, connect the memory card to the adapter that came with it.
  • Make sure that the memory card inserted is supported by the printer. For more information, see Supported memory cards and file types.
  • The card reader light comes on when a memory card is inserted and blinks when a memory card is being accessed.
The illustration shows a flash drive being inserted into the USB and PictBridge port.

Notes:

  • The flash drive uses the same port that is used for a PictBridge camera cable.
  • An adapter may be necessary if your flash drive does not fit directly into the port.

The illustration shows a warning sign to keep the user from touching the memory card slot as well as the USB and PictBridge port of the printer.

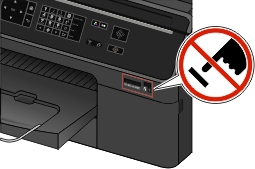
Warning—Potential Damage: Do not touch any cables, ports, any network adapter, any connector, the memory device, or the printer in the areas shown while actively printing, reading, or writing from the memory device. A loss of data can occur.


Follow the instructions on the printer display or select from available options.

Notes:

Printing photos from a memory card or flash drive

  1. Load photo paper.

  2. Insert a memory card, flash drive, or digital camera set to mass storage mode.

    If image files and document files are stored in the memory device, then press the left or right arrow button to select Photos, and then press the select button.

    Note: Only files with supported file types will be shown.
  3. Use the up or down arrow button to select a photo printing option, and then press the select button.

    • Select and Print allows you to choose a layout, the number of photos per page, paper settings, photo size, photo quality, and to sharpen the quality of graphics.

    • Print Photos allows you to print all photos, selected photos by photo range, and print photos using predefined photo size templates.

  4. To adjust the print settings, press the up or down arrow button to scroll to the option you want to set, and then press the left or right arrow button to scroll to the setting you want. If necessary, press the select button to make a selection.

  5. Press the start button.

    Note: For best results, allow the prints to dry at least 24 hours before stacking, displaying, or storing.

Printing photos from a PictBridge-enabled digital camera

PictBridge is a technology available in most digital cameras that lets you print directly from your digital camera without using a computer.

  1. Insert one end of the USB cable into the camera.

    Note: Use only the USB cable that came with the camera.
  2. Insert the other end of the cable into the PictBridge port on the front of the printer.

    The illustration shows the  USB cable  being inserted  into the Pictidge port of the printer.

    Notes:

    • Make sure that the digital camera is set to the correct USB mode. If the camera USB selection is incorrect, then the camera is detected as a flash drive, or an error message is displayed on the printer control panel. For more information, see the documentation that came with the camera.
    • The printer reads only one memory device at a time.
    The illustration shows a warning  for the user not to touch the printer while it is  actively reading from the memory device.

    Warning—Potential Damage: Do not touch any open connector, the memory device, or the printer in the areas shown while actively printing, reading, or writing from the memory device. A loss of data can occur.


  3. If the PictBridge connection is successful, then the following message appears on the display: Use PictBridge Device to choose and print photos. Press OK to select printer default settings.

  4. If you want to change the default print settings:

    1. Press the select button to access the PictBridge menu.

    2. Press the arrow buttons to select the paper source, paper setup, photo size, number of photos per page and print quality. You can also enhance the quality of graphics. Press the select button each time you make a selection.

    Note: The printer will use the default print settings unless you change the print settings from the camera.
  5. See the documentation that came with the camera to begin printing.

Note: If you insert the USB cable of the PictBridge-enabled camera while the printer is performing another job, then wait for the job to finish before printing from the camera.