Follow these steps to set up your printer
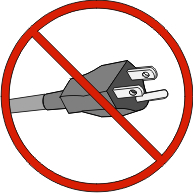 |  |  |
| Note: Do not connect cables until instructed to do so. |
Set up the printer hardware. For more information, see the Setup Guide.
Follow the instructions for your operating system:
| Note: Wireless printing is not standard on all printer models. |
| | |
| Note: Do not connect cables until instructed to do so. |
Set up the printer hardware. For more information, see the Setup Guide.
Follow the instructions for your operating system:
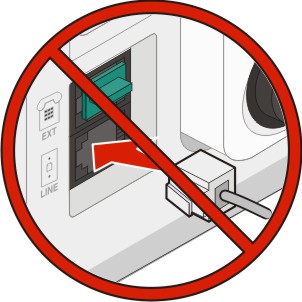
| Note: Do not connect the installation or network cables until prompted to do so by the setup software. |
SSID—The SSID is also referred to as the network name.
Wireless Mode (or Network Mode)—The mode will be either infrastructure or ad hoc.
Channel (for ad hoc networks)—The channel defaults to auto for infrastructure networks.
Some ad hoc networks will also require the auto setting. Check with your system support person if you are not sure which channel to select.
Security Method—There are three basic options for Security Method:
WEP key
If your network uses more than one WEP key, enter up to four in the provided spaces. Select the key currently in use on the network by selecting the Default WEP Transmit Key.
or
WPA or WPA2 passphrase
WPA includes encryption as an additional layer of security. The choices are AES or TKIP. Encryption must be set for the same type on the router and on the printer, or the printer will not be able to communicate on the network.
No security
If your wireless network does not use any type of security, then you will not have any security information.
| Note: Using an unsecured wireless network is not recommended. |
If you are installing the printer on an 802.1X network using the Advanced method, then you may need the following:
Authentication type
Inner authentication type
802.1X username and password
Certificates
| Note: For more information on configuring 802.1X security, see the Networking Guide on the Software and Documentation CD. |
Before you install the printer on a wireless network, make sure that:
A wireless card is installed in your printer.
Your wireless network is set up and working properly.
The computer you are using is connected to the same wireless network where you want to set up the printer.
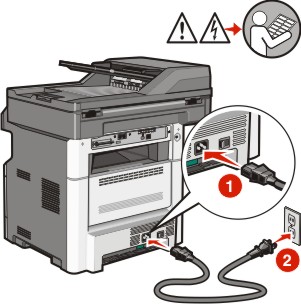
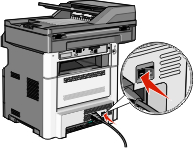
Connect the power cable to the printer and then to a properly grounded electrical outlet, and then turn the printer on.
 |  |
| Make sure the printer and computer are fully on and ready. |
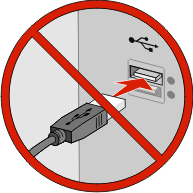
| Do not connect the USB cable until instructed to do so on the screen. |
From the printer control panel, select your language and country or region, and then touch Continue.
Select your time zone, and then touch Continue.
Deselect any function you plan to set up later, such as Fax or E-mail, and then touch Continue.

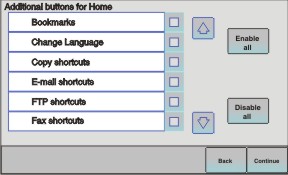
Select any additional buttons you want to display on the home screen, and then touch Continue.
If Fax is enabled, then type in your Fax Station name and touch Enter. For more information on fax station name and number, see your system support person; or touch Back to go back and deselect Fax.
If Fax is enabled, enter the Fax station (phone) number for this printer, and then touch Continue.
If E-mail is enabled, type in the Primary SMTP (mail server) Gateway address, and then touch Enter. For more information on enabling e-mail, see your system support person; or touch Back to go back and deselect E-mail.
If prompted, set the date and time, and then touch Continue.
Insert the Software and Documentation CD.

Click Install Printer and Software.
Click Agree to agree to the License Agreement.
Select Suggested, and then click Next.
Click Wireless Network Attach.
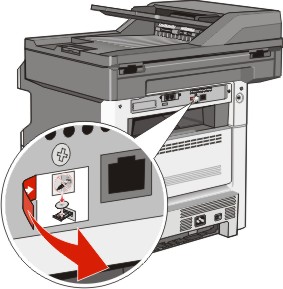
Remove the label covering the USB port on the back of the printer.
Connect the cables in the following order:
Temporarily connect a USB cable between the computer on the wireless network and the printer.

| Note: After the printer is configured, the software will instruct you to disconnect the temporary USB cable so you can print wirelessly. |
If you plan to set up fax now, then connect the fax cables. See the User's Guide on the Software and Documentation CD for help deciding how to connect the cables.
Follow the on-screen instructions to complete the software installation.
| Note: is the recommended path to choose. Choose only if you want to customize your installation or if your network uses 802.1x security. |
To allow other computers on the wireless network to use the wireless printer, follow steps 10 through 14 for each computer.
Before you install the printer on a wireless network, make sure that:
A wireless card is installed in your printer.
Your wireless network is set up and working properly.
The computer you are using is connected to the same wireless network where you want to set up the printer.
Locate the printer MAC address on the sheet that came with the printer. Write the last six digits of the MAC address in the space provided:
MAC address: ___ ___ ___ ___ ___ ___
Connect the power cable to the printer and then to a properly grounded electrical outlet, and then turn the printer on.
| |
From the printer control panel, select your language and country or region, and then touch Continue.
Select your time zone, and then touch Continue.
Deselect any function you plan to set up later, such as Fax or E-mail, and then touch Continue.
Select any additional buttons you want to display on the home screen, and then touch Continue.
If Fax is enabled, type in your Fax Station name, and then touch Enter. For more information on fax station name and number, see your system support person; or touch Back to go back and deselect Fax.
If Fax is enabled, enter the Fax station (phone) number for this printer, and then touch Continue.
If E-mail is enabled, type in the Primary SMTP (mail server) Gateway address, and then touch Enter. For more information on enabling e-mail, see your system support person; or touch Back to go back and deselect E-mail.
If prompted, set the date and time, and then touch Continue.
Access the AirPort options.
From the Apple menu, choose System Preferences.
Click Network.
Click AirPort.
From the Finder desktop, choose Go >Applications.
From the Applications folder, double-click Internet Connect.
From the toolbar, click AirPort.
From the Network pop-up menu, select print server xxxxxx, where the x’s are the last six digits of the MAC address located on the MAC address sheet.
Open the Safari browser.
From the Bookmarks drop-down menu, select Show.
Under Collections, select Bonjour or Rendezvous, and then double-click the printer name.
| Note: The application is referred to as Rendezvous in Mac OS X version 10.3, but is now called Bonjour by Apple Computer. |
From the main page of the Embedded Web Server, navigate to the page where the wireless settings information is stored.
Type the name of your network (SSID) in the appropriate field.
Select Infrastructure as your Network Mode if you are using a wireless router.
Select the type of security you use to protect your wireless network.
Enter the security information necessary for the printer to join your wireless network.
Click Submit.
Open the AirPort application on your computer:
From the Apple menu, choose System Preferences.
Click Network.
Click AirPort.
From the Finder desktop, choose Go >Applications.
From the Applications folder, double-click Internet Connect.
From the toolbar, click AirPort.
From the Network pop-up menu, select your wireless network.
To print to a network printer, each Macintosh user must install a custom PostScript Printer Description (PPD) file and create a printer in the Print Center or Printer Setup Utility.
Install a PPD file on the computer:
Insert the Software and Documentation CD in the CD or DVD drive.
Double-click the installer package for the printer.
From the Welcome screen, click Continue.
Click Continue again after viewing the Readme file.
Click Continue after viewing the license agreement, and then click Agree to accept the terms of the agreement.
Select a Destination, and then click Continue.
From the Easy Install screen, click Install.
Type the user password, and then click OK.
All necessary software is installed on the computer.
Click Restart when installation is complete.
Add the printer:
For IP printing:
From the Apple menu, choose System Preferences.
Click Print & Fax.
Click +.
Select the printer from the list.
Click Add.
From the Finder desktop, choose Go >Applications.
Double-click the Utilities folder.
Double-click Printer Setup Utility or Print Center.
From the Printer List, choose Add.
Select the printer from the list.
Click Add.
For AppleTalk printing:
From the Apple menu, choose System Preferences.
Click Print & Fax.
Click +.
Click AppleTalk.
Select the printer from the list.
Click Add.
From the Finder desktop, choose Go >Applications.
Double-click the Utilities folder.
Double-click Print Center or Printer Setup Utility.
From the Printer List, choose Add.
Choose the Default Browser tab.
Click More Printers.
From the first pop-up menu, choose AppleTalk.
From the second pop-up menu, select Local AppleTalk zone.
Select the printer from the list.
Click Add.

