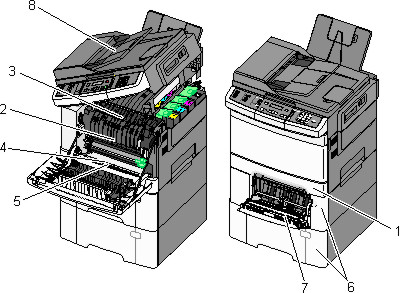
When a jam occurs, a message indicating the jam location appears. The following illustration and table list the paper jams that can occur and the location of each jam. Open doors and covers, and remove trays to access jam locations.
Jam number | Jam location | Instructions | |
|---|---|---|---|
1 | 200 | Standard 250-sheet tray and manual feeder (Tray 1) |
|
2 | 201 | Under the fuser | |
3 | 202 | In the fuser | |
4 | 230 | In the duplex | |
5 | 235 | In the duplex Note: This jam number indicates that the paper being used for a duplex print job is not supported. | |
6 | 242 and 243 | 550-sheet tray |
|
7 | 250 | In the multipurpose feeder |
Note: You may need to open the 650-sheet duo tray to remove jammed pages behind the multipurpose feeder. |
8 | 290 | ADF | Open the ADF cover, and then remove the jam. |