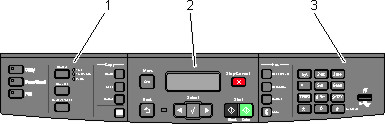
| Note: Some features are not available on selected printer models. |
Item | Description | |
|---|---|---|
1 | Selections and settings | Select a function such as Copy, Scan, Email, or Fax. Change default copy and scan settings such as the number of copies, duplex printing, copy options, and scaling. Use the address book when scanning to e-mail. |
2 | Display area | View scanning, copying, faxing, and printing options as well as status and error messages. Access the administration menus, start, stop, or cancel a print job. |
3 | Keypad area | Enter numbers, letters, or symbols on the display, print using the USB flash memory device, or change the default fax settings. |
Item | Description | |
|---|---|---|
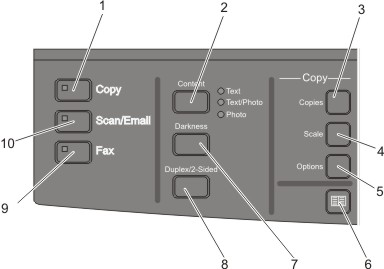
1 | Copy  | Press the Copy button to enter the copy function. |
2 | Content  | Press the Content button to enhance copy, scan, e-mail, or fax quality. Choose from Text, Text/Photo, or Photo. |
3 | Copies  | Press the Copies button to enter the number of copies to print. |
4 | Scale  | Press the Scale button to change the size of the copied document to fit onto the currently selected paper size. |
5 | Options  | Press the Options button to change Original Size, Paper Source, Paper Saver, and Collate settings. |
6 | Address Book  | Press |
7 | Darkness  | Press the Darkness button to adjust the current darkness settings. |
8 | Duplex 2-Sided  | Press the Duplex 2-Sided button to scan or print on both sides of the paper. Note: The duplex feature is not available on selected printer models. |
9 | Fax  | Press the Fax button to enter the fax function. Note: Fax mode is not available on selected printer models. |
10 | Scan/Email  | Press the Scan/Email button to enter the scan or scan to e-mail function. |
Item | Description | |
|---|---|---|
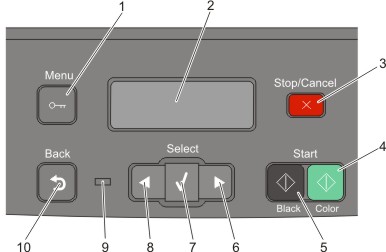
1 | Menu  | Press |
2 | Display | View scanning, copying, faxing, and printing options as well as status and error messages Note: The fax feature is not available on selected printer models. |
3 | Stop/Cancel  | Press |
4 | Color start  | Press |
5 | Black start  | Press |
6 | Right arrow | Press |
7 | Select  | Press |
8 | Left arrow | Press |
9 | Indicator light | Indicates the printer status:
|
10 | Back | Press Note: An error beep sounds when you press |
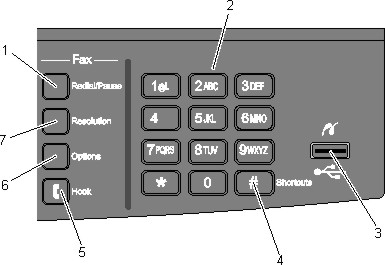
| Note: The fax buttons, keypad, and USB port are not available on selected printer models. |
Item | Description | |
|---|---|---|
1 | Redial/Pause  |
|
2 | Keypad  | Enter numbers, letters, or symbols on the display. |
3 | Front USB port  | Lets you scan to a flash drive or print supported file types Note: When a USB flash memory device is inserted into the printer, the printer can only scan to the USB device or print files from the USB device. All other printer functions are unavailable. |
4 | Shortcuts  | Press |
5 | Hook  | Press |
6 | Options | Press the Options button to change Original Size, Broadcast, Delayed Send, and Cancel settings. |
7 | Resolution  | Press the Resolution button to select a dpi value for the scan. Note: Press |
 to enter the address book.
 to enter the administration menus.
 to stop all printer activity.
 to copy or scan in color.
 to copy or scan in black and white.
 to accept menu selections and settings.
 to enter the shortcut screen.
 to take the line off-hook (like picking up a phone receiver). Press