
| Note: Fax capabilities may not be available on all printer models. |
The following connection methods may not be applicable in all countries or regions.
| | CAUTION—SHOCK HAZARD: Do not use the fax feature during a lightning storm. Do not set up this product or make any electrical or cabling connections, such as the fax feature, power cord, or telephone, during a lightning storm. |
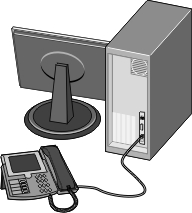
You can connect the printer with equipment such as a telephone, an answering machine, or a computer modem.
| Note: The printer is an analog device that works best when directly connected to the wall jack. Other devices (such as a telephone or answering machine) can be successfully attached to pass through the printer, as described in the setup steps. If you want a digital connection such as ISDN, DSL, or ADSL, a third-party device (such as a DSL filter) is required. |
You do not need to attach the printer to a computer, but you do need to connect it to a telephone line to send and receive faxes.
You can connect the printer to other equipment. See the following table to determine the best way to set up the printer.
Equipment | Benefits |
|---|---|
| Send and receive faxes without using a computer. |
|
|
| Receive both incoming voice messages and faxes. |
| Send faxes using the computer or the printer. |
Country/region | |
|---|---|
|
|
To connect your printer to an answering machine, telephone, or other telecommunications equipment, use the telephone line adapter included in the box with the printer in some countries or regions.
| Note: If you have DSL, do not connect the printer using a splitter because the fax feature may not work correctly. |
Connect the adapter to the telephone cord that came with the printer.
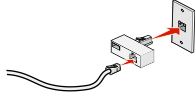
| Note: The UK adapter is shown. Your adapter may look different, but it will fit the telephone outlet used in your location. |
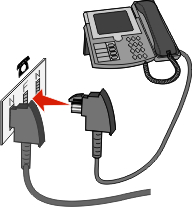
Connect the telephone line of your chosen telecommunications equipment to the left outlet of the adapter.
If your telecommunications equipment uses a US-style (RJ11) telephone line, follow these steps to connect the equipment:
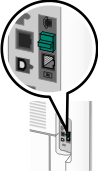
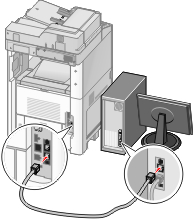
Remove the plug from the EXT port  on the back of the printer.
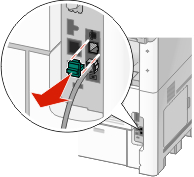
| Note: Once this plug is removed, any country- or region-specific equipment you connect to the printer by way of the adapter, as shown, will not function properly. |
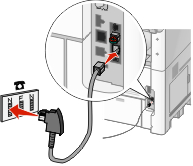
Connect your telecommunications equipment directly to the EXT port on the back of the printer.

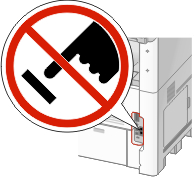
| Warning—Potential Damage: Do not touch cables or the printer in the area shown while actively sending or receiving a fax. |
Country/region | |
|---|---|
|
|
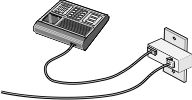
To connect a telephone, an answering machine, or other telecommunications equipment to the printer:
Remove the plug from the back of the printer.
Connect your telecommunications equipment directly to the EXT port on the back of the printer.
| Note: Once this plug is removed, any country- or region-specific equipment that you connect to the printer by way of the adapter, as shown, will not function properly. |
Country/region |
|---|
|
There is a plug installed in the EXT port of the printer. This plug is necessary for the proper functioning of the printer.
| Note: Do not remove the plug. If you remove it, other telecommunications devices in your home (such as telephones or answering machines) may not work. |
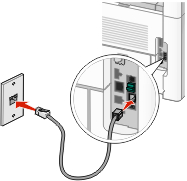
Connect the printer directly to a telephone wall jack to send and receive faxes without using a computer.
| Note: In Germany (and some other countries), the printer ships with a special RJ-11 plug in the EXT port. Do not remove the RJ-11 plug. It is required for both the fax and telephone to work properly. |
Make sure you have a telephone cord (provided with the product) and a telephone wall jack.
Connect one end of the telephone cord into the LINE port of the printer.
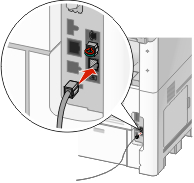
Connect the other end of the telephone cord into the N slot of an active telephone wall jack.
If you would like to use the same line for both fax and telephone communication, connect a second telephone line (not provided) between the telephone and the F slot of an active telephone wall jack.
If you would like to use the same line for recording messages on your answering machine, connect a second telephone line (not provided) between the answering machine and the other N slot of the telephone wall jack.

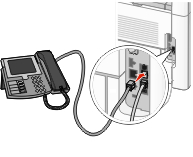
Connect a telephone to the printer to use the fax line as a normal telephone line. Then set up the printer wherever your telephone is located to make copies or to send and receive faxes without using a computer.
| Note: Setup steps may vary depending on your country or region. |
Make sure you have the following:
A telephone
Two telephone cords
A telephone wall jack
Connect one telephone cord to the LINE port  of the printer, and then plug it into an active telephone wall jack.
Remove the protective plug from the EXT port of the printer.
Connect the other telephone cord to a telephone, and then plug it into the EXT port of the printer.
Connect an answering machine to the printer to receive both incoming voice messages and faxes.
| Note: Setup steps may vary depending on your country or region. |
Make sure you have the following:
A telephone
An answering machine
Three telephone cords
A telephone wall jack
Connect one telephone cord into the LINE port of the printer, and then plug it into an active telephone wall jack.
Remove the protective plug from the EXT port of the printer.
Connect a second telephone cord from the telephone to the answering machine.
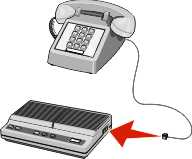
Connect a third telephone cord from the answering machine to the EXT port of the printer.
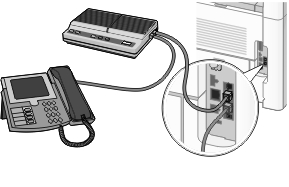
Connect the printer to a computer with a modem to send faxes from the software program.
| Note: Setup steps may vary depending on your country or region. |
Make sure you have the following:
A telephone
A computer with a modem
Three telephone cords
A telephone wall jack
Connect a telephone cord into the LINE port of the printer, and then plug it into an active telephone wall jack.
Remove the protective plug from the EXT port of the printer.
Connect a second telephone cord from the telephone to the computer modem.
Connect a third telephone cord from the computer modem to the EXT port of the printer.
To have the designated fax name and fax number printed on outgoing faxes:
Type the printer IP address into the address field of your Web browser.
| Note: If you do not know the IP address of the printer, then print a network setup page and locate the IP address in the TCP/IP section. |
Click Settings.
Click Fax Settings.
Click Analog Fax Setup.
Click inside the Station Name box, and then enter the name to be printed on all outgoing faxes.
Click inside the Station Number box, and then enter the printer fax number.
Click Submit.
You can set the date and time so that they are printed on every fax you send. If there is a power failure, then you may have to reset the date and time. To set the date and time:
Type the printer IP address into the address field of your Web browser.
| Note: If you do not know the IP address of the printer, then print a network setup page and locate the IP address in the TCP/IP section. |
Click Links & Index.
Click Set Date and Time.
Click inside the Manually Set Date & Time box, and then enter the current date and time.
Click Submit.
The printer can be set to automatically adjust for Daylight Saving Time (DST):
Type the printer IP address into the address field of your Web browser.
| Note: If you do not know the IP address of the printer, then print a network setup page and locate the IP address in the TCP/IP section. |
Click Links & Index.
Click Set Date and Time.
Select Automatically Observe DST.
Click Submit.