
| | CAUTION—SHOCK HAZARD: Do not use the fax feature during a lightning storm. Do not set up this product or make any electrical or cabling connections, such as the fax feature, power cord, or telephone, during a lightning storm. |
Notes:
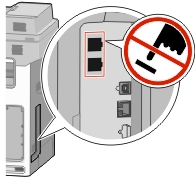
| Warning—Potential Damage: Do not touch cables or the printer in the area shown while actively sending or receiving a fax. |
Many countries and regions require outgoing faxes to contain the following information in a margin at the top or bottom of each transmitted page, or on the first page of the transmission: station name (identification of the business, other entity, or individual sending the message) and station number (telephone number of the sending fax machine, business, other entity, or individual).
To enter your fax setup information, use the printer control panel, or use your browser to access the Embedded Web Server and then enter the Settings menu.
| Note: If you do not have a TCP/IP environment, then you must use the printer control panel to enter your fax setup information. |
When the printer is turned on for the first time or if the printer has been off for an extended time, a series of start-up screens appear. If the printer has fax capabilities, then the following screens appear:
Fax Name or Station Name
Fax Number or Station Number
When or appears, enter the name to be printed on all outgoing faxes.
After entering the Fax Name or Station Name, touch Submit.
When or appears, enter the printer fax number.
After entering the Fax Number or Station Number, touch Submit.
Type the printer IP address into the address field of your Web browser.
If you do not know the IP address of the printer, you can:
View the IP address on the printer control panel in the TCP/IP section under the Networks/Ports menu.
Print a network setup page or the menu settings pages and locate the IP address in the TCP/IP section.
Click Settings > Fax Settings > Analog Fax Setup.
In the Fax Name or Station Name field, enter the name to be printed on all outgoing faxes.
In the Fax Number or Station Number field, enter the printer fax number.
Click Submit.
Notes:
Equipment and service options | Fax connection setup |
|---|---|
Connect directly to the telephone line. | |
Connect to a Digital Subscriber Line (DSL or ADSL) service. | |
Connect to a Private Branch eXchange (PBX) or Integrated Services Digital Network (ISDN) system. | |
Use a Distinctive Ring service. | |
Connect through an adapter used in your area. |
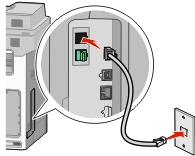
If your telecommunications equipment uses a US-style (RJ11) telephone line, then follow these steps to connect the equipment:
Connect one end of the telephone cable that came with the printer to the printer LINE port  .
.
Connect the other end of the telephone cable to an active analog telephone wall jack.
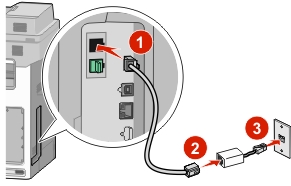
If you subscribe to a DSL service, then contact the DSL provider to obtain a DSL filter and telephone cord, and then follow these steps to connect the equipment:
Connect one end of the telephone cable that came with the printer to the printer LINE port .
Connect the other end of the telephone cable to the DSL filter.
| Note: Your DSL filter may look different than the one in the illustration. |
Connect the DSL filter cable to an active telephone wall jack.
If you use a PBX or ISDN converter or terminal adapter, then follow these steps to connect the equipment:
Connect one end of the telephone cable that came with the printer to the printer LINE port .
Connect the other end of the telephone cable to the port designated for fax and telephone use.
Notes:
A distinctive ring service may be available from your telephone service provider. This service allows you to have multiple telephone numbers on one telephone line, with each telephone number having a different ring pattern. This may be useful for distinguishing between fax and voice calls. If you subscribe to a distinctive ring service, then follow these steps to connect the equipment:
Connect one end of the telephone cable that came with the printer to the printer LINE port .
Connect the other end of the telephone cable to an active analog telephone wall jack.
Change the Distinctive Rings setting to match the setting you want for the printer to answer:
| Note: The factory default setting for distinctive rings is On. This allows the printer to answer single, double, and triple ring patterns. |
From the home screen, navigate to:
 > Settings > Fax Settings > Analog Fax Settings > Distinctive Rings
Select the pattern setting you want to change, and then touch Submit.
The following countries or regions may require a special adapter to connect the telephone cable to the active telephone wall jack:
Country/Region | |
|---|---|
|
|
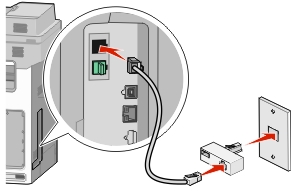
For some countries or regions, a telephone line adapter is included in the box. Use this adapter to connect an answering machine, telephone, or other telecommunications equipment to the printer.
Connect one end of the telephone cable that came with the printer to the printer LINE port
Connect the other end of the telephone cable to the adapter, and then connect the adapter to the active telephone wall jack.
| Note: Your telephone adapter may look different than the one shown. It will fit the wall jack used in your location. |
Type the printer IP address into the address field of your Web browser.
If you do not know the IP address of the printer, you can:
View the IP address on the printer control panel in the TCP/IP section under the Networks/Ports menu.
Print a network setup page or the menu settings pages and locate the IP address in the TCP/IP section.
Click Settings > Fax Settings > Analog Fax Setup.
In the Fax Name or Station Name field, enter the name to be printed on all outgoing faxes.
In the Fax Number or Station Number field, enter the printer fax number.
Click Submit.
You can set the date and time so that they are printed on every fax you send. If there is a power failure, then you may have to reset the date and time.
Type the printer IP address in the address field of your Web browser.
If you do not know the IP address of the printer, then you can:
View the IP address on the printer control panel in the TCP/IP section under the Networks/Ports menu.
Print a network setup page or the menu settings pages and locate the IP address in the TCP/IP section.
Click Security > Set Date and Time.
In the Set Date & Time field, enter the current date and time.
Click Submit.
| Note: It is recommended to use the network time. |
The printer can be set to automatically adjust for daylight saving time.
Open a Web browser, and then type the printer IP address in the address field.
Notes:
Click Settings > Security > Set Date and Time.
Click the Automatically Observe DST check box.
In the Custom Time Zone Setup section, set the DST start and end dates.
Click Submit.