Networking
| Note: A Service Set Identifier (SSID) is a name assigned to a wireless network. Wired Equivalent Privacy (WEP), Wi-Fi Protected Access (WPA), WPA2, and 802.1X - RADIUS are types of security used on a network. |
Preparing to set up the printer on an Ethernet network
To configure your printer to connect to an Ethernet network, organize the following information before you begin:
| Note: If your network automatically assigns IP addresses to computers and printers, continue on to installing the printer. |
A valid, unique IP address for the printer to use on the network
The network gateway
The network mask
A nickname for the printer (optional)
| Note: A printer nickname can make it easier for you to identify your printer on the network. You can choose to use the default printer nickname, or assign a name that is easier for you to remember. |
You will need an Ethernet cable to connect the printer to the network and an available port where the printer can physically connect to the network. Use a new network cable when possible to avoid potential problems caused by a damaged cable.
Preparing to set up the printer on a wireless network
Notes:
- Make sure your access point (wireless router) is turned on and is working properly.
- Do not connect the installation or network cables until prompted to do so by the setup software.
Make sure you have the following information before setting up the printer on a wireless network:
SSID—The SSID is also referred to as the network name.
Wireless Mode (or Network Mode)—The mode is either infrastructure or ad hoc.
Channel (for ad hoc networks)—The channel defaults to automatic for infrastructure networks.
Some ad hoc networks will also require the automatic setting. Check with your system support person if you are not sure which channel to select.
Security Method—There are four basic options for Security Method:
WEP key
If your network uses more than one WEP key, then enter up to four in the provided spaces. Select the key currently in use on the network by selecting the default WEP transmit key.
WPA or WPA2 preshared key or passphrase
WPA includes encryption as an additional layer of security. The choices are AES or TKIP. Encryption must be set for the same type on the router and on the printer, or the printer will not be able to communicate on the network.
802.1X–RADIUS
If you are installing the printer on an 802.1X network, then you may need the following:
No security
If your wireless network does not use any type of security, then you will not have any security information.
| Note: Using an unsecured wireless network is not recommended. |
Notes:
- If you do not know the SSID of the network that your computer is connected to, then launch the wireless utility of the computer network adapter, and then look for the network name. If you cannot find the SSID or the security information for your network, then see the documentation that came with the access point or contact your system support person.
- To find the WPA/WPA2 preshared key or passphrase for the wireless network, see the documentation that came with the access point, see the Embedded Web Server associated with the access point, or consult your system support person.
Installing the printer on a wireless network (Windows)
Before installing the printer on a wireless network, make sure:
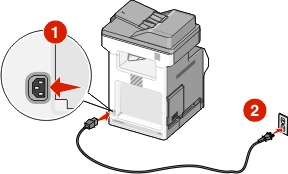
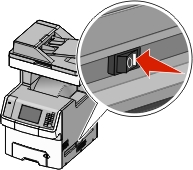
Connect the power cord to the printer, then to a properly grounded electrical outlet, and then turn on the printer.
| Note: Make sure the printer and the computer are fully on and ready. |
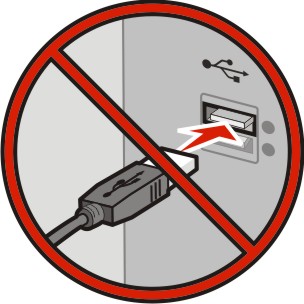
| Warning—Potential Damage: Do not connect the USB cable until instructed to do so on the computer screen. |
Obtain a copy of the software installer package.
From the Software and Documentation CD that came with your printer.
From our Web site:
Go to http://support.lexmark.com, and then navigate to:
SUPPORT & DOWNLOAD > select your printer > select your operating system
Double-click the software installer package.
Wait for the installation dialog to appear.
If you are using the Software and Documentation CD and the installation dialog does not appear, then do the following:
In Windows 8
From the Search charm, type run, and then navigate to:
Apps list > Run > type D:\setup.exe > OK
In Windows 7 or earlier
Click  or click Start, and then click Run.
In the Start Search or Run dialog, type D:\setup.exe.
Press Enter or click OK.
| Note: D is the letter of your CD or DVD drive. |
Click Install, and then follow the instructions on the computer screen.
Select Wireless connection when asked to choose a connection type.
From the Wireless Configuration dialog, select Guided Setup (Recommended).
| Note: Choose Advanced Setup only if you want to customize your installation. |
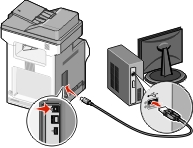
Temporarily connect a USB cable between the computer on the wireless network and the printer.
| Note: After the printer is configured, the software will instruct you to disconnect the temporary USB cable so you can print wirelessly. |
Follow the instructions on the computer screen.
| Note: For more information on allowing other computers on the network to use the wireless printer, see the Networking Guide. |
Installing the printer on a wireless network (Macintosh)
| Note: Make sure to disconnect the Ethernet cable when installing the printer on a wireless network. |
Prepare to configure the printer
Connect the power cord to the printer, then to a properly grounded electrical outlet, and then turn on the printer.
Locate the printer MAC address.
From the printer control panel, navigate to:
 > Reports >
  > Network Setup Page >
or
 > Reports > Network Setup Page
In the Standard Network Card section, look for UAA (MAC).
| Note: You will need this information later. |
Enter the printer information
Access the AirPort options:
In Mac OS X version 10.5 or later
From the Apple menu, navigate to either of the following:
In Mac OS X version 10.4
From the Finder, navigate to:
Applications > Internet Connect > AirPort
From the Network Name pop-up menu, select print server [yyyyyy], where the y’s are the last six digits of the MAC address located on the MAC address sheet.
Open a Web browser.
From the Bookmarks menu, select Show or Show All Bookmarks.
Under COLLECTIONS, select Bonjour or Rendezvous, and then double-click the printer name.
| Note: The application referred to as Rendezvous in Mac OS X version 10.2 is now called Bonjour by Apple Inc. |
From the Embedded Web Server, navigate to the location of the wireless settings information.
Configure the printer for wireless access
Type the network name (SSID) in the appropriate field.
Select Infrastructure as your Network Mode setting if you are using an access point (wireless router).
Select the type of security you want to use to protect the wireless network.
Enter the security information necessary for the printer to connect to the wireless network.
Click Submit.
Open the AirPort application on the computer:
In Mac OS X version 10.5 or later
From the Apple menu, navigate to either of the following:
In Mac OS X version 10.4
From the Finder, navigate to:
Applications > Internet Connect > AirPort
From the Network pop-up menu, select the name of the wireless network.
Configure your computer to use the printer wirelessly
To print on a network printer, each Macintosh user must install a custom printer driver file and create a print queue in the Printer Setup Utility or Print Center.
Install a printer driver file on the computer:
Obtain a copy of the software installer package.
From the Software and Documentation CD that came with your printer.
From our Web site:
Go to http://support.lexmark.com, and then navigate to:
SUPPORT & DOWNLOAD > select your printer > select your operating system
Double-click the installer package for the printer.
Follow the instructions on the computer screen.
Select a destination, and then click Continue.
From the Easy Install screen, click Install.
Type the user password, and then click OK.
All necessary applications are installed in the computer.
Click Close when the installation is complete.
Add the printer:
For IP printing:
In Mac OS X version 10.5 or later
From the Apple menu, navigate to either of the following:
Click +.
If necessary, click Add Printer or Scanner or Add Other Printer or Scanner.
Click the IP tab.
Type the IP address of the printer in the address field, and then click Add.
In Mac OS X version 10.4
From the Finder, navigate to:
Applications > Utilities
Double-click Printer Setup Utility or Print Center.
From the Printer List, choose Add, and then click IP Printer.
Type the IP address of the printer in the address field, and then click Add.
For AppleTalk printing:
Notes:
- Make sure AppleTalk is activated on your printer.
- This feature is supported only in Mac OS X version 10.5 or earlier.
In Mac OS X version 10.5
From the Apple menu, navigate to:
System Preferences > Print & Fax
Click +, and then navigate to:
AppleTalk > select the printer from the list > Add
In Mac OS X version 10.4
From the Finder, navigate to:
Applications > Utilities
Double-click Printer Setup Utility or Print Center.
From the Printer List, click Add.
Click Default Browser tab > More Printers.
From the first pop-up menu, select AppleTalk.
From the second pop-up menu, select Local AppleTalk Zone.
Select the printer from the list, and then click Add.
Changing port settings after installing a new network Internal Solutions Port
When a new Lexmark Internal Solutions Port (ISP) is installed in the printer, the printer configurations on computers that access the printer must be updated since the printer will be assigned a new IP address. All computers that access the printer must be updated with this new IP address.
Notes:
- If the printer has a static IP address, then you do not need to make any changes to the computer configurations.
- If the computers are configured to use the network name, instead of an IP address, then you do not need to make any changes to your computer configurations.
- If you are adding a wireless ISP to a printer previously configured for an Ethernet connection, then make sure the printer is disconnected from the Ethernet network when you configure the printer to operate wirelessly. If the printer is connected to the Ethernet network, then the wireless configuration completes, but the wireless ISP is inactive. To activate the wireless ISP, disconnect the printer from the Ethernet network, turn off the printer, and then turn it back on.
- Only one network connection is active at a time. To switch between Ethernet and wireless connection types, turn off the printer, connect the cable (to switch to an Ethernet connection) or disconnect the cable (to switch to a wireless connection), and then turn the printer back on.
For Windows users
Open a Web browser, and then type the printer IP address in the address field.
Notes:
- View the printer IP address on the printer control panel. The IP address appears as four sets of numbers separated by periods, such as 123.123.123.123.
- If you are using a proxy server, then temporarily disable it to load the Web page correctly.
Open the printers folder.
In Windows 8
From the Search charm, type Run and then navigate to:
Apps list > Run > type control printers > OK
In Windows 7 or earlier
Click , or click Start and then click Run.
In the Start Search or Run dialog, type control printers.
Press Enter, or click OK.
To select the printer that has changed, do either of the following:
Press and hold the printer, and then select Printer properties.
Right-click the printer, and then select Printer properties (Windows 7 or later) or Properties (earlier versions).
| Note: If there is more than one copy of the printer, then update all of them with the new IP address. |
Click the Ports tab.
Select the port from the list, and then click Configure Port.
Type the new IP address in the “Printer Name or IP Address” field.
Click OK > Close.
For Macintosh users
Open a Web browser, and then type the printer IP address in the address field.
Notes:
- View the printer IP address on the printer control panel. The IP address appears as four sets of numbers separated by periods, such as 123.123.123.123.
- If you are using a proxy server, then temporarily disable it to load the Web page correctly.
Add the printer.
For IP printing:
From the Apple menu, navigate to either of the following:
Click +.
Click the IP tab.
Type the printer IP address in the address field, and then click Add.
For AppleTalk printing:
Notes:
- Make sure AppleTalk is activated on your printer.
- This feature is supported only in Mac OS X version 10.5.
From the Apple menu, navigate to:
System Preferences > Print & Fax
Click +, and then navigate to:
AppleTalk > select the printer > Add
Setting up serial printing
Use serial printing to print even when the computer is far from the printer, or to print at a reduced speed.
After installing the serial or communication (COM) port, configure the printer and the computer. Make sure you have connected the serial cable to the COM port on your printer.
Set the parameters in the printer.
From the printer control panel, navigate to the menu for the port settings.
Locate the menu for the serial port settings, and then adjust the settings, if necessary.
Save the modified settings, and then print a menu settings page.
Install the printer driver.
Obtain a copy of the software installer package.
From the Software and Documentation CD that came with your printer
From our Web site:
Go to http://support.lexmark.com, and then navigate to:
SUPPORT & DOWNLOAD > select your printer > select your operating system
Double-click the software installer package.
Wait for the installation dialog to appear.
If the your are using the Software and Documentation CD and the installation dialog does not appear, then do the following:
In Windows 8
From the Search charm, type run and then navigate to:
Apps list > Run > type D:\setup.exe > OK
In Windows 7 or earlier
Click or click Start, and then click Run.
In the Start Search or Run dialog, type D:\setup.exe.
Press Enter, or click OK.
| Note: D is the letter of your CD or DVD drive. |
Click Install.
Follow the instructions on the computer screen.
Select Advanced, and then click Continue.
From the Configure Printer Connection dialog, select a port.
If the port is not in the list, then click Refresh, or navigate to:
Add port > select a port type > enter the necessary information > OK
Click Continue > Finish.
Set the COM port parameters.
After installing the printer driver, set the serial parameters in the COM port assigned to the printer driver.
| Note: Make sure the serial parameters in the COM port match the serial parameters you set in the printer. |
Open Device Manager.
In Windows 8
From the Search charm, type run and then navigate to:
Apps list > Run > type devmgmt.msc > OK
In Windows 7 or earlier
Click , or click Start and then click Run.
In the Start Search or Run dialog, type devmgmt.msc.
Press Enter, or click OK.
Double-click Ports (COM & LPT) to expand the list of available ports.
Do either of the following:
From the menu that appears, select Properties.
On the Port Settings tab, set the serial parameters to the same serial parameters set in the printer.
Check the serial heading of the menu settings page for the printer settings.
Click OK, and then close all the dialogs.
Print a test page to verify printer installation.