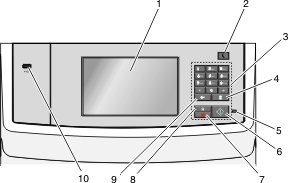
1 | Display | View printing, e-mailing, copying, and faxing options, as well as status and error messages. |
2 | Sleep button | Enable Sleep Mode or Hibernate Mode. The following are the statuses of the indicator light and the Sleep button: Entering or waking from Sleep mode Operating in Sleep mode Entering or waking from Hibernate mode The indicator light is unilluminated. The Sleep button is blinking amber for 0.10 of a second, then goes completely unilluminated for 1.9 seconds in pulsing pattern.
Operating in Hibernate mode The indicator light is unilluminated. The Sleep button is blinking amber for 0.10 of a second, then goes completely unilluminated for 1.9 seconds in pulsing pattern.
The following actions wake the printer from Sleep mode: Touching the screen or pressing any hard button Opening an input tray, cover, or door Loading paper into the automatic document feeder (ADF) Opening the scanner glass cover or lid. Sending a print job from the computer Performing a power-on reset (POR) with the main power switch
|
3 | Keypad | Enter numbers, letters, or symbols. |
4 | Dial pause button | Notes: - Pressing
 outside of the Fax menu causes an error beep. outside of the Fax menu causes an error beep. - Pressing from the home screen redials the most recent fax number.
|
5 | Indicator light | Off—The printer is off. Blinking green—The printer is warming up, processing data, or printing. Solid green—The printer is on, but idle. Blinking red— Operator intervention is needed.
|
6 | Start button | Note: Pressing the button while scanning has no effect. |
7 | Stop button | Stop all printer activity. Note: A list of options is displayed once Stopped appears on the display. |
8 | Home button | Return to the home screen. Note: Pressing the Home button from the home screen resets all workflow factory defaults. |
9 | Back button | Delete the right-most digit of the value in the Copy Count field. The factory default value of 1 appears if the entire number is deleted by pressing  numerous times. numerous times. Delete the right-most digit of a number entered manually in the Fax Destination List field. You can also press to delete an entire shortcut entry. When an entire line is deleted, another press of causes the cursor to move up one line. Delete the character to the left of the cursor in the E-mail Destination List field. If the character is in a shortcut, then the shortcut is deleted.
|
10 | USB port | Connect a flash drive to the printer. Note: Only the front USB port supports flash drives. |