Managing licenses

Finding the host ID

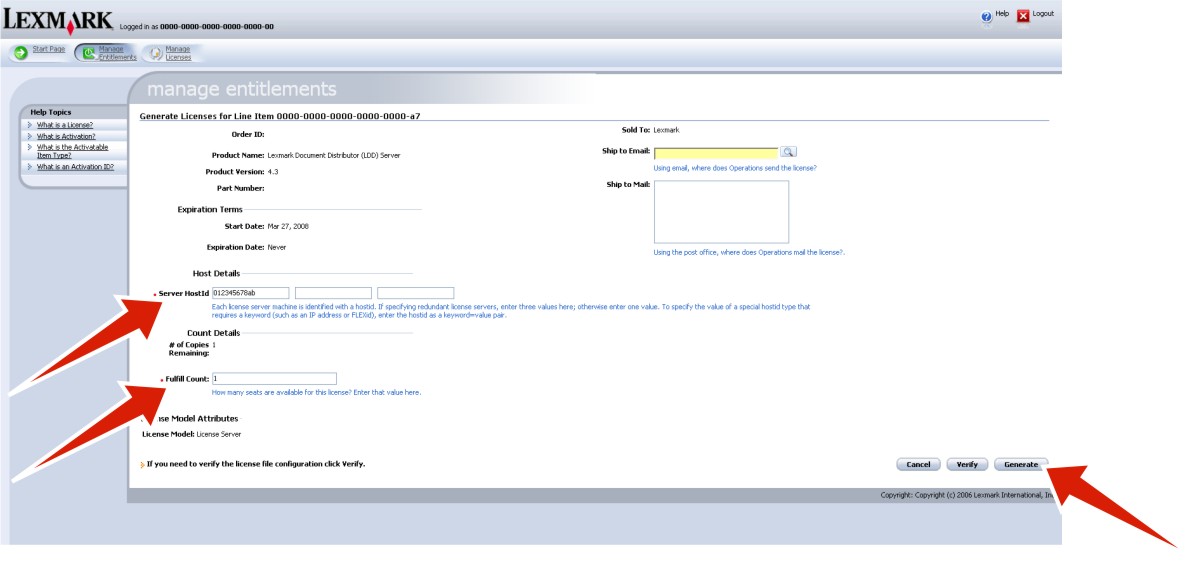
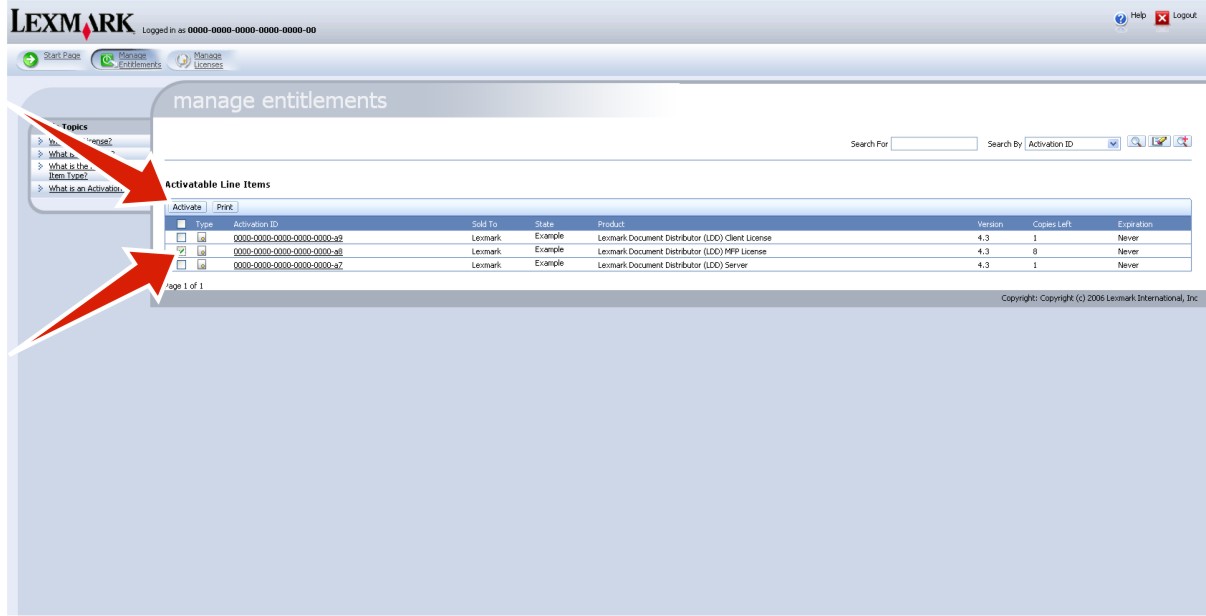
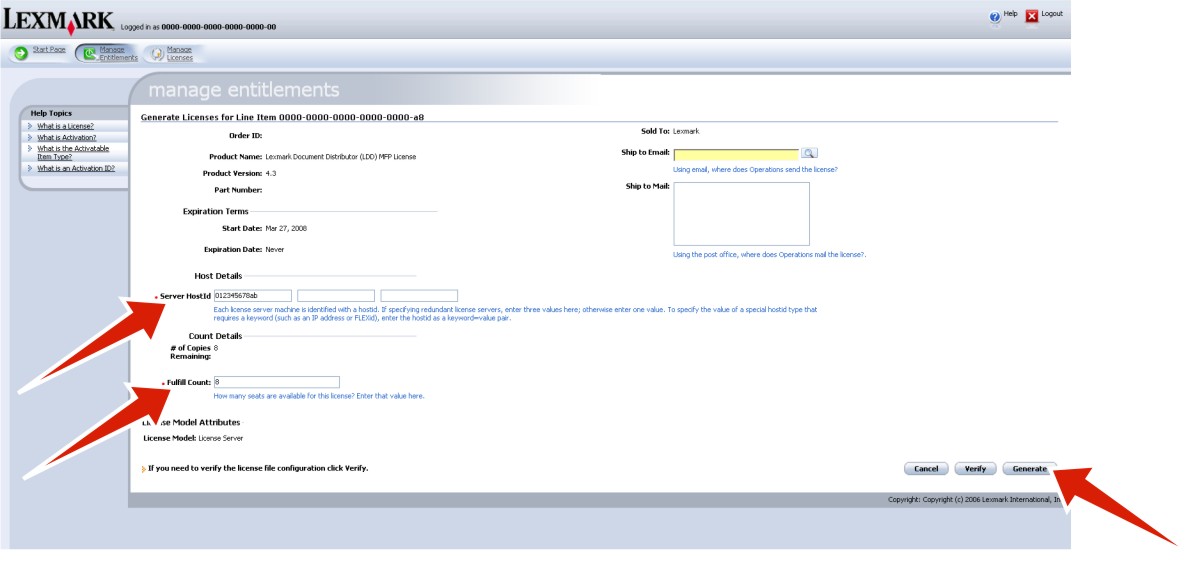
Each license file installed on the server is associated with a host ID on the server, which is the physical address (MAC address) of a network adapter in the load balancer without hyphens or other punctuation. During installation, the host ID is shown by clicking Activate and Download License File(s). If you do not have access to the installation files, or if you have multiple host IDs and want to determine which is associated with the network adapter connected to the same network as your printers, then do following:

  1. Click Start button, or click Start and then click Run.

  2. In the Start Search or Run box, type cmd.

  3. Press Enter, or click OK.

  4. From the command prompt window, type ipconfig /all, and then press Enter.

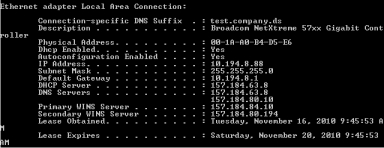
  5. If you want to use the host ID associated with the network adapter connected to the same network as your system, then determine the correct network adapter using the description and IP address.

    Note: The host ID of any listed network adapter is appropriate for creating license files as long as the associated network adapter remains in the server. However, using the host ID associated with the network adapter connected to the same network as your system may help avoid future confusion.
  6. Write down the physical address shown with the selected network adapter, removing the hyphens, and store it in a safe place for use as the host ID in the Lexmark Licensing Portal.

Viewing or downloading existing licenses

  1. Open the Lexmark Licensing portal at http://software.lexmark.com.

  2. Type the entitlement ID you received when you purchased your licenses, and then click Login.

  3. Click Manage Licenses.

    Each record represents a license file generated using the current entitlement ID.

  4. Select the line for the license you want to view or download, and then click View Licenses.

  5. To download the license file, click Save To File.

  6. To return to the start page of the Lexmark Licensing Portal, click Complete.

Upgrading the license of an existing server

Note: Back up your current license files before updating with new files.
  1. Open the Lexmark Licensing portal at http://software.lexmark.com.

  2. Type the entitlement ID you received when you purchased your license, and then click Login.

  3. Click Manage Entitlements.

  4. Select the line for the product Lexmark Distributed Intelligent Capture Server License that indicates one or more licenses in the Copies Left column, and then click Activate.

  5. In the Host ID field, type the host ID of your server. For more information, see Finding the host ID.

  6. In the Fulfill Count field, type 1, and then click Generate.

  7. Click Save To File, and then save the file using a descriptive file name, such as server.lic, to a folder accessible to the load balancer.

  8. Click Complete.

    Note: If you are using a failover cluster for the load balancer, then repeat steps through 1 through 7, using the host ID of each standby node of the failover cluster. Use unique file names to avoid overwriting existing license files.
  9. From the System tab in LMC, select Licenses from the System list.

  10. Click Add License.

  11. In the window that appears, type a path to a license file, or click Browse to browse for a license file, and then click Upload.

    Note: Uploading license files copies them to the program folder. You can safely move or delete the license files from the temporary location where you saved them.

Adding an MFP, e-forms virtual printer, or software client license to an existing server

Note: Back up your current license files before updating with new files.
  1. Open the Lexmark Licensing portal at http://software.lexmark.com.

  2. Type the entitlement ID you received when you purchased your licenses, and then click Login.

  3. Click Manage Entitlements.

  4. Select the license to activate:

    • For an MFP license, select the line for the product Lexmark Distributed Intelligent Capture MFP License that indicates one or more licenses in the Copies Left column, and then click Activate.

    • For an e-forms virtual printer license, select the line for the product Lexmark Distributed Intelligent Capture EFVP License that indicates one or more licenses in the Copies Left column, and then click Activate.

    • For a software client license, select the line for the product Lexmark Distributed Intelligent Capture Client License that indicates one or more licenses in the Copies Left column, and then click Activate.

  5. Type the host ID of your server into the first Host ID field. For more information, see Finding the host ID.

  6. Type the number of printers, virtual printers, or software clients associated with the current server in the Fulfill Count field.

  7. Click Generate.

  8. Click Save To File, and then save the file using a descriptive file name, such as mfp.lic, efvp.lic, or client.lic, to a folder accessible to the load balancer.

    Note: The server automatically adds a time stamp to the file name of new licenses as they are installed, so existing licenses are not overwritten if the file name used is the same as an already installed license file.
  9. Click Complete.

    Note: If you are using a failover cluster for the load balancer, then repeat steps 1 through 8, using the host ID of each standby node of the failover cluster. Use unique file names to avoid overwriting existing license files.
  10. From the System tab in LMC, select Licenses from the System list.

  11. Click Add License.

  12. In the window that appears, type a path to a license file, or click Browse to browse for a license file.

  13. Click Upload.

    Note: Uploading license files copies them to the program folder. You can safely move the license files from the temporary location where you saved them.

Re-hosting licenses

Activating purchased licenses associates the server license and each printer license with the host ID of the load balancer and generates license files that will work only with that load balancer. If the load balancer is transferred to a new computer, then printers are moved to a different server system, or the network adapter is changed in the load balancer, the applicable licenses must be reallocated to the new host ID.

  1. Open the Lexmark Licensing portal at http://software.lexmark.com.

  2. Type the entitlement ID you received when you purchased your licenses, and then click Login.

  3. Click Manage Licenses.

  4. Select a license, and then click Rehost.

  5. Replace the existing server host ID with the host ID of the new load balancer. For more information on determining the host ID, see Activating Lexmark Distributed Intelligent Capture licenses.

  6. In the Rehost Count field, type the number of licenses to re-host :

    • When moving a server license, always use 1.

    • When moving all printer licenses to the new server system, use the number shown in the Fulfill Count field.

    • To move only some of the existing printer licenses to the new server system (known as a partial re-host), enter a number less than the number show in the Fulfill Count field.

  7. Click Rehost.

    The new license is shown. If you are re-hosting only some printer licenses, a second fulfillment ID is shown.

  8. If you are re-hosting all licenses, then click Save To File, and then save the new license file to a folder accessible to the new Lexmark Distributed Intelligent Capture system.

    If you are re-hosting only some of the printer licenses, then you must replace the license file on the original server system:

    1. Note the host ID for the license file associated with each fulfillment ID shown to determine the server system with which each of the new license files is associated.

    2. Click Save To File while viewing the license for the original server system, and then save the new license file.

    3. Click Save To File while viewing the license for the new server system, and then save the new license file. Use a different name or folder from the license file for the original server system so that you do not overwrite it.

  9. Click Complete.

    Note: When moving all licenses, this procedure must be completed once for the server license, and a second time for all printer licenses.
  10. Launch Lexmark Management Console for the new system in your Web browser, and then add a new license. For more information, see Adding an MFP, e-forms virtual printer, or software client license to an existing server.

  11. If you are re-hosting only some of the printer licenses, then repeat step 10 for the original server.