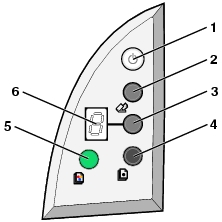
You can scan and copy directly using the control panel on your All-In-One.

1 | Power/Resume button | Turns your All-In-One on or off. Cancels the print process. Cancels the scanning process. Cancels the copying process. During an out of paper error, feeds paper through your All-In-One. |
2 | Scan button | Scans your document using the current scan settings. Opens the Scan dialog (if specified in the Lexmark 2200 Series Center Preferences.) |
3 | Copy Quantity button | Increments the number of times an image is copied. Note: Range of copies is 1 - 9. |
4 | Black Copy button | When pressed, scans your image and makes a grayscale copy using the Normal copy quality setting. When pressed and held for at least 2 seconds, scans your image and makes a grayscale copy using the Best copy quality setting. Note: You can make grayscale copies using the Black Copy button with only one cartridge installed (either black or color cartridge.) |
5 | Color Copy button | When pressed, scans your image and makes a color copy using the Normal copy quality setting. When pressed and held for at least 2 seconds, scans your image and makes a color copy using the Best copy quality setting. Note: You can make color copies using the Color copy button with only a color cartridge installed. If you only have a black cartridge installed, you can only print the black shades of your color image. |
6 | Display | Displays number of copies to be performed by your All-In-One. Displays error codes. |
To modify the settings for the control panel buttons, go to the Lexmark 2200 Series Center Preferences.