 Loading paper into the paper support
Using the paper type sensor
Loading paper into the paper support
You can load up to 100 sheets of plain paper at a time, depending on the thickness of the paper.
- Pull the transparent deflector back.
- Place the paper against the right side of the paper support with the print side facing you. If the paper has a header (top), place the header down into the paper support. Do not force the paper into the All-In-One.
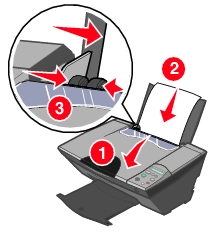
- Squeeze the release tab and slide the paper guide to the right until it rests against the edge of the paper.
Paper feed
You can use the control panel display to feed paper through the All-In-One. Its messages help you through the task.
|
Display
|
Meaning
|
|
Load paper, then
press Menu(->)

|
The All-In-One is out of paper.
|
|
|
This message remains until the button or any button other than Cancel or Power is pressed.
Pressing a valid button causes the paper to feed, and the display returns to its former message.
|
The following media types are acceptable for the All-In-One. Follow the guidelines when loading specialty media:
|
Load
|
Make sure
|
|
Up to 100 sheets of plain or coated inkjet paper
|
- The print side is facing you.
- You load the paper vertically against the right side of the paper support.
- You load the paper header (if any) down into the paper support.
- You squeeze the release tab and slide the paper guide to the right until it rests against the edge of the paper.
- You read any instructions that came with the paper.
- If there is a special manufacturer's mark such as a letterhead on the paper, you place the mark facing away from you.
- You do not force the paper into the All-In-One.
|
|
Up to 10 iron-on transfers
|
- The print side (blank side) is facing you.
- The paper guide rests against the edge of the iron-on transfers.
- You follow the loading instructions on the iron-on transfer packaging.
|
|
Up to 25 sheets of photo/glossy paper
|
- The glossy or coated side is facing you.
- You use photo paper that is made for inkjet printers.
- You read any instructions that come with the paper.
- You load the photo paper vertically against the right side of the paper support.
- The paper guide rests against the edge of the photo paper.
Note: Glossy media is detected and your print quality setting will automatically be set to Photo.
To prevent smudging, remove each photo as it exits the All-In-One, and let it dry before stacking.
|
|
Up to 20 sheets of banner paper
|
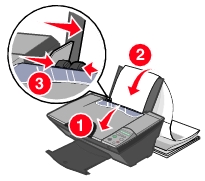
- You remove any paper from the paper support before inserting banner paper.
- You place a stack of banner paper behind the All-In-One, with only the number of sheets you need to print the banner.
- You use continuous banner paper.
Note: You must select Banner in Print Properties. Make sure that the paper size is either Letter or A4.
Note: Failure to do so will cause a paper jam. See Jams and misfeeds troubleshooting.
- You load the leading edge of the banner paper into the All-In-One against the right side of the paper support.
- You squeeze and slide the paper guide to the left edge of the banner paper.
Note: Banner printing is disabled when your printer is networked by the peer-to-peer method.
|
|
Up to 25 sheets of greeting card stock, index cards, or postcards
|
- You read any instructions that came with the cards.
- The print side is facing you.
- The cards are loaded vertically against the right side of the paper support.
- You do not force the cards into the All-In-One.
- You squeeze and slide the paper guide to the left side of the cards.
|
|
Up to 25 transparencies
|
- The rough sides of the transparencies are facing you.
- The paper guide rests against the edge of the transparencies.
Note: Since transparencies and photos require more drying time, we recommend that you remove each transparency or photo as it exits and allow it to dry to avoid ink smudging.
|
|
Up to 10 envelopes
|
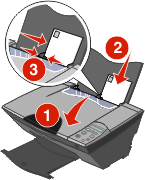
- The print side is facing you.
- The envelopes are loaded vertically against the right side of the paper support.
- The stamp location is in the upper left corner.
- The paper guide rests against the edge of the envelopes.
Note: Do not load envelopes with:
- Holes, perforations, or deep embossing
- Metal clasps, string ties, or metal folding bars
- Exposed flap adhesive
|
|
Up to 25 sheets of labels
|
|
|
Up to 100 sheets of custom size paper
|
- You adjust the paper guide to fit your paper.
- Your paper size fits within these dimensions: 3.0 (8 cm)-8.5 inches (22 cm) wide and 5.0 (13 cm)-17.0 inches (43 cm) long.
|
Make sure you select the correct paper or media size for the project. Media capacity will vary depending on the brand and thickness of paper.
Using the paper type sensor
The All-In-One has a paper type sensor that detects these media types:
- Plain paper
- Transparencies
- Coated paper
- Glossy/Photo paper
Note: The All-In-One can detect the type of paper you are using but not the paper size.
Turning the paper type sensor off
By default, the paper type sensor is on. If you want to turn off the paper type sensor, do the following:
- With the document open, click File
 Print.
- Click Properties, Preferences, or Options.
- Select the Quality/Copies tab.
- From the Paper Type area, select Use my choice and select the paper type from the drop-down box.
Paper sensor settings will remain in effect until you close the program.
To keep your paper sensor settings:
- From the Start menu, click Settings Printers Lexmark 3300 Series Printer Printing Preferences.
- Select the Quality/Copies tab.
- From the Paper Type area, select Use my choice and select the paper type from the drop-down box.
Note: If you make the paper type setting from the printers folder, it will remain in effect until you reset it from there.
Turning the paper type sensor back on
- With a document open, click File Print.
- Click Properties, Preferences or Options.
- Select the Quality/Copies tab.
- From the Paper Type area, select Use printer sensor.
Note: For more information, click Help at the top of the window.