Printing a document
- Load paper with the print side facing you. For more information, see Loading paper into the paper support.
- With the document open, click File
 Print.
If you want to change print settings, continue with the following instructions.
- Click Properties and select the I Want To menu to select a print wizard for a project such as printing an envelope or a banner.
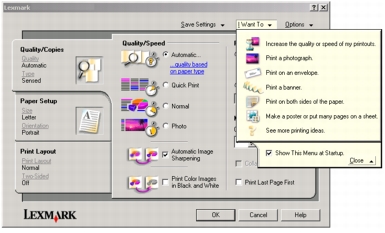
- Click OK on the wizard.
- Click OK on Lexmark Print Properties.
- Click Print on the Print dialog box to start printing.
Changing print settings
- With the document open, click File Print.
- Click Properties, Preferences, Options, or Setup (depending on the program or operating system) to customize print settings.
The Print Properties dialog box appears.
- Click one of the tabs to change the print settings.
- From the Quality/Copies tab, select the Quality/Speed Auto Image Sharpening, Print Color Images in Black and White, Paper Type, the number of copies, and how you want to print multiple copies of the document. For more information, see Multiple Copies.
- From the Paper Setup tab, select the paper size and orientation.
- From the Print Layout tab, select the layout and duplexing settings for the type of document you are printing.
Note: To see details about a setting, right-click a setting on the screen, and then select the What's This? item.
- After making the changes in Print Properties, click OK at the bottom of the screen to return to the Print dialog box.
- Click OK or Print to complete the task.