 Scanning an item
Customizing a scan job
Scanning an item
- Open the top cover of the All-In-One.
- Place the item you want to scan face down on the scanner glass. Make sure the upper left corner of the front of the item aligns with the arrow on the right side of the glass. This way the item will scan from top to bottom.
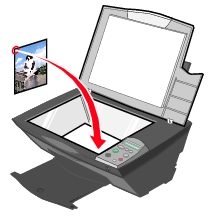
- Close the top cover.
- Open the Lexmark All-In-One Center by right-clicking on the Lexmark Imaging Studio icon in the system tray and selecting Lexmark 3300 Series All-In-One Center, or using one of the following methods:
- Click Start
 Programs Lexmark 3300 Series Lexmark All-In-One Center.
 - Press Scan
 on the All-In-One control panel.
- From the Send scanned image to drop-down menu, select a program.
This will open your image in the photo editing program or other program of your choice.
- Customize the scan settings as desired. For more information, see Customizing a scan job.
- Click Scan Now to complete the scan.
Customizing a scan job
- From the Scan section of the Lexmark All-In-One Center, Scanning and Copying tab, click See More Scan Settings.
- Select an item under What is being scanned?
- Select an item under Select Scan Quality.
- Click Display Advanced Scan Settings to change advanced options. For more information, see Adjusting the scan settings for newspapers, magazines, or lithographs.
- Click the tabs to make changes as needed.
Advanced Scan Settings tabs
|
Click this tab
|
To
|
|
Scan
|
- Select the color depth and scan resolution.
- Select whether to auto-crop (digitally trim) the scanned image.
- Select the area to be scanned.
- Select to convert the scanned item to text for editing (OCR).
- Select to scan multiple images before saving or outputting them.
- Update the list of programs that use scans.
- Update the default fax driver.
|
|
Image Enhancements
|
- Straighten the image after scanning (deskew).
- Select whether to sharpen blurry images.
- Adjust the brightness of the image.
- Adjust the color correction curve (gamma) of the image.
|
|
Image Patterns
|
- Facilitate the conversion of a gray image to a black-and-white dot pattern (dither).
- Remove image patterns in magazine/newspapers (descreen).
- Reduce more or less of the background noise (scratches and imperfections) on color documents.
|
- When you are finished customizing the scan settings, click OK to save the changes, and then click Scan Now.
Previewing photos before scanning
- Place the photo face down on the scanner glass. See Scanning an item.
- Click Preview Now.
- Adjust the dotted lines to fit around the portion of the image you want to scan.
Note: If you open the Lexmark All-In-One Center by pressing the Scan button on the control panel, the preview takes place automatically.
Finishing the scan
- Select the scan destination from the drop-down box.
Note: If the program you want to use is not listed, select Search for more... in the drop-down box. On the next screen, click Add to locate and add a program to the list.
- Change settings as needed. See Customizing a scan job.
- When you are finished customizing the image, click Scan Now.
When the document has finished processing, it will open the program to which you chose to send the image.
E-mailing a scanned image or document
- Place the item face down on the scanner glass.
- Right-click the Lexmark Imaging Studio icon in the system tray.
- Click the Share Photos button.
- Select Scan and e-mail a photo.
- On the Lexmark All-In-One Center's Scanning & Copying tab, click Scan Now.
- From the Creative Tasks area, click E-mail an image to a friend.
- Click Preview Now to see a preview of the image.
- From the What is being scanned? menu, make a selection.
- Select the scan quality.
- Select Yes if there is more than one page.
- Click Next.
The item will scans and a new e-mail message appears with an attachment.
- Write a note to accompany the attached item, and then send it.
E-mailing a saved image or document
- Right-click the Lexmark Imaging Studio icon in the system tray.
- Click the Share Photos button.
- Select Find and e-mail a saved photo.
- Browse to the photo in the left pane of the Lexmark All-In-One Center.
- Choose options for the image size.
- Click Attach Now.
A new e-mail message appears with an attachment.
- Write a note to accompany the attached item, and then send it.
Editing scanned text using Optical Character Recognition (OCR)
- Right-click the Lexmark Imaging Studio icon in the system tray.
- Click the Scan and Edit Text (OCR) button.
The Edit text in a document feature appears. You can Preview the image if you want.
- From the Select your text editor drop-down menu, select a word processing or text-editing program.
- If you have more than one page click Yes, prompt me for each page.
- Click Send Now.
The text editing application opens and the scanned text appears on the computer screen.