Connect a PictBridge-enabled digital camera to the printer.
Insert one end of the USB cable into the camera.
Note: Use only the USB cable that came with the digital camera. Insert the other end of the cable into the PictBridge port on the front of the printer.
Note: The PictBridge port is marked with the  PictBridge symbol.
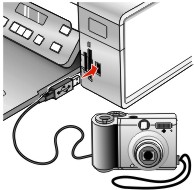
The message, appears on the display.
Press  or
or  repeatedly until the menu item you want appears.
Press  .
.
Press or repeatedly until the submenu item you want or the setting you want appears.
Press .
| Note: Pressing selects a setting. An * appears next to the selected setting. |
To go into additional submenus and settings, repeat step 4 and step 5 as needed.
If necessary, press  repeatedly to return to the previous menus and make other setting selections.